Bring the magic of Maurice Sendak’s story into your home with simple, fun crafts kids can actually make and play with.
You’ll find mask, crown, puppet, and sensory ideas that match the book’s wild spirit—perfect for short afternoons or those long, rainy project days.
These easy crafts use common supplies and clear steps, so you can start making wild things, crowns, and play props right away.
Pick a project that fits your time—quick masks for storytime, a felt crown for pretend play, or a sensory tray for quiet moments.
You’ll get craft tips, supply lists, and ideas to turn each activity into a game, snack, or story extension that keeps the fun going.
Key Takeaways
- Choose simple supplies to make crafts that match the book’s themes.
- Mix hands-on crafts with movement and sensory play to deepen engagement.
- Turn projects into stories, games, or snacks to extend the experience.
Essential Craft Supplies and Preparation

Grab basic art tools, safe adhesives, and a few household items to make masks, puppets, and paper-bag monsters.
Set out paints, cutting tools, and tidy up your workspace so crafting stays fun, not stressful.
Recommended Materials for Wild Things Crafts
Gather these supplies before you start: paper plates, paper bags, construction paper in brown, green, and yellow.
Tempera or acrylic paints, washable markers, and yarn or string for hair and ties come in handy.
Googly eyes, foam sheets, and felt add some texture.
Use child-safe scissors, and save the craft knife for adults only.
For adhesives, have white glue, a glue stick, and hot glue on hand—just use hot glue with adult supervision.
Keep starter templates or simple traced shapes of Max’s wolf suit, horns, and claws to speed up cutting.
Label small containers for sequins or pom-poms so bits don’t get lost.
Setting Up a Creative Craft Space
Choose a flat table you can wipe clean and cover it with a disposable tablecloth or kraft paper.
Put paints in shallow trays and use jars for brushes to avoid spills.
Arrange materials in clear bins or trays so kids can grab what they need without wrecking the setup.
Set up one bin for wet supplies (paint, glue), one for dry stuff (paper, felt), and a small trash bowl for scraps.
Keep a first-aid kit and wet wipes nearby, just in case.
If you’re planning a Where the Wild Things Are read-aloud, keep the book close.
Kids love checking colors and character details as they craft.
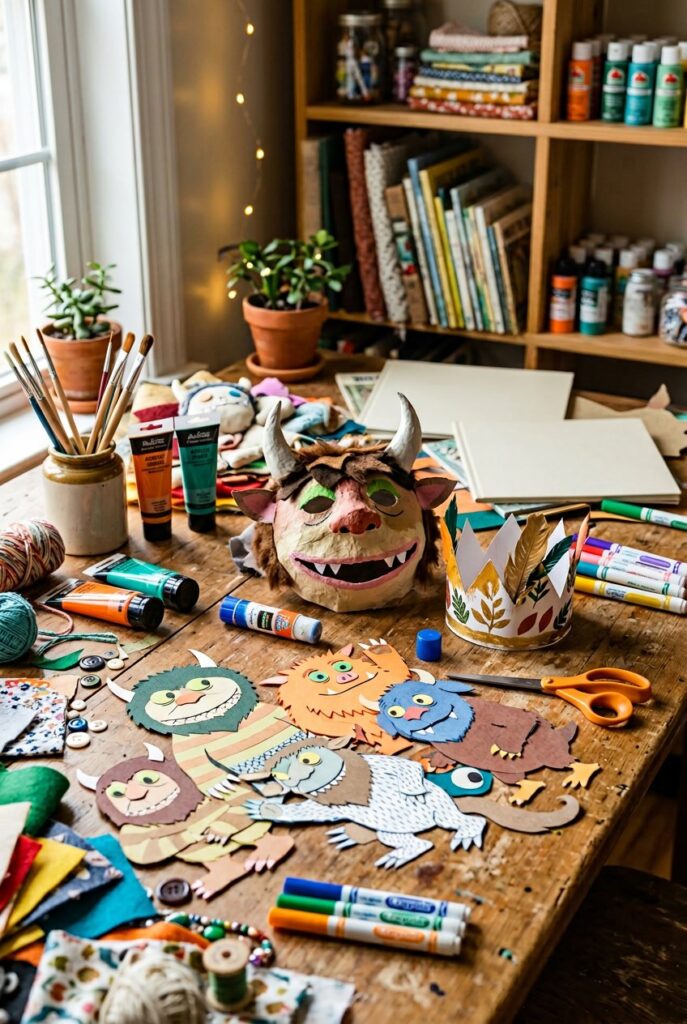
Making Wild Things Masks

Try simple builds for monster-style masks, ways to add texture and shine, and how to make a royal Max crown that actually fits.
Each idea uses easy materials like paper plates, paper bags, felt, and paint—you probably have most of this already.
Paper Plate Monster Masks
Paper plates work as sturdy bases for wild things masks.
Cut eye holes and a mouth, then layer torn paper or felt around the rim for fur.
Glue or a hot glue gun holds heavier materials; kids can paint eyes, noses, and teeth with tempera or acrylic paint.
Add horns by rolling cardstock into cones and gluing them to the top edge.
Staple or tape elastic or ribbon to each side if you want a wearable mask.
Or just attach a craft stick and use the mask as a hand-held puppet.
Try mixing up textures: crumpled tissue for shaggy fur, corrugated cardboard for a snout, and yarn for whiskers.
Paint a base color, then dry-brush lighter tones for depth.
These monster masks are perfect for role play or a class performance.
Decorative Wild Things Mask Ideas
Focus on texture and small details to make each mask unique.
Combine faux fur for the mane, sequins for eyes, and foam sheets for layered facial plates.
Work in small sections so glue and paint dry cleanly.
Use templates to repeat shapes: cheek patches, eyebrow ridges, and teeth.
Cut several identical pieces from cardstock and glue them in rows for scales or layered fur.
Add accents like painted veins in the ears or a white highlight on the eyeball to make features pop.
If you want a lighter mask, use a paper bag as the headpiece and attach decorative pieces to the front.
This keeps the mask roomy and comfortable, plus you can go bolder with materials.
Label one corner with a child’s name if you’re making masks for a group.
Personalized King of the Wild Things Mask
Build a Max-inspired mask with a crown and a softened face shape.
Start with a paper bag or shaped cardboard base trimmed into Max’s oval face.
Paint the face pale and add simple, bold features: big eyes, a button nose, and a row of triangle teeth.
Make the crown from gold-painted cardboard or felt.
Secure it with tape or glue and add a strip inside to size the crown to your child’s head.
Decorate with glued-on pom-poms, glitter, or painted dots to make the crown look special.
Personalize the king mask with a name or a small sewn-on patch.
Punch holes at the sides and tie elastic so your child can wear the mask during story time or a dress-up parade.
Crowning the King: Crown Crafts and Accessories

Try simple crown patterns and playful royal accessories that let kids become the king of the wild things.
Materials are basic—paper, felt, glue, and a few decorations—and the steps focus on cutting, fitting, and personalizing.
DIY King of the Wild Things Crowns
Use a printable crown template or cut crown points from a paper plate for a quick start.
Trace the template onto yellow construction paper or cardstock, cut two matching strips, and tape or staple them together to fit your child’s head.
For sturdier crowns, glue the paper to thin cardboard before cutting.
Decorate with crayons, oil pastels, glitter glue, or sequins.
Fold crown points slightly inward to match the story’s shape.
If you want reusable crowns, cut from felt and hand-sew or hot-glue the edges.
Add Velcro or snaps for an adjustable fit.
Keep safety in mind: skip small loose beads for young children and use child-safe glue.
Label the inside with a name so the crown doesn’t get lost during a wild rumpus.
Max’s Royal Accessories
Add character with a few simple accessories that echo Max’s look.
Make a faux-fur collar from craft fur or a cut-up old sweater.
Attach it with a snap or ribbon so kids can remove it easily.
Create a scepter from a wooden dowel or cardboard tube.
Paint it gold and glue on a pom-pom or foam star at the tip.
Wrap the handle with washi tape or ribbon for grip and color.
If you want a complete costume set, pair the crown and accessories with striped pajamas or a plain white tee.
Store pieces in a labeled box or bag so they stay ready for every wild rumpus.
Interactive Games and Movement Activities

These activities get kids moving, using action words, counting, and color recognition.
They focus on gross motor skills, imagination, and simple materials you probably have around.
Action Word Rumpus
Lead kids through a list of action words from the story and have them act each one out.
Write or print cards with verbs like “stomp,” “roar,” “sail,” “tiptoe,” and “shake.”
Hold up a card and call one child to model the action, then let the group copy.
Use a timer for 20–30 seconds per action to keep it lively.
Add two-step prompts: “tiptoe to the chair, then roar.”
For classrooms, pair movement with a short writing or drawing activity.
After performing “sail,” students can sketch how their boat looks.
This ties movement to literacy and gives quieter kids a low-pressure way to join in.
Wild Rumpus Dance Party
Turn the “wild rumpus” into a dance session.
Create a playlist of two to four upbeat tracks and assign cues: stomp for the drum beat, spin on a trumpet sound, and freeze on a bell.
Teach a simple sequence (stomp, roar, spin, freeze) and repeat, letting kids add one new move each round.
Use props like monster masks, crowns, or scarves to deepen role play.
Clear a space and set boundaries for safety.
Offer alternative movements (march instead of stomp) for kids who need gentler options.
End with a calm cool-down: slow breathing and a quiet sail motion to settle the group.
Wild Things Counting Game
Create a counting game using monster cards, stickers, or cutouts labeled 1–20.
Scatter the items around the room or yard.
Call out numbers or simple math prompts (“Find three monsters” or “Find two then add one”) and have kids collect or point to the correct items.
This builds number recognition and one-to-one counting.
Change it up by using shapes or colors with numbers: “Find five blue Wild Things” or “Collect the odd numbers.”
For mixed-age groups, offer simpler tasks (count to five) and harder tasks (count by twos).
Track progress on a group chart so kids can see their wins and practice counting across sessions.
Color Tree Game
Set up a paper or felt “color tree” with removable leaves in the book’s palette—greens, yellows, browns, and a few bold colors.
Call out a color or a two-step prompt (“Find a yellow leaf, then hop to the tree”).
Kids search for matching leaves and attach them to the tree with Velcro or tape.
This combines color recognition with movement.
Try pattern challenges: place leaves in a sequence and ask kids to continue it.
Use story language: “Find the leaf that looks like Max’s crown.”
Have each child describe the leaf they added in one sentence to practice vocabulary and observation.
Sensory Play and Emotional Exploration

Hands-on textures and simple prompts help kids connect body sensations to feelings.
These activities pair sensory play items with guided language so you can help kids name emotions, practice calm-down skills, and act out scenes from Where the Wild Things Are.
Wild Things Sensory Bins
Set up a sensory bin that matches the book’s mood using natural and safe materials.
Try a “forest night” bin with dried leaves, pom-pom “moons,” smooth river stones, and soft faux fur.
Add small toy boats, a paper crown, and a Max figure for story play.
Give clear prompts for play.
Ask your child to find a calm stone, show how Max might feel when he sails, or build a cozy den for the Wild Things.
These prompts teach vocabulary (lonely, brave, angry, safe) and invite role-play.
Rotate textures weekly to target different reactions.
Rough materials (sand, bark) can be for stomping out wild feelings.
Soft materials (fur, cotton) become safe spaces for breathing exercises.
Keep bins at child height and limit tools to two or three items to avoid overwhelm.
Scented Playdough Monsters
Mix playdough with food-grade scents to create scented monsters that match moods.
Use lavender for sleepy monsters, citrus for lively ones, and cinnamon for grumpy ones.
Keep recipes simple: flour or store dough, oil, salt, and a few drops of essential oil or safe flavoring.
Invite your child to mold a monster for each feeling.
Name the monster, give it a home, and ask what calms it down.
Scented dough links smell to mood, which helps kids remember coping strategies when they sense those scents later.
Use a simple chart to track monsters: monster name, scent, feeling, and one calming action (hug, deep breath, stomp).
Store each scented ball in a labeled bag.
Reuse them for quick practice during transitions, like before nap or after a noisy activity.
Exploring Wild Feelings through Art
Set up an art station with big sheets of paper, tempera paint, crayons, and some textured brushes. Ask your child to paint a moment from Where the Wild Things Are that really shows a strong feeling.
Get specific with questions. “What color is Max when he’s angry?” “How tall do the Wild Things look when they’re happy?” Kids usually love having a reason to pick wild colors.
Bring in mixed-media stuff to crank up the intensity. Let kids press leaves for quiet scenes or drag a fork through paint when things get wild.
Encourage them to stick emotion words on their art. That way, they start connecting pictures to feelings.
After the art dries, ask quick reflection questions: two things you like about your picture, and one thing that calms the character down. Keep sessions short—20 minutes tops. Kids seem to focus better that way.
Creative Storytelling and Puppet Crafts

Let’s get hands-on with storytelling, puppet-making, and crafts that help kids map out the book’s scenes. You’ll end up with characters kids can move, voice, and use in little plays that follow Max’s wild journey.
Wild Things Puppets
Make full-body or hand puppets to show off each Wild Thing’s personality. Grab felt, faux fur, and craft foam for the fun textures.
Cut out basic body shapes from sturdy fabric or cardboard. Glue on eyes, teeth, and claws. Add yarn or fringe for manes and fur patches—let each puppet look a little different.
Teach one big action for each puppet, like stomping or roaring. Maybe even have one throw a crown. Attach a stick to the back or make a simple hand pocket so kids can control the puppet’s mouth and limbs.
Use these puppets for short scenes: the ship ride, the rumpus, Max’s return. Let kids swap voices and roles, so they get to try narration, dialogue, and showing emotion. Paint a simple backdrop on butcher paper if you want to set the stage.
Paper Bag Character Puppets
Paper bag puppets are fast and cheap. Start with brown lunch bags, crayons, and scrap paper.
Draw or cut out eyes, teeth, and crowns. Glue them onto the bag flap so the mouth opens when you move it. Craft fur or textured paper makes the monster faces pop.
Make a quick template for Max’s crown and a bunch of monster features to mix and match. Toss in sticker sheets and felt pieces for some fine-motor practice. Label each puppet with the child’s name and character role to keep things organized.
Pair kids up: one reads lines, the other moves the puppet. It helps with reading confidence and teamwork. Keep extra bags and supplies nearby for quick fixes or new ideas.
Story Mapping with Crafts
Turn story mapping into a craft project. Give each group a long strip of paper or a tri-fold board.
Assign key scenes—Max’s room, the boat, the island, the rumpus, home. Let students create a panel for each scene with collage, watercolor, and little puppets or masks.
Add a column for emotions under each panel. Kids can stick on a Wild Thing face for feelings like angry, lonely, joyful, or proud. It’s a good way to connect craft time with emotional literacy.
Stage the finished map as a play set. Place the paper bag puppets or Wild Things puppets at each panel. Let students practice moving from scene to scene and telling the story out loud.
Wild Treats and Snack Crafts

Make simple snacks that look like monsters, crowns, or forest boats. Kids can help put these together.
Stick to easy steps, safe ingredients, and a final look that feels tied to the story.
Themed Party Treats Ideas
Pick a base you can decorate: sugar cookies, apple slices, or small sandwiches. For crowns, cut sandwich bread into circles, spread yellow cheese or frosting, then press on edible glitter or fruit for jewels.
Make “forest” kabobs with fruit or mini marshmallows on skewers. Label trays with printed tags like “Wild Crown Bites” or “Sail to the Island” so kids get the theme.
Prep food safely. Pre-cut anything that needs a knife and use plastic spreaders. Offer at least one healthy option—maybe apple boats with cheddar sails—or a sweet treat like decorated cookies.
Arrange snacks on a low table so kids can reach. Keep napkins and wipes close for easy cleanup.
Edible Monster Crafts
Turn cookies or rice cakes into monsters with frosting, candy, and fruit. Start with a frosted cookie or a rice cake with cream cheese.
Press on edible googly eyes or sliced grapes for eyes. Make horns from gummy candy or banana slices stuck on with frosting. Sprinkle grated chocolate for hair and use almond slivers for teeth.
Set up a decorating station with bowls of toppings: colored frosting, shredded coconut, sprinkles, chocolate shavings, and candies. Give each child a simple template card (eyes + horns + hair) for ideas.
Watch out for sticky items and food allergies. Let kids show off their monsters on a platter with their names so everyone can admire the creations.
Extension Activities and Related Book Crafts

Try some extra activities that build on crafts and deepen learning. Use printable templates, sequencing, counting, and sensory play for hands-on practice with story vocabulary and fine motor skills.
Printable Wild Things Crafts
Use printable masks, coloring pages, and cut-and-paste templates to save prep time and keep the focus on creativity.
Print masks on cardstock so kids can color, add fur, and attach elastic. Offer scissors, glue sticks, and scrap fabric for texture.
Turn printables into a storytelling station. Number a set of scenes and have kids arrange them in story order, then retell Max’s journey with their masks. Add a checklist: cut, color, add texture, rehearse.
For group work, copy a sheet of monster parts (eyes, teeth, claws) and let kids mix and match to design their own Wild Thing. Use printable name tags so each child labels their creature and adds a describing word for extra vocabulary practice.
Very Hungry Caterpillar Project Ideas
Connect to The Very Hungry Caterpillar with counting, food sequencing, and a craft about growth. Cut a paper plate in sections and glue a row of painted circles to make a caterpillar body.
Label each circle with numbers 1–10 and let kids place paper “foods” on the matching number.
Make a tactile food-sorting tray with laminated food cards from the story. Let kids sort by meal type, color, or size for some classification practice.
For an art add-on, trace a leaf template and have kids glue tissue paper “holes” to show where the caterpillar ate. It’s great for scissor skills and planning.
Frequently Asked Questions

Here are some step-by-step ideas for costumes, decorations, activities, a storytelling boat, monster masks, and preschool crafts. I’ll keep it simple so you can try these at home or in class.
How can I create a ‘Where the Wild Things Are’ themed costume for kids?
Start with a wolf suit: use a gray hoodie and sweatpants. Add felt ears, a tail (just sew or safety-pin it), and a bit of face paint.
For a Wild Thing, pick a bright color for a furry onesie or sweatshirt. Attach felt claws to gloves, cut cardboard horns and cover with fabric, and glue or sew on strips of faux fur for a mane.
Use elastic for masks and make sure small pieces are glued on tight. Size everything so it fits comfortably—no tripping hazards.
What materials are needed for a ‘Where the Wild Things Are’ themed party decoration?
Grab paper plates, construction paper, paint, glue, scissors, and string for banners and masks. Add faux fur, felt, and cardboard for 3D creatures and table toppers.
Use brown kraft paper and markers to make a forest backdrop. Hang paper lanterns or leaf shapes for depth, and stick to greens, browns, and bold colors.
Label snacks with monster names using printed tags. Place little props like crowns, boats, and stuffed animals for detail.
What are some engaging ‘Where the Wild Things Are’ activities for a children’s book club?
Do a read-aloud and stop to ask prediction questions about Max’s choices. Try prompts like, “Why did Max go to the island?” or “How did he feel when he came back?”
Let kids make Wild Thing masks and act out a scene. Add a movement activity: dance like a Wild Thing to different songs.
Try story-mapping on a big sheet: draw Max’s journey, label moments, and let kids add stickers or drawings for each event.
How can I make a ‘Where the Wild Things Are’ inspired boat for a storytelling prop?
Use a big cardboard box for the hull. Cut an angled bow from one end, tape the edges, and paint it brown or blue.
Add a mast from a dowel or broomstick and drape fabric for a sail. Glue a paper crown at the bow for Max’s touch.
Keep the boat low and stable so kids can sit around it. Use lightweight decorations to avoid tipping.
What are the steps to craft a ‘Where the Wild Things Are’ monster mask?
Trace a child’s face on cardstock, leaving extra space for ears and horns. Cut out the shape and two eye holes.
Decorate with paint, crayons, or markers. Glue on felt for fur, add cardboard horns with foil or fabric, and attach elastic or ribbon to hold it on.
Reinforce weak spots with extra tape and try the fit before handing it to a child.
Can you suggest simple ‘Where the Wild Things Are’ crafts for preschool-aged children?
Try making paper plate masks. Kids can paint plates, glue on paper ears, and draw faces with markers.
Keep the steps short. Offer pre-cut pieces so nobody gets frustrated or accidentally snips a finger.
Handprint Wild Things are fun too. Use washable paint on paper, then let the kids turn their painted handprints into monsters.
Add eyes, teeth, and horns with crayons or stickers. It gets a little messy, but that’s half the fun, right?
You can also build a sensory “island” tray. Toss in some sand, leaves, and small plastic animals for free play.
Just keep an eye on the little ones, and skip any tiny pieces. Safety first, always.