You can make a valentine box that matches your child’s personality using simple supplies you probably already have around the house. Grab a basic container, pick a theme (unicorn, robot, pizza—whatever feels right), and decorate with paper, paint, and a few fun extras. Before you know it, you’ll have a sturdy, eye-catching mailbox for classroom valentines.
Pick a container that’s easy to cut and cover. Gather glue, scissors, paint, and embellishments, and let the theme steer you.
You’ll save time (and probably some stress) if you plan the shape and color scheme before you start crafting.
Key Takeaways
- Use a simple box and a clear theme to build a valentine box quickly.
- Basic tools and household materials make decorating easy and budget-friendly.
- Plan the shape, colors, and opening so the box works well for collecting valentines.
Essential Materials and Tools

You need a sturdy base, basic cutting and gluing tools, and a few decorative supplies that match your design. Pick materials that hold shape, are safe for kids if they’ll help, and fit your chosen theme.
Cardboard and Shoebox Bases
Grab a plain shoebox, cereal box, or even corrugated cardboard for structure. Shoeboxes are perfect if you want something big—think princess castle or pirate ship.
Cereal boxes and small gift boxes work for handheld or classroom-sized valentine boxes. Reinforce weak corners with masking tape or hot glue.
If you want a mailbox style, cut a slot in the top and add a folded cardboard flap to keep edges neat. For 3D shapes, score fold lines with a bone folder or blunt knife for clean creases.
Use heavyweight cardstock or poster board as a lid cover or to build turrets, cones, or balloon baskets. These materials let you stick on craft foam hearts, paper scales, or metallic paper without sagging.
Decorative Supplies and Crafting Tools
Gather acrylic paint, paintbrushes, and spray adhesive for your base color. For fine details, permanent markers and gel pens work well.
Craft foam sheets and foam hearts stick with tacky glue and add soft texture for themes like love bugs or animals. Keep scissors, a craft knife, cutting mat, ruler, and hot glue gun close by.
Googly eyes, sequins, pom-poms, and ribbon make fast accents. If you want sparkle, pick fine craft glitter and seal it with glue to avoid a glitter explosion.
For kid-safe projects, swap in craft glue and blunt scissors instead of hot glue and knives. Use a tray for loose items like stickers and confetti to keep things less chaotic during group builds.
Printable Templates and Patterns
Free printable valentines and printable valentine cards save time and help you get uniform shapes. Look for printable templates for mailbox slots, heart shapes, and 3D pieces you can trace onto cardboard or foam.
Print templates on cardstock for durability. Cut and transfer outlines to your base material.
For repeated classroom projects, enlarge templates to make stencils you can reuse. Keep extra copies of common patterns like heart grids and flag tags.
If you’re feeling creative, use a simple grid or tracing paper to make mirrored pieces. This is especially helpful for symmetrical boxes like a robot face or unicorn horn.
How to Build a DIY Valentine Box

You’ll plan the look, pick materials, cut and join pieces, and add a slot plus any useful features like handles or a lid. Think about size, how many cards it needs to hold, and what tools you actually have before you dive in.
Planning Your Design
Decide the box type first: shoe-box style card holder, mailbox on a candlestick, or a shaped valentine card box (heart, monster, robot). Measure the space you need—count classmates or guess 30–50 cards for a standard school box.
Pick a base material: cereal or shoe box for light use, thin cardboard or corrugated plastic for keepsakes, or even a recycled oatmeal tub for round designs. Gather supplies: ruler, pencil, utility knife or scissors, hot glue or tacky glue, tape, and paint or craft paper.
Choose decorations now so you can plan colors and textures—think crepe paper ruffles, felt envelopes, or craft foam cutouts. Sketch a simple template on paper showing front, sides, bottom, and slot location.
Label each panel and mark fold lines. This saves time when cutting and helps the box look even and functional.
Cutting and Assembling the Base
Transfer your template to the chosen material using a ruler and pencil. Cut slowly with a sharp utility knife on a cutting mat for straight edges.
If you use a pre-made box, remove flaps and trim to shape. Reinforce weak points with extra cardboard strips glued along seams or inside corners.
Fold along scored lines and dry-fit pieces before gluing. Use hot glue for quick hold on cardboard or tacky glue for a neater finish on paper and felt.
Press corners together for 30–60 seconds to set hot glue. For round or weird shapes, cut smaller curved panels and join them with overlapping tabs.
Add a base insert (a flat cardboard piece fitted inside) if the bottom feels flimsy. Test the box by dropping in a few cards to check balance and capacity before you start decorating.
Adding the Card Slot and Functional Features
Cut the card slot on the top or front, sized to fit standard classroom cards (about 4.5–5 inches long and 1–1.5 inches wide) or adjust for bulkier envelopes. Score both sides of the slot first, then cut slowly to avoid tearing.
Reinforce the slot with a strip of craft foam or folded cardstock glued along the inside edge to stop wear from repeated use. Add features based on need: a lid with a hinge of tape or ribbon for secure storage, a handle made from ribbon or a wooden dowel for carrying, or a small flag like a mailbox using a popsicle stick and paper.
If you want a keepsake, line the interior with fabric or felt for a clean look. Attach name tag pockets or sticky-label windows so teachers can sort boxes easily.
Test the slot and any moving parts a few times to make sure cards slide in smoothly and the box stays closed during transport.
Creative Valentine Box Ideas for Kids

You can turn boxes into fun, themed collectors with stuff you already have. Stick to a clear main shape, pick 2–3 key decorations, and keep the opening big enough for cards and small treats.
Animal-Themed Valentine Boxes
Turn a shoebox or cereal box into an animal by focusing on a few bold features: ears, eyes, and a tail or snout. For a panda valentine box, wrap the box in white paper, cut black circles for eyes, and glue on small round ears.
A panda is easy and uses basic shapes kids can trace. Make a bee valentine box from a round tub or oatmeal container.
Paint yellow and add black stripes, pipe-cleaner antennae, and small paper wings. Add a handle so kids can carry it home.
For a unicorn valentine box or mermaid valentine card box, use glitter paper, yarn mane, or a scalloped paper tail. Cut a horn from gold cardstock for the unicorn.
For a panda-corn or other combos, mix textures—felt, pom-poms, and googly eyes—to keep it playful.
Superhero and Fantasy Boxes
Use bold colors and a strong emblem to make a superhero box fast and recognizable. For a Superman card holder, paint a shoebox bright blue, glue a big yellow and red “S” emblem, and add a cape down the back.
Keep edges neat so the emblem stands out from across the classroom. For fantasy, make a monster valentine box by adding one big mouth as the mail slot and felt teeth.
Bright foam, wiggly eyes, and extra arms (made of cardboard tubes) make it silly and safe for school. A robot valentine box works well with recycled cereal boxes—cover with silver paint, add button details with bottle caps, and use a small flap for the mouth slot.
If you want a current hit, build a small Baby Yoda valentine box from a rectangular box, sculpting ears from foam and painting the face with simple shapes. Use templates or printables to help with proportions.
Sports and Hobby Inspired Boxes
Match the box to the kid’s favorite activity for instant appeal. Turn a shoebox into a basketball valentine box by painting it orange and drawing black panel lines.
Add a small net by gluing white string under the opening. For a lego valentine box, attach foam or cardboard “studs” to a painted box top so it looks like a giant block.
You can also make a football or soccer themed box with felt numbers and team colors. If your child likes music or art, turn a small crate into a mini locker-style box decorated with stickers, a faux lock, or a paint-splatter design.
These hobby boxes stay functional and show personality without too much fuss.
Pop Culture and Character Designs
Pick one clear reference and simplify it into basic shapes so teachers won’t object to detailed likenesses. For a Mickey Mouse shoebox, cut two big circular ears and attach to a wrapped shoebox; add red paper on the front and two white circles for buttons.
Create a hot air balloon valentine box from a small round container with a paper cup basket below. Use colorful strips of paper for the balloon panels.
For trending characters, use free printable templates to trace facial features—this works well for Baby Yoda or a R2-D2-style robot. Keep copyrighted characters simple to avoid detailed logos.
For a themed class box like a unicorn, mermaid, or monster, focus on color palette and one or two signature items (horn, tail, big eye). This gives you quick, recognizable boxes that still respect school rules and look great on party day.
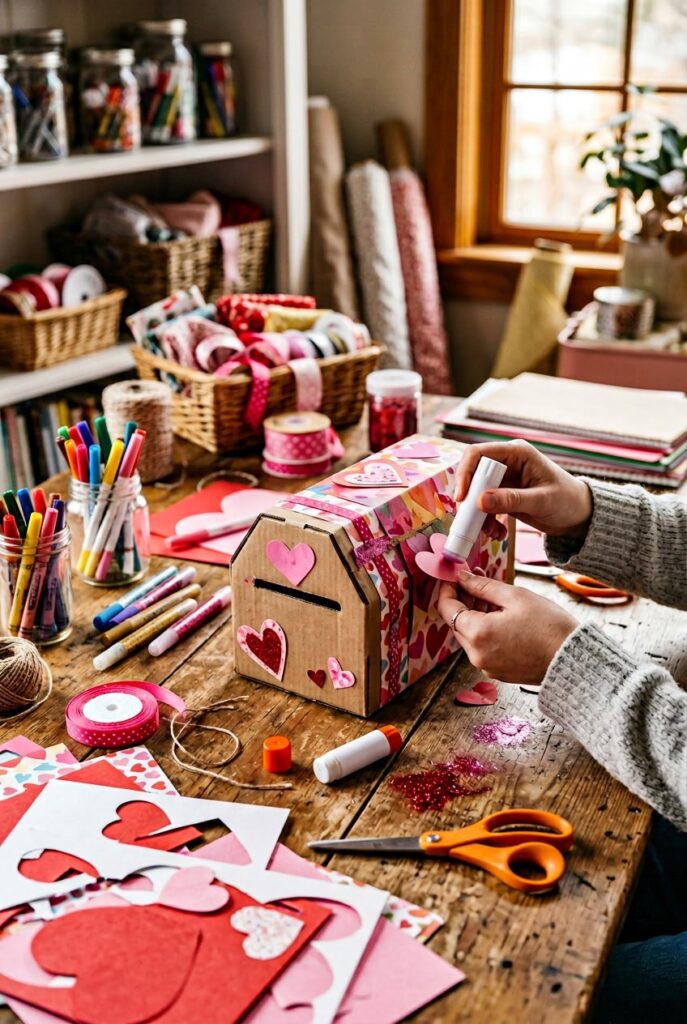
Valentine Box Decorating Techniques

You can turn a plain box into a fun, sturdy holder for cards and treats. Focus on simple supplies, neat edges, and clear placement of names so it looks good and survives the party.
Painting, Wrapping, and Covering the Box
Start by picking the right base: a shoebox, cereal box, or tissue box works well. Lightly sand or tape over rough areas so paint and paper stick better.
Use acrylic or tempera paint for bright, even color. Apply two thin coats and let each dry fully.
If you prefer paper, cut wrapping paper or colored cardstock to size and glue with a glue stick or craft glue. For large surfaces, use Mod Podge or diluted white glue for a smooth finish.
Crepe paper and tissue add texture—wrap in strips and secure with double-sided tape. Cover edges with ribbon, washi tape, or craft foam strips to hide seams and protect the box from wear.
For a sturdy lid, reinforce the inside with extra cardboard. Let paint and glue cure overnight before adding heavy decorations or filling the box.
Using Stickers, Foam, and Printable Details
Grab craft foam hearts and foam sheets to add 3D shapes that won’t tear like paper. Trace simple heart or star templates and cut with sharp scissors for clean edges.
Attach foam pieces with hot glue for a strong hold, or use tacky craft glue for safer, kid-friendly work. Stickers are great for quick designs—pick vinyl or paper stickers that fit your theme.
Place large stickers first, then fill gaps with smaller ones to keep things balanced. Printable valentines and labels let you add patterns or characters; print on heavy paper, cut precisely, and glue flat to avoid bubbling.
For a layered look, glue a printed shape onto foam, then add glitter or rhinestones. Use a glue dot or fabric glue for small embellishments so they stay put.
Keep a scrap of clear tape nearby to press down edges and prevent lifting during transport.
Personalizing with Names and Messages
Write the recipient’s name big and legible on the front or top so the valentine box is easy to spot. Use block letters with a permanent marker, or cut letters from craft foam for a raised effect.
If you print names, choose bold fonts and print on sticker paper for quick application. Add short messages inside the lid or on a tag—phrases like “Give to [Name]” or “From [Your Name]” work well.
For classrooms, number the box or add a small card holder for teacher notes. Use contrasting colors so names and messages stand out.
Seal names and handwritten parts with a thin coat of clear Mod Podge or a spray sealer to prevent smudging. If the box will be handled a lot, reinforce the name area with extra cardboard behind the label so it won’t bend or tear.
Unique Valentine Card Holders and Mailboxes

You can make fun, sturdy card holders with basic supplies like cardboard, glue, and paint. Just pick a simple shape, cut an easy slot for cards, and decorate in a way that’ll survive a little chaos.
Heart-Shaped Valentine Boxes
Try making a heart-shaped box from a shoe box lid or thin cardboard—it helps get that smooth curve. Trace a heart template, cut out two hearts for the top and bottom, then connect them with a 2–3 inch strip of cardboard wrapped around the edge for the sides.
Glue or tape the seam. Cut a 1.5–2 inch slot along the top edge for the cards.
Cover the box with craft paper, felt, or paint. If kids need to carry it, attach a ribbon handle.
For extra strength, double up the cardboard at the base and around the slot. Add heart stickers, foam shapes, or a name label on the front to finish it off.
Gumball Machine Card Holders
Turn a clear plastic jar and a small round base into a gumball machine card holder. Use a clear jar or a recycled peanut-butter jar for the globe.
Mount it on a painted wooden base or flip a sturdy plastic bowl upside down for the stand. Cut a 1–1.5 inch slot near the top of the jar lid so cards can slide in but not fall out.
Fill the jar with colored tissue paper, fake gumballs, or wrapped candies to look fun. Paint the lid red like a dome and stick on a paper “coin slot” at the front.
Hot glue the jar to the base. Pop a small name tag or label on the stand so nobody grabs the wrong one.
Conversation Hearts Decorations
Go with conversation hearts for a sweet, playful look. Cut rectangular cardboard into a mailbox shape or make a flat envelope-style holder.
Cover it with pastel paint or paper—think pink, mint, yellow, lavender. Cut conversation-heart shapes from craft foam or thick paper and write short messages like “Be Mine,” “Hi,” or just initials with a black marker.
Glue the hearts in rows or scatter them around. If you want a 3D effect, layer foam hearts over paper ones.
Add a clear slot or flap for cards and maybe scallop the flap edge or add ribbon. It’s a cute touch.
Tips for Organizing a Valentine’s Exchange

Plan logistics, gather simple supplies, and set clear rules so the exchange doesn’t turn into chaos. Get your pickup spot, timeline, and participant list ready before things kick off.
Setting Up for School or Group Parties
Pick a sturdy table or shelf for the collection area. Label it with the class, group, or grade so kids can find their boxes without wandering around.
If space is tight, assign time windows for each group to drop off and pick up boxes. Keep a central craft station with tape, glue sticks, scissors (with adult supervision), stickers, and extra envelopes.
Have a marker and a stack of name tags on hand so each box is clearly labeled. Set basic safety and allergy rules in writing.
If you’ve got allergy concerns, ask families to skip food items and share those rules on the invite or signup sheet. Recruit a couple of volunteers to help during drop-off and pickup so things stay on track.
Encouraging Creativity and Participation
Offer a few themed prompts—animals, food shapes, favorite characters—to spark ideas. Share a short materials list: cardboard boxes, crepe paper, paint, glue.
Set up a quick demo table where volunteers can show one easy design and a faster option for younger kids. Printable templates or simple stencils help kids who struggle with cutting or drawing.
Let everyone know they only need to make one box—no pressure. Maybe hand out a sticker or ribbon for creative thinking instead of “best” design.
That way, everyone feels included and the exchange stays fun for all skill levels.
Frequently Asked Questions

You’ll find practical themes, step-by-step building tips, material picks, kid-friendly decorating ideas, classroom uses, and ways to personalize a box for a partner. Each answer gives steps or examples you can actually use with regular supplies.
What are some creative themes for Valentine’s Day boxes?
Pick themes that match the recipient’s interests, like superheroes, animals, or favorite movies. Try a vintage mailbox with fake rust and a tiny flag for an adult, or a candy shop with paper sweets for kids.
Seasons or hobbies work too—a garden full of paper flowers, or a sports box with team colors and mini gear. Mix two ideas, like “space cupcake” or “robot heart,” if you want something extra original.
How can I construct a Valentine’s Day box using everyday household items?
Start with a shoebox, cereal box, or tissue box for the base. Cut a slot in the lid or top for cards, and use tape or glue to reinforce the edges.
Wrap the box in gift wrap, construction paper, or fabric for a clean look. Add handles from ribbon or yarn by punching holes and knotting the ends inside.
What are the best materials to use for a durable and decorative Valentine’s box?
Cardboard or a shoebox keeps things strong and lightweight. Cover with cardstock, decorative paper, or fabric to add color and hide seams.
For details that last, use hot glue, foam shapes, and acrylic paint. Use clear tape or Mod Podge over paper to protect it from scuffs.
Can you suggest simple Valentine box decorating ideas for children’s school projects?
Let kids use stickers, markers, and pom-poms for quick, mess-friendly decorating. Glued-on construction paper hearts, googly eyes, and tissue paper ruffles add texture.
Go for simple themes like a monster, animal, or mail slot so the design doesn’t get overwhelming. Pre-cut shapes for younger kids to glue so they can finish fast and safely.
How do I incorporate a Valentine’s Day box into a classroom activity?
Turn box-making into a craft station: one for cutting, one for decorating, one for assembling. Use the finished boxes for a card exchange and assign each student to deliver cards to a different classmate.
Tie themes to a story or art lesson—maybe symmetry with heart shapes. Run a quick vote for best theme, best reuse of materials, or most creative use of color. Why not add a little friendly competition?
What are some unique ways to personalize a Valentine’s Day box for my partner?
Tuck in photos, ticket stubs, or little keepsakes to create a memory theme. Glue them inside or just let them peek out—it feels more personal that way.
Jot down short notes and clip them to the outside with clothespins or tiny flags. It’s fun to reveal them one by one.
Paint the lid with their favorite colors or a custom message. You could even add a hidden compartment for a surprise gift.
Spritz the inside with a favorite perfume or tuck in a scented sachet. That way, the box smells just like them—or you.