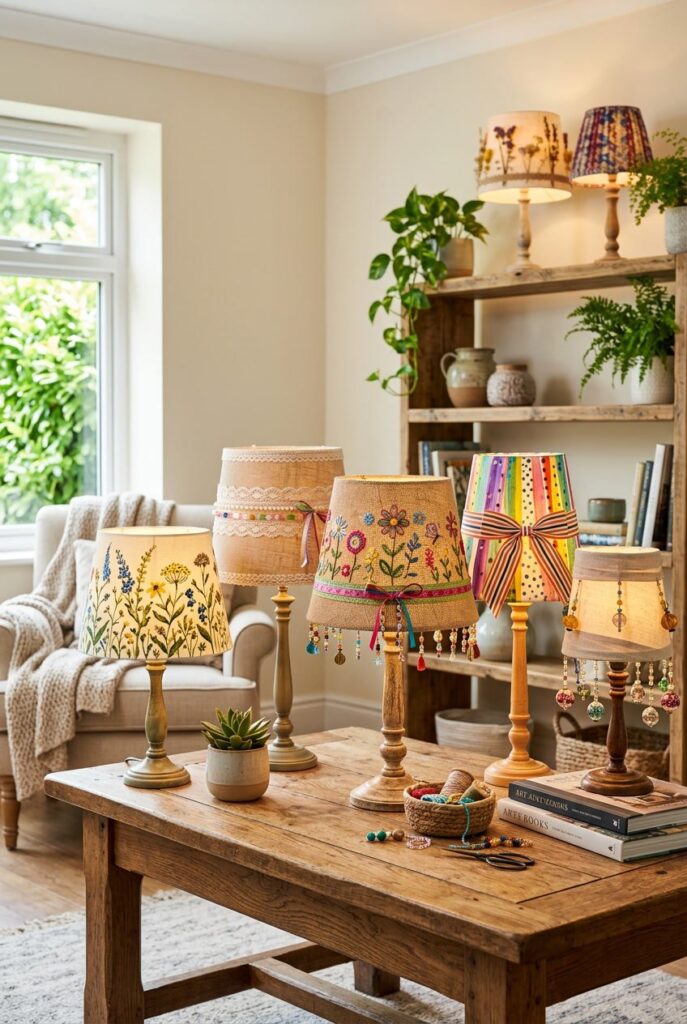
You can update any room fast by customizing a lampshade with paint, fabric, trim, or just simple found objects. Pick one idea that fits your style or skill level—you’ll get a big visual impact without much time or money.
Think about color, scale, and where the lamp sits. Choose a technique—painting, decoupage, fabric wrap, or embellishment—that works with your materials and tools.
A quick painted pattern or a wrapped fabric band can refresh a shade in under an hour. Suddenly, your whole space feels new.
Get ready to try projects that range from no-sew fabric covers to painted stencils and paper or metallic accents. You can match any theme or mood, really.
Key Takeaways
- You can transform a lampshade quickly using paint, fabric, or simple trims.
- Choose a method that matches your space and the lamp’s size for best results.
- Most projects use basic tools and finish in a short time.
Why Decorate Lamp Shades?

Updating a lamp shade changes how a room looks and feels. You can match colors, add texture, or fix a worn shade without buying a new lamp.
Personalization and Style
You control the final look when you decorate lamp shades. Pick fabrics, trims, or paint to match a room’s color, pattern, or mood.
Wrap a drum shade in velvet for a rich bedroom tone, or add metallic leaf to a table lamp for a modern glow. That’s a quick way to get a whole new vibe.
Think about scale and light. Dark fabrics cut glare and create cozy pools of light.
Sheer or perforated materials let patterns show on walls when the lamp is on. Use stencils or ribbon bands to add crisp lines or geometric shapes.
A custom lampshade makes a lamp feel unique. Add beaded fringe, pom-poms, or a painted edge—those small details reflect your taste.
These touches tie in with pillows, rugs, or curtain colors. It’s a way to pull the room together.
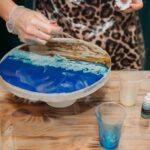
Budget-Friendly Lamp Shade Makeovers
You don’t need to buy a new lamp to get a fresh look. A simple DIY lamp shade project—gluing fabric, adding trim, or spraying metallic paint—costs way less than a designer lamp.
Start with a plain shade and basic supplies: fabric glue, spray adhesive, scissors, and trim. Cover the whole shade with leftover fabric for a bold change, or add a narrow ribbon band for a subtle update.
Sequins or glitter on small areas make a lampshade sparkle without much cost. Why spend more than you need to?
Work in stages to avoid mistakes. Test adhesives on a scrap first.
Replace only the shade rather than the lamp base to save money and reduce waste. A lampshade makeover can refresh a room in a few hours.
Repurposing and Upcycling Shades
Repurposing old shades gives them new life and cuts waste. Turn a faded empire shade into a planter cover, or use patterned napkins with decoupage to make a unique custom lampshade.
Look for materials at thrift stores or around the house. Old scarves, lace, and yarn add interesting textures.
Use beaded trims or tassels from other projects to add vintage flair. For paper shades, try painting or applying metallic foil for a modern twist.
Think about safety and durability. Use flame-retardant sprays or avoid materials that melt near hot bulbs.
Secure edges and seams so the shade lasts. Upcycling saves money and creates one-of-a-kind pieces that fit your space.
Essential Tools and Materials

You’ll need a solid lampshade base, basic crafting tools, and safe adhesives and finishes. Pick supplies that match your material and the level of heat from your bulb.
Choosing the Right Lamp Shade Base
Pick a base that fits your lamp harp, bulb size, and room scale. For a drum lampshade, measure the top and bottom diameters and the height so the shade sits evenly and clears the bulb by at least 3 inches.
If you use a fabric lampshade, choose one with a smooth frame to avoid puckering when you cover it. Decide between ready-made frames and full blank shades.
Wire frames work well for custom fabric wraps. Pre-covered paper or plastic shades save time and are easier for decoupage.
For vintage or thrifted bases, check for rust and bent wires. Straighten or replace parts before decorating.
Consider light diffusion and flame resistance. Natural fabrics like cotton give soft light but may need a liner.
Synthetic fabrics can melt if they touch a hot bulb, so keep some clearance and use lower-heat LEDs if you can.
Common Decorative Supplies
Gather these basic supplies before you start: fabric or paper, spray adhesive or fabric glue, scissors, a hot glue gun, measuring tape, and a seam gauge or straight edge.
For drum lampshade projects, you’ll want bias tape or seam binding to finish the edges cleanly. Add embellishments like trim, ribbon, stencils, acrylic paint, and decoupage medium.
If you plan to sew, bring a needle and matching thread. For textured effects, try yarn, lace, or metal leaf.
Use craft clips or clothespins to hold materials as adhesive dries. Keep a simple kit for repairs: spare shade liner, replacement wire frame pieces, and clear fabric sealant.
Label containers for small items like thumbtacks, beads, and brads so you can find trims quickly during assembly.
Safety Tips for DIY Projects
Always unplug the lamp and remove the bulb before you work on a shade. Work in a well-lit area with good ventilation, especially when using spray adhesives, solvent-based glues, or sealants.
Use heat-safe materials near the bulb. Test trims and adhesives on a scrap piece with an LED bulb for several hours to check for heat sensitivity.
Keep flammable glues and solvent rags in a metal container and dispose of them properly. Wear safety gear: gloves when handling metal frames, a dust mask for sanding or cutting old shades, and eye protection for wire snips.
Secure wire edges with pliers and cover sharp points with tape or heat-shrink tubing to prevent cuts when you install the shade.
Fabric and Textile Lamp Shade Ideas

These ideas show simple ways to change a plain shade into a stylish one using fabric, trim, and recycled textiles. Focus on fabric choice, secure attachment, and how the material affects light and heat.
Wrapping and Covering with Fabric
Choose a lightweight cotton or linen for even light diffusion. Measure the shade’s height and circumference, add 1 inch for seams, and cut the fabric to size.
Use spray adhesive or fabric glue for a no-sew finish, applying in short sections to avoid lumps. For a clean edge, fold the top and bottom hems under 1/4 inch and glue or hot-glue ribbon over the seams.
If you prefer sewing, stitch a tube, slide it over the frame, and tack the edges inside with hot glue. Match fabric pattern scale to shade size.
Small patterns suit small shades, large prints work best on drum shades. Stick with a low-heat bulb (LED is your friend) to protect delicate fabrics.
Pleated and Ruffled Fabric Techniques
Pleats and ruffles add texture without complex sewing. For pleats, cut fabric strips slightly longer than the shade height.
Fold accordion pleats and glue the folded edge to the shade rim, spacing pleats evenly as you go. Satin or grosgrain ribbon pleats work well for a neat finish.
For ruffles, use long strips gathered with a basting stitch or gathered ribbon, then glue in horizontal bands from bottom to top.
Layer ruffles for a fuller look. Keep pleats and ruffles away from the bulb; leave at least an inch of clearance and use low-heat LED bulbs to reduce fire risk.
Lace and Doily-Covered Shades
Lace and doilies create soft, patterned light. Choose sturdy lace or cotton doilies to avoid sagging.
To attach, spray the shade evenly with adhesive and smooth lace over the surface, trimming excess fabric at the seams. For doilies, arrange a pattern before gluing so the design reads from all angles.
Use a plain white or neutral shade underneath to make lace patterns pop when lit. If you want a vintage look, tea-stain cotton doilies before attaching.
Test the shade with the bulb on to check shadow patterns. Adjust doily placement for even illumination.
Upcycled and Repurposed Textile Shades
Turn scarves, tablecloths, or old clothing into a unique fabric-covered lampshade. Cut larger pieces to wrap the shade; patch smaller scraps into a quilted or collage style.
Secure edges with fabric glue or hand-stitch inside the rim for a tidy finish. Mix materials—denim base with lace trim, or silk panels with grosgrain edging—for contrast.
Reinforce weak fabrics with interfacing or a lining to prevent sagging. Label any upcycled shade as “decorative” if the material is thin.
Always use an LED bulb and keep fabric away from direct contact with the bulb for safety.
Painted and Stenciled Lamp Shades

You can change a lamp’s look with paint, from a single bold color to layered stencils. Choose paint that bonds to your shade material and plan the design, tools, and drying time before you start.
Solid Colors and Bold Patterns
Pick a paint made for fabric or plastic depending on your shade. For fabric lampshades, use fabric paint or thinned acrylic.
For paper or plastic, use acrylic or spray paint labeled safe for those surfaces. Test a small area first.
Clean the shade, remove dust, and tape off edges or the inside rim with painter’s tape. Use a foam roller or wide brush for even coverage.
Apply two thin coats rather than one thick coat to avoid drips. For bold patterns, use painter’s tape to create stripes or geometric blocks.
Measure and mark lightly with a pencil so lines stay straight. Let each color dry before removing tape or adding another color to prevent bleeding.
Watercolor, Ombre, and Gradient Effects
Ombre and watercolor effects can soften a room and suit painted lampshade projects where you want subtle color shifts. Use diluted acrylics or fabric dyes for fabric shades; mix paint with water to create gradients.
Work from lightest to darkest. Apply the light color at one edge, then add progressively darker tones while the paint is still damp.
Blend with a clean, damp sponge or wide brush using soft, horizontal strokes for a smooth transition. Control drips by turning the shade on its side and working in short strokes.
Dry the shade upright on a clean surface between layers. For a watercolor look, blot excess paint with a paper towel to lift color and create texture.
Stencils and Freehand Designs
Stencils give sharp, repeatable patterns and work well on painted lamp shades for damask, honeycomb, or geometric motifs. Buy a stencil or cut your own from stiff plastic or vinyl.
Secure the stencil with low-tack tape and use a stencil brush or sponge. Dab paint lightly; don’t overload the brush to avoid bleed under the stencil.
Work from the center outward and lift the stencil straight up when the paint is set but not fully dry. For freehand work, sketch your design in pencil first.
Use fine brushes for lines and small details. Seal painted lamp shade designs with a clear matte or satin spray sealer if the shade will be handled often or exposed to humidity.
Decorative Embellishments and Trims

These details change a plain shade into a custom piece. Choose trims that match the scale of your shade and attach them securely so the look lasts.
Ribbon, Beads, and Fringe Accents
Use narrow or wide ribbon to create bands, stripes, or a pleated cover. For a clean finish, run fabric glue or double-sided soft furnishing tape along the top or bottom edge, press the ribbon in place, and overlap ends at the seam.
If you pleat ribbon, pin or glue each fold every 1–2 inches so the pleats stay even. String beads on thin wire or fishing line and wrap them around the frame for a hanging beaded fringe.
Anchor the bead strand with a dab of hot glue at each rib for extra hold. For heavier fringe, use high-tack furnishing tape or a sewn-on trim strip to prevent sagging.
Match trim width to shade size: delicate ribbon suits small shades, while wide braid or heavy fringe fits large drum shades. Test your glue on scrap material first to avoid marks.
Buttons, Pom-Poms, and Tassels
Buttons add a pop of visual interest and a vintage vibe. Arrange them in rows or clusters, then sew onto a fabric-covered shade or use textile adhesive for a faster fix.
If you’re sewing, pick thread that matches and stick to small stitches so the buttons lie flat. Pom-poms and tassels bring a playful, boho touch—attach them to a cotton braid or ribbon, then glue or tape the braid along the bottom edge.
Space pom-poms about 1.5–3 inches apart depending on their size, so the trim looks balanced. Reinforce high-stress spots with a quick stitch or a tiny glue dot for extra durability.
Skip heavy embellishments on thin shades; they’ll just distort the frame or make it wobble.
Sequin and Glitter Techniques
Cover part of your shade with sequins for a bit of shimmer. Work in small areas—spread fabric glue over a 6–8 inch patch, press on the sequins, and overlap them a bit to avoid gaps.
Use a soft brush to sweep away loose glitter before the glue dries. For a more controlled glitter look, mix clear craft glue with a splash of water, brush it on, then sprinkle fine glitter and tap off the extra.
Spray on a clear sealer to keep glitter from shedding and protect the finish. Always use low-heat bulbs and steer clear of thick, heat-sensitive glue if the light is close to the fabric.
Test a small spot first to check for adhesion and see how it looks under lamp light. Watch for hot spots or uneven shine.
Creative Paper and Decoupage Designs

You can totally change a plain shade with paper, photos, or napkins. Here’s how to pick the right materials, get a clean finish, and end up with a shade that looks intentional—not just thrown together.
Paper Laminate and Origami Shades
Sturdy cardstock or lightweight laminates work well for paper lampshades that keep their shape and block light where you want. Cut panels to fit your shade’s height and circumference, leaving a half-inch overlap for glue.
For drum shades, score the paper every few inches so it curves instead of wrinkling. Spray adhesive or double-sided tape works great—just press the panels smooth from one edge to the other.
Origami folds add texture and pattern. Fold triangles or hexagons from sheets the size of your panels, then glue the folded pieces in rows.
Leave space for the harp and bulb. If you want a DIY photo lamp, print your photos on matte photo paper, laminate them, and attach in a band so they stay flat.
Materials list:
- Cardstock or laminated sheets
- Spray adhesive or double-sided tape
- Craft knife and metal ruler
- Matte photo paper (for photo bands)
Collage and Decoupage Techniques
Decoupage lets you layer paper, napkins, or thin fabric for a seamless look. Start by cleaning the shade and lightly sanding cardboard or hardback shades.
Cut your images or papers a little bigger than the area you’re covering. Brush on some decoupage medium (like Mod Podge), lay the paper down, and smooth from the center out to push out air bubbles.
Work in small sections. Seal each layer with two thin coats, letting it dry in between.
For tricky curves, cut slits in the paper edge or use torn edges to hide seams. Don’t use thick papers on soft-back fabric shades—they don’t mold well and tend to wrinkle.
Stick with thin materials and avoid metallic foils for heat safety.
Tools to keep handy:
- Foam brush, scissors, craft knife
- Decoupage medium and clear sealer
- Soft cloth for smoothing
Floral and Map-Inspired Designs
Floral designs look great with napkin decoupage or printed fabric strips. Pick a repeat pattern that fits the shade: small prints look uniform, big blooms become the focal point.
Press floral cutouts flat, layer them with a thin decoupage coat, and align repeats so stems and blooms flow around the shade.
Maps make for cool, conversation-starting shades and fit neutral rooms. Print vintage maps on matte paper, trim to fit the curve, and decoupage in thin coats.
Try placing a map band inside and floral decoupage outside for a subtle glow and extra detail. The floral exterior ties the look together.
Tips:
- Match print scale to shade size
- Use matte finishes to cut glare
- Tidy up edges with bias tape or narrow trim
Specialty & Thematic Lamp Shade Ideas

If you want a lamp shade that fits a theme or has a special purpose, these ideas might spark something. Use photos, natural materials, or holiday accents to get a focused look that matches a room or event.
Custom Photo and Memory Shades
Turn a plain shade into a custom piece that shows off your favorite pictures. Print photos on thin fabric or printable transparency sheets cut to fit the panels.
Stick them on with double-sided tape or spray adhesive so they lie flat. For a softer look, back the photos with a light-colored lining to keep images visible when the lamp is on.
You can arrange several small photos in a band or wrap a single panoramic image all the way around. Hide seams and finish it up with fabric trim or ribbon.
If you don’t want anything permanent, use magnetic photo strips on a metal ring or clip little photos with removable clothespins onto cord wrapped around the shade.
Nature-Inspired and Boho Designs
Bring in natural textures and boho style with woven rattan, dried grasses, lace, or macramé. Wrap the shade with thin rattan or seagrass strips, gluing at the top and bottom.
For a softer feel, attach macramé panels or a lace overlay so light filters through the patterns. Add real dried flowers or pressed leaves under clear decoupage medium for an organic, lasting finish.
Stick with neutral tones—cream, tan, olive—or muted metallics for a calm, cohesive look. Fringe, tassels, and pom-pom trims at the bottom edge boost the boho vibe without blocking light.
Seasonal and Holiday Makeovers
Change a shade fast by swapping out a band of fabric or trim to match the season or holiday. For autumn, glue on burlap and a rust-colored ribbon, maybe add a few faux leaves along the rim.
Winter looks pop with metallic spray paint outside and a simple silver or white ribbon at the edge. For holidays, use themed stencils and fabric paint—stars for Independence Day, pumpkins for Halloween, holly for Christmas.
Stick with low-heat bulbs and don’t let materials touch the bulb. Store removable bands or wraps flat in labeled bags so you can use them again next year.
Frequently Asked Questions

Here are some quick answers about safe materials, easy application, and smart decorating choices. I’ll point out specific options for fabrics, paints, trims, and techniques that work for most shades.
What materials can be safely used to embellish a lampshade?
You can use fabric, ribbon, lace, trim, and lightweight fringe on fabric and paper shades. These stick well with fabric glue or spray adhesive.
For sparkle, try sequins, beads, metallic leaf, or craft glitter with the right glue. Don’t use heavy or heat-sensitive metals on shades near a bulb.
Acrylic or fabric paint works for most lampshades. Skip solvent-based paints on thin paper shades—they can warp or weaken them.
Can I use fabric to change the look of my lampshade, and how do I apply it?
Definitely. Measure your shade and cut the fabric to size, leaving a bit extra for the top and bottom.
Use fabric glue or spray adhesive in small sections to avoid bubbles. Smooth as you go and trim the extra at the edges.
If you don’t want to sew, fold raw edges under or glue a ribbon trim over the seam. Wrap horizontally for drum shades; for empire shades, angle strips or panel the fabric to follow the slope.
What are some creative ways to use paint on a lampshade for decoration?
Stencils or painter’s tape give you crisp geometric patterns. Metallic acrylic paint adds shine—go for thin coats and let each one dry.
Try splatter or drip effects by thinning paint and flicking a brush. Test on scrap first so you don’t get too much bleed.
Paint the inside with a reflective color (white, gold, whatever you like) to change the light without messing with the outside.
How can I incorporate stenciling or decals in lampshade design?
Tape the stencil down so it doesn’t move. Use a stencil brush or sponge and dab the paint gently to avoid bleeding.
Pick thin vinyl or heat-stable stickers for decals. Stick them on a clean, dry surface, press out bubbles, and seal edges with clear matte sealer if the shade gets handled a lot.
Keep stencils or decals away from the bulb and stick with thin designs so they don’t trap heat.
What techniques are recommended for adding texture to a lampshade?
Glue on pom-pom fringe, tassels, or beaded trim at the edge for instant texture and movement. Measure and attach in sections to keep it even.
Try wrapping yarn or making a fabric strip collage for a cozy look. Use glue sparingly and support heavier trims as they dry to prevent sagging.
Layering fabrics—lace over solid, or strips in a chevron—builds depth without a lot of extra weight.
How do I choose the right decorations to complement the style of my room?
Match textures and colors to the textiles and finishes you already have. For modern rooms, go for metallic paints, clean geometric patterns, or maybe even a smooth satin ribbon.
If your space feels vintage or romantic, try lace, beaded fringe, tassels, or aged metallic leaf. Think about scale—use subtle trims on smaller lamps, and save the bold patterns for big shades.
Ask yourself what the lamp’s really for. If you need to read, stick to clear, light-filtering fabrics. Want mood lighting? Denser, richer materials usually work better.