Are you feeling a bit uninspired by your home decor? Sometimes a fresh coat of paint can be just what you need to breathe new life into your space. Whether it’s transforming an old piece of furniture or adding a splash of color to your walls, painting is an easy, budget-friendly way to make a huge impact. In this post, I’ve gathered 18 easy DIY painting ideas that can help you instantly refresh your home without breaking the bank.
If you’re someone who loves DIY projects or enjoys upcycling furniture, you’ll find this guide especially helpful. It’s perfect for creative individuals looking to add a personal touch to their living space. You don’t need to be a professional artist to achieve fantastic results—just a little creativity and the right techniques.
With these 18 ideas, you’ll discover simple yet effective painting techniques that can turn ordinary items into stunning home decor projects. You’ll find inspiration for everything from ombre dresser makeovers to vibrant painted planters. Get ready to unleash your inner artist and transform your home into a space that reflects your unique style!
Key Takeaways
– Discover 18 easy DIY painting ideas perfect for refreshing your home decor on a budget.
– Find step-by-step techniques for both furniture upcycling and wall art, so you can tackle any project with confidence.
– Learn about creative painting methods that add flair, like ombre effects and stenciling, to elevate your decor.
– Explore budget-friendly crafts that not only look good but also encourage sustainability through upcycling.
– Get inspired by a range of home decor projects, from painted planters to revitalized kitchen cabinets, to make your home uniquely yours.
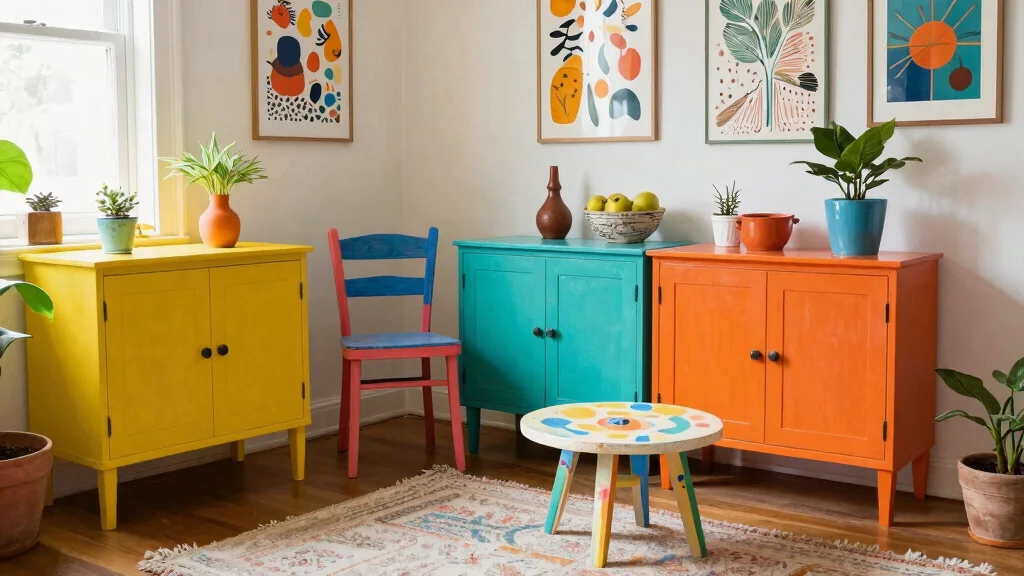
1. Ombre Dresser Makeover

Transforming an old dresser using the ombre painting technique can create a stylish centerpiece in your bedroom. This method of gradually blending two or more colors infuses depth and intrigue, perfect for expressing your unique taste. Colors such as soft pastels or bold jewel tones can complement your existing decor beautifully, making the dresser look like a designer piece.
To get started, sand the dresser to prepare the surface. Apply a base coat in your lightest color and let it dry. Then, blend a second color on the lower part, feathering the edges with a sponge for that perfect gradient effect.
– Work in small sections for a smooth finish.
– Use painter’s tape for crisp lines between colors.
– Seal with a clear coat to enhance durability.
This creative endeavor not only revitalizes your furniture but also serves as a captivating statement piece in your space!
| # | Preview | Product | Price | |
|---|---|---|---|---|
| 1 |

|
2 Pcs Cabinet Knobs 2 Inch, Black Abstract Wood Drawer Pulls Decorative Kitchen Cabinet Handles... | $17.19 | Buy on Amazon |
Last update on 2026-03-03 / Affiliate links / Images from Amazon Product Advertising API
How To Choose The Right Paint for Your DIY Projects
When diving into DIY painting projects, selecting the appropriate type of paint is crucial. Each type has unique properties that can affect the finish, durability, and overall look of your project. Here’s how to make the best choice for your needs.
1. Consider the Surface
Think about what you’ll be painting. Different surfaces require different types of paint. For wood, you might choose acrylic, while metal surfaces often call for enamel. For outdoor furniture, ensure the paint is weather-resistant. Understanding the surface you’re working with will lead to a more successful finish.
2. Determine the Finish
Paint finishes range from matte to glossy. A matte finish hides imperfections, while a glossy finish is easier to clean. For furniture, consider a satin or semi-gloss for durability. For walls, eggshell or satin finishes work well in living spaces. Selecting the right finish not only affects aesthetics but also the longevity of the paint job.
3. Choose the Right Color
Color plays a vital role in the mood of a space. Light colors can make a room feel larger, while darker hues can provide a cozy atmosphere. Consider using an accent color for furniture or decor to create visual interest. Keep in mind the existing decor to ensure a harmonious look. Test samples on small areas to see how they look in different lighting.
4. Check the Paint Type
There are various paint types available, such as water-based, oil-based, and chalk paint. Water-based paints dry quickly and have low odor, making them ideal for indoor projects. Oil-based paints, while more durable, take longer to dry and require solvents for cleanup. Chalk paint is popular for furniture due to its matte finish and ease of distressing. Choosing the right type can simplify your project and enhance the results.
5. Budget Considerations
Set a budget before starting your project. High-quality paints tend to be more expensive but can save you money in the long run. They often require fewer coats, providing better coverage. Consider buying samples first to test before committing to larger quantities. This can help you stay within budget while achieving the desired results.
6. Environmental Impact
If you’re eco-conscious, look for paints labeled as low-VOC (volatile organic compounds) or zero-VOC. These paints are better for indoor air quality and are less harmful to the environment. Many brands now offer environmentally friendly options that still provide excellent coverage and durability. Choosing greener options can make your home healthier and reduce your carbon footprint.
Pro Tip: Always read the label! Each paint has specific instructions on application and drying times. Following these guidelines will help you achieve the best results and prevent common pitfalls associated with DIY painting projects.
By keeping these factors in mind, you can confidently choose the right paint for your DIY painting ideas. Whether you’re upcycling furniture or refreshing your walls, the right paint will elevate your home decor projects and bring your creative visions to life. Happy painting!
2. Chalk Paint Coffee Table

Chalk paint is a fantastic tool for DIY enthusiasts looking to refresh furniture effortlessly. It requires minimal prep and delivers a beautiful matte finish, making it ideal for giving an old coffee table a trendy update. You can choose colors that harmonize with your living room decor, creating a striking centerpiece.
Start by cleaning the table and applying a coat of chalk paint using a brush or roller. Once dry, distress the edges with fine sandpaper to achieve that rustic charm. A wax finish can enhance the surface and protect the color beautifully.
– Experiment with various colors for a unique two-tone effect.
– Add stencils or rubber stamps for delightful details.
– Allow ample drying time to avoid smudging.
The versatility of chalk paint makes it perfect for any upcycling project, creating a fresh vibe in your home!
Chalk paint is your shortcut to a chic, matte finish on a tired coffee table. A simple coat and a touch of distressing—and you’ll have a fresh centerpiece without heavy prep. For easy diy painting ideas, this is the move you’ll actually finish.


Last update on 2026-02-27 / Affiliate links / Images from Amazon Product Advertising API
3. Abstract Wall Art with Acrylics

Creating your own abstract wall art with acrylics can dramatically change the atmosphere of your room. This fun and affordable project allows for personal expression, making it easy to customize your space. You don’t need to be an artist; simply let your creativity flow with colors that resonate with your style.
Start by applying a base color and letting it dry. Layer on your chosen colors using a variety of brushes and sponges, blending freely. The essence of abstract art is spontaneity, so embrace imperfections!
– Try pouring techniques for eye-catching effects.
– Use painter’s tape to create clean lines and shapes.
– Hang your artwork as a bold statement piece in your living area.
Crafting your own wall art not only showcases your personality but also adds a unique touch to your home!


Last update on 2026-02-27 / Affiliate links / Images from Amazon Product Advertising API
4. Stenciled Accent Wall

Revitalize a dull wall by incorporating a stenciled design, adding character and charm to any room. Selecting a stencil pattern that speaks to your style, whether geometric or floral, can create a stunning focal point in your space.
Begin by painting the wall in your desired base color and allowing it to dry completely. Position the stencil and apply a contrasting color over it, making sure to dab off excess paint to prevent drips. Carefully remove the stencil to reveal your design!
– Secure the stencil with painter’s tape to prevent shifting.
– Mix colors for a unique twist on traditional stenciling.
– Create your own stencils from cardboard to save money.
This simple project personalizes your space and makes a bold statement without breaking the bank!


Last update on 2026-02-27 / Affiliate links / Images from Amazon Product Advertising API
5. Color-Blocked Bookshelf

Elevate your bookshelf with a playful color-blocking technique that’s both simple and creative. This project not only enhances functionality but also allows your personality to shine through. Choose colors that either match or contrast with your room’s theme for a dynamic look.
Start by removing the shelves and painting each section in different colors, creating a unique visual impact. Use painter’s tape to achieve crisp lines between the colors for a polished finish.
– Opt for a semi-gloss finish for a modern aesthetic.
– Arrange your books and decor to enhance the color scheme.
– Utilize leftover paint from past projects to keep costs down.
A color-blocked bookshelf transforms a practical item into a stunning piece of art that brightens your room!


Last update on 2026-02-27 / Affiliate links / Images from Amazon Product Advertising API
6. Furniture Decoupage

Decoupage is a delightful technique for upcycling old furniture into something fresh and beautiful. This creative approach allows you to cover surfaces with paper, fabric, or even photographs, breathing new life into your pieces. Choose materials that resonate with your style, such as vintage newspapers or vibrant floral patterns.
Start by cleaning the furniture and cutting your chosen materials into shapes. Apply a layer of decoupage glue, place your cutouts, and seal everything with another layer of glue.
– Use a foam brush for an even application.
– Finish with clear varnish for added protection.
– Experiment with layering materials for depth and interest.
Your upcycled decoupage furniture will surely become a conversation starter, showcasing your creativity!
Fun fact: Decoupage can cut waste by up to 40% when you breathe new life into old furniture. With easy diy painting ideas, you can transform a tired piece in just one weekend.


Last update on 2026-02-27 / Affiliate links / Images from Amazon Product Advertising API
7. Painted Planters

Add a vibrant touch to your home with painted planters! This project not only enhances your plant display but also allows for a personal touch that reflects your style. Choose from terracotta pots, ceramic containers, or even recycled items to create a unique look.
Begin by cleaning your pots and applying a primer if necessary. Select colors that harmonize with your decor and paint them using a brush or spray paint. Incorporate patterns or stencils for added creativity.
– Seal your painted pots with waterproof sealant for outdoor durability.
– Mix and match colors or try an ombre effect.
– Create themed planters for different rooms to elevate your decor.
Your painted planters will not only enhance your indoor garden but also infuse joy into your space!


Last update on 2026-02-27 / Affiliate links / Images from Amazon Product Advertising API
8. Painted Rugs

Transform a basic rug into a stunning statement piece using paint! This unique DIY project offers you the freedom to design patterns that fit your style perfectly. Opt for a flat-weave rug and use durable fabric paint to achieve the best results.
Start by laying the rug flat on a clean surface. Use painter’s tape to outline your design, then fill in the sections with paint. Allow it to dry completely before placing it back in your space.
– Test the paint on a small area first to ensure proper adhesion.
– Use stencils for intricate designs that stand out.
– Add fabric medium to the paint for flexibility.
This project may require time, but the result will be a one-of-a-kind rug that personalizes your home beautifully!


Last update on 2026-02-27 / Affiliate links / Images from Amazon Product Advertising API
9. Upcycled Kitchen Cabinets

Revamping your kitchen cabinets with paint can completely transform your cooking space! If your cabinets are looking worn, this affordable solution can refresh them beautifully. Choose a bold color for a dramatic statement or a soft hue for a subtle upgrade.
Start by removing the cabinet doors and sanding the surfaces. Apply a high-quality primer before your chosen paint for the best adherence. To enhance the look even further, consider adding new hardware.
– Use a paint sprayer for a smooth finish.
– Add a clear coat for added protection and longevity.
– Tape off edges carefully for clean lines.
This DIY makeover can breathe new life into your kitchen, making it feel brand new without the expense of replacements!


Last update on 2026-02-27 / Affiliate links / Images from Amazon Product Advertising API
10. Painted Picture Frames

Elevate your wall decor by refreshing old picture frames with a new coat of paint! This easy DIY project can create a cohesive gallery wall or add a pop of color to any space. Choose colors that complement your home’s palette or go bold with vibrant shades.
Remove the glass and backing from the frames and apply primer if necessary. Paint them with your selected colors and allow them to dry completely before reassembling.
– Consider using metallic paints for a touch of elegance.
– Mix and match different frame styles for an eclectic look.
– Use a spray bottle for a textured paint effect.
Your painted frames will beautifully showcase your cherished memories in a unique and stylish way!
Fun fact: refreshing five picture frames with a quick coat of paint can boost a room’s vibe by up to 40% without breaking the bank. Remove the glass, prime if needed, choose soft neutrals or bold metallics, and enjoy easy DIY painting ideas for a fresh gallery wall.


Last update on 2026-02-27 / Affiliate links / Images from Amazon Product Advertising API
11. Painted Light Fixtures

Revitalize your light fixtures with a fresh coat of paint! Whether it’s a chandelier, lamp, or pendant, a splash of color can breathe new life into old lighting. Choose metallic or bold colors to turn these fixtures into statement pieces.
Start by removing the fixture and cleaning it thoroughly. Apply a spray primer followed by your preferred paint, ensuring even coverage for a professional finish. Reassemble once everything is dry.
– Use painter’s tape to protect areas you want to keep unpainted.
– Consider adding fabric shades for a softer appearance.
– Ensure the paint is heat-resistant if needed.
This project is a fantastic way to add personality and character to any room!
12. Painted Bathroom Vanity

Give your bathroom a fresh look by painting the vanity! This simple project can significantly improve the overall aesthetic and is quite straightforward. Choose a refreshing color that aligns with your bathroom decor to brighten the space.
Begin by removing the hardware and prepping the surface. Apply a quality primer to ensure the paint adheres well. Once painted, allow it to dry completely before reattaching the hardware.
– Opt for waterproof paint for lasting durability.
– Consider stenciling a design on the vanity for added flair.
– Update the hardware for an instant refresh.
This small change can elevate your bathroom’s appearance dramatically!
13. Painted Window Shutters

Enhance your home’s exterior by painting window shutters! This simple project can dramatically boost your curb appeal. Choose a color that either contrasts or complements your home’s exterior for a striking look.
Start by cleaning the shutters and lightly sanding them. Apply a coat of primer followed by your chosen paint. If possible, remove the shutters for easier application.
– Use exterior paint for long-lasting durability against the elements.
– Consider adding stencils for a personalized touch.
– Choose a fun color to make your home stand out.
Your painted shutters will give your house a fresh and inviting look, making a wonderful first impression!
14. Painted Side Tables

Revive your living room or bedroom with a painted side table! This small piece of furniture can create a significant impact, especially when dressed in a bold color. Consider using leftover paint from previous projects for a cost-effective refresh.
Clean the table thoroughly and sand any rough patches. Apply a coat of primer, followed by your selected color. Finish with a clear coat to ensure durability.
– Mix colors for a playful, unique appearance.
– Stencil a design for added visual interest.
– Change colors seasonally for a fresh look.
Your painted side table will not only serve a purpose but also act as a stylish accent in your space!
15. Painted Stair Risers

Transform your staircase into a stunning focal point with painted stair risers! This engaging DIY project adds color and personality to your home. Choose a color scheme that aligns with your decor or try a gradient design for extra flair.
Clean the risers and apply tape to protect surrounding areas. Use a brush or roller to paint your chosen colors, allowing drying time between coats.
– Use non-slip paint for safety on the stairs.
– Experiment with patterns like stripes or polka dots for fun.
– Consider a rainbow effect for a cheerful touch.
This project can completely revitalize your stairway, making it a lively and captivating feature in your home!
16. Painted Serving Tray

Add a personal touch to your gatherings with a painted serving tray! This easy project allows you to express your style while being practical. Select colors that complement your home decor for a cohesive look.
Start by cleaning the tray and sanding if necessary. Apply a coat of primer, followed by your chosen paint. Feel free to add designs or stenciling for uniqueness.
– Use food-safe paint for serving items safely.
– Consider adding handles that match the tray’s color scheme.
– Seal with a clear coat to protect the finish.
Your painted serving tray will be a stylish addition to your entertaining essentials!
17. Painted Pet Bowls

Show your furry friends some love with painted pet bowls! This fun DIY project brightens up your pet’s dining area while allowing you to personalize their space. Ensure you use non-toxic, pet-safe paint to keep your pets safe while enjoying their meals.
Clean the bowls thoroughly before painting. If necessary, apply a coat of primer before using your chosen colors. Finish with a clear sealant to protect the design and simplify cleaning.
– Choose playful colors that reflect your pet’s personality.
– Consider stenciling their name for a custom touch.
– Ensure the paint is completely dry before use.
Your painted pet bowls will not only look fantastic but also add a special touch to your furry friend’s dining experience!
18. Painted Garden Furniture

Refresh your outdoor space with painted garden furniture! Whether it’s chairs, tables, or benches, a pop of color can transform your garden into a vibrant oasis. Choose outdoor paint for durability against the elements.
Start by cleaning and sanding the furniture. Apply a coat of primer, followed by your chosen outdoor paint. Consider adding patterns or stripes for an extra flair.
– Use bright, cheerful colors to create a lively atmosphere.
– Seal with a UV protectant to prevent fading.
– Mix colors for an eclectic garden vibe.
Your painted garden furniture will create an inviting outdoor space perfect for relaxation and gatherings!
Conclusion

These easy DIY painting ideas are a fantastic way to unleash your creativity while transforming your home! With a bit of time and effort, you can turn everyday items into stunning focal points that reflect your personal style. From furniture to wall art, each project offers a unique opportunity to enhance your space without breaking the bank. So, gather your supplies and let your imagination run wild!
Remember, the most rewarding projects are those that bring joy to your space and to you!
Frequently Asked Questions
What are some easy DIY painting ideas to kickstart upcycling furniture?
Start with simple color refreshes on a dresser, chair, or coffee table. With easy diy painting ideas, begin by cleaning and lightly sanding the surface, then applying a primer if needed. Try chalk paint for quick coverage, then finish with a protective wax or poly. You can experiment with a two-tone look, subtle distressing, or a bold color block for instant impact. These upcycled furniture painting projects are a great way to try budget-friendly crafts that transform a room in hours.
What supplies do I need for beginner-friendly upcycling furniture painting projects?
Here’s a practical starter kit: drop cloth, clean rag, sandpaper (120–220 grit), primer (if needed), chalk paint or good acrylics, brushes and a small roller, painter’s tape, and a sealer (wax or polyurethane). Gather gloves and ventilation for safety. Budget-friendly tip: reuse old brushes or borrow from friends, and stick to one piece to practice a technique like creative painting techniques before scaling up.
How can I protect my furniture and achieve a durable finish on a budget?
Preparation matters: clean, sand lightly, remove dust. Use a primer if the wood is slick or stained, then pick a finish you love—wax for a soft, antique look or polyurethane for durability. Apply thin coats and let each fully dry, lightly sanding between coats for a smooth result. With budget-friendly crafts, you can stretch your sealer by buying in small cans and applying sparingly while still getting protection.
What are some creative painting techniques that work well for wall art ideas and furniture projects?
Experiment with creative painting techniques like chalk paint for easy coverage, dry brushing to highlight grain, distressing for vintage charm, color blocking for a bold look, and stencil or metallic wax accents for texture. These approaches pair nicely with wall art ideas and upcycled furniture painting, helping you achieve professional-looking results with minimal tools. Start by testing on a scrap piece before committing.
Can I transform a room quickly with budget-friendly DIY painting ideas?
Yes! Start with a focal piece or a couple of small wall art projects to set the mood. Choose a cohesive color palette, maybe a bold accent or a subtle monochrome wash, and pair with coordinated decor. These home decor projects and budget-friendly crafts can deliver a noticeable makeover in hours when you use easy diy painting ideas that are simple to execute.
Related Topics
easy diy painting ideas
upcycled furniture painting
home decor projects
budget-friendly crafts
creative painting techniques
wall art ideas
beginner friendly
quick makeovers
colorful designs
furniture revamp
DIY home improvements
seasonal decor