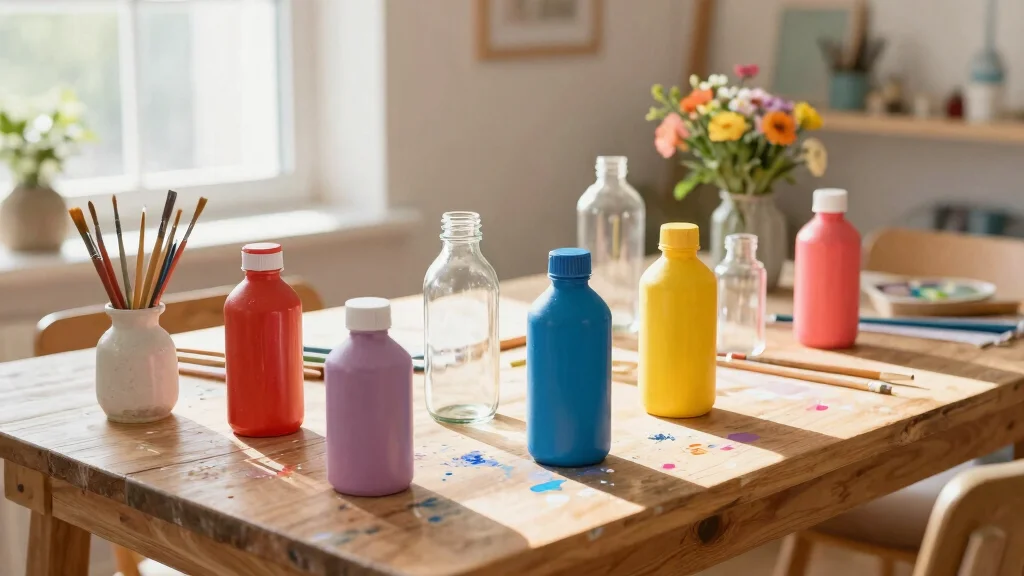
Creating a warm and inviting home can be a challenge, especially if you’re on a tight budget. If you’re like me, you might find yourself looking for creative ways to spruce up your space without breaking the bank. That’s why I put together this post about 12 easy bottle painting ideas using items you already have at home. These projects not only help you declutter but also breathe new life into old glass bottles, transforming them into stunning decor pieces.
If you’re a DIY enthusiast or just someone looking to add a personal touch to your home, this guide is for you. Whether you’re a seasoned crafter or a beginner, these bottle painting techniques are simple and fun. You’ll find ideas that suit every style, from rustic to modern, and they make for great upcycled bottle crafts that can brighten any room.
By the end of this post, you’ll be inspired and equipped with practical tips to create beautiful art from the items you already have. You’ll discover how to turn those empty bottles into eye-catching decor, helping you create a space that reflects your personal taste—all while being budget-friendly!
Key Takeaways
– You don’t need to spend a lot to create stylish home decor; simple bottle painting can transform your space.
– Each of the 12 ideas uses items you likely already have, making these projects easy and accessible.
– Techniques like ombre effects and stenciling can elevate your bottle art, adding depth and texture to your designs.
– Upcycled bottles can serve multiple purposes, such as vases, candle holders, or seasonal decor, maximizing their use.
– These painting projects are not only enjoyable but also a great way to reduce waste while showcasing your creativity.
1. Ombre Effect Bottles

Elevate your bottles with the captivating ombre effect. This technique, featuring a smooth gradient of colors, adds a sophisticated touch that can transform any space into a chic retreat. Imagine a delicate blend of soft pink transitioning to a deep coral, perfect for a sunset-inspired decor. You can achieve this look using acrylic or spray paint, ensuring that your choice of colors harmonizes beautifully together.
To bring this idea to life, start with a light shade at the base and work your way up to a darker hue. For those on a budget, consider using leftover paint from previous projects. This style not only aligns with current trends but also offers a calming visual effect, enhancing your home’s ambiance.
Consider these tips to perfect your ombre bottles:
– Pair lighter shades at the base for a smooth transition
– Use a sponge or small brush for seamless blending
– Incorporate a sunset palette with pinks, oranges, and yellows
Once completed, the ombre effect will serve as a stunning centerpiece, bringing warmth and elegance to your decor.


Last update on 2026-02-27 / Affiliate links / Images from Amazon Product Advertising API
2. Nature-Inspired Designs

Infuse your home with the serene beauty of nature through nature-inspired bottle designs. Using elements like leaves, flowers, or twigs, you can create enchanting botanical bottles that evoke the tranquility of the outdoors. Picture a lovely arrangement of green ferns and vibrant blooms adorning your shelves, bringing a fresh essence into your living space.
Begin by gathering natural items from your garden or local park. If you prefer, stencils can help replicate the shapes of these elements. This project not only beautifies your home but also connects you to nature, enhancing your emotional well-being.
Here are some practical steps to craft your nature-inspired bottles:
– Use real leaves or flowers for an authentic touch
– Incorporate earthy colors to complement your design
– Seal with mod podge for durability and finish
These charming bottles can serve as lovely vases or decorative accents, adding a touch of nature’s grace to your surroundings.


Last update on 2026-02-27 / Affiliate links / Images from Amazon Product Advertising API
How To Choose the Right Bottles for Painting
When it comes to bottle painting, choosing the right bottles plays a crucial role in your project’s success. Here are some key factors to consider when selecting bottles for your next creative endeavor:
1. Bottle Material
The type of material your bottle is made from will affect how well paint adheres to its surface. Glass bottles are popular because they provide a smooth canvas and can withstand various paint types. Plastic bottles, on the other hand, may require special paint or preparation to ensure the paint sticks. Always consider what materials you have at hand and how they would work with your chosen painting techniques.
2. Bottle Shape
Bottles come in all shapes and sizes, from narrow necks to wide bases. The shape you choose can influence the design and style of your painting. For instance, a tall, slender bottle is perfect for intricate designs, while a round or wide bottle can be great for bold, abstract art. Think about the final look you want to achieve and select a shape that complements your vision.
3. Size Matters
The size of the bottle can also affect the amount of paint you’ll need and the complexity of your design. Larger bottles provide more space for creativity but can also require more time and materials. If you’re just starting out, consider using smaller bottles to practice your techniques. This way, you won’t waste materials and can easily experiment with different designs.
4. Existing Decor Style
Consider how your painted bottles will fit into your home decor. If your style is rustic, you might want to choose bottles that look aged or have a more earthy color palette. For modern decor, you could go for sleek, minimalist designs with metallic paints. Matching your bottle art to your existing decor can make your DIY projects feel more cohesive and intentional.
5. Accessibility of Supplies
Before diving into your bottle painting project, ensure that you have all necessary supplies readily available. This includes paints, brushes, and any decorative elements you want to add, like twine or glitter. Using items you already have can also help you stick to a budget. Check your craft stash before heading to the store to grab extra materials.
6. Easy Cleanup
Consider the cleanup process as well. Some paints can be challenging to remove from surfaces and require solvents for cleanup. If you’re working with kids or prefer a hassle-free experience, look for water-based paints that can be easily cleaned with soap and water. This will make your painting experience more enjoyable and less stressful.
Pro Tip: Start by selecting a few different types of bottles to experiment with. This way, you can try out various techniques and find what works best for your artistic style. Mixing shapes and sizes can lead to unique results that enhance your home decor!
Choosing the right bottles is just the first step. With these criteria in mind, you can confidently select bottles that align with your creative projects. Enjoy the process, and let your imagination guide you!


Last update on 2026-02-27 / Affiliate links / Images from Amazon Product Advertising API
3. Chalk Paint Textures

For a rustic touch, explore the world of chalk paint. This versatile medium offers a beautiful matte finish, perfect for vintage-inspired decor. Imagine your bottles showcasing soft, muted tones that evoke a sense of nostalgia and charm. With chalk paint, you can layer colors to create unique textures that breathe life into your home.
Choose your favorite shades and consider mixing them for a custom color palette. This technique is easy to master, making it perfect for crafters of all skill levels, and can add character to any bottle.
Here’s how to create textured bottles with chalk paint:
– Apply a base coat and let it dry thoroughly
– Use a dry brush technique for a distressed look
– Finish with clear wax for added protection
Chalk-painted bottles can enhance a farmhouse-style decor, adding warmth and personality to any room.


Last update on 2026-02-27 / Affiliate links / Images from Amazon Product Advertising API
4. Stenciled Patterns

Stenciling offers a creative way to personalize your bottles with intricate designs. This technique allows you to add stunning patterns or even words without needing advanced painting skills. Imagine a beautiful floral pattern or motivational words adorning your bottles, making your decor feel uniquely yours.
Choose a color scheme that resonates with your style, and secure your stencil in place using painter’s tape. This method is perfect for those who enjoy adding a personal touch to their decor and can easily adapt to various design themes.
Follow these steps for successful stenciled bottles:
– Clean and dry your bottles before stenciling
– Dab paint carefully over the stencil for a clean design
– Experiment with different colors for added depth
Stenciled bottles can serve as eye-catching vases or decorative accents, enriching your home with personality and flair.


Last update on 2026-02-27 / Affiliate links / Images from Amazon Product Advertising API
5. Metallic Accents

Introduce a hint of glamour to your decor with metallic-painted bottles. This chic trend is perfect for adding a luxurious touch to ordinary objects. Imagine bottles adorned with gleaming gold or silver accents that catch the light and elevate your home’s aesthetic.
Consider painting only specific sections of the bottle for a stylish contrast, or apply a textured finish for added visual interest. Metallic paints can be found in both spray and brush-on options, catering to your preferred application method.
Try these ideas to create stunning metallic bottles:
– Apply a smooth coat of gold or silver for elegance
– Use a sponge for a textured metallic effect
– Combine matte and glossy finishes for depth
These metallic beauties will shine as striking centerpieces or decorative accents in any space.
Fun fact: A little metallic touch goes a long way—just 1-2 coats of gold or silver can transform an ordinary bottle into a glam focal point. With easy bottle painting ideas, you can DIY chic decor in minutes.


Last update on 2026-02-27 / Affiliate links / Images from Amazon Product Advertising API
6. Mosaic Bottle Art

Transform your bottles into vibrant mosaic art pieces that reflect your creativity. This project is perfect for repurposing broken tiles, glass, or colorful paper, allowing you to showcase your unique style. Picture a colorful mosaic bottle brightening up a corner of your home, a true conversation starter.
Start by cutting tiles or glass into manageable pieces and adhere them to your bottle with a strong adhesive. You can create structured patterns or a whimsical assortment of colors, depending on your preference.
Consider these steps for creating your mosaic masterpiece:
– Prepare your bottle by cleaning it thoroughly
– Use adhesive to secure each piece onto the bottle
– Fill gaps with grout for a polished finish
Mosaic bottles add a splash of color and personality to any room, making them delightful decorative items or thoughtful gifts.
Did you know that turning old bottles into mosaic art can cut waste by up to 30% in a single project? With simple tile or glass pieces and a strong adhesive, you’ll master easy bottle painting ideas that brighten any corner and start conversations.


Last update on 2026-02-27 / Affiliate links / Images from Amazon Product Advertising API
7. Twine-Wrapped Bottles

Wrap your bottles in twine for a charming rustic look that complements farmhouse decor beautifully. This simple technique adds warmth and texture, perfect for creating cozy accents in your space. Imagine a bottle adorned with twine, embellished with dried flowers, adding a cozy touch to your tabletop.
Begin by gluing the end of the twine to the bottle and wrapping it tightly. You can personalize your bottles further with wooden tags or small charms for added character.
Try these techniques for twine-wrapped bottles:
– Secure twine with hot glue for a quick bond
– Experiment with different twine colors for variety
– Incorporate embellishments for a personal touch
These twine-wrapped bottles can serve as lovely vases or purely decorative pieces, enhancing the rustic charm of your home.


Last update on 2026-02-27 / Affiliate links / Images from Amazon Product Advertising API
8. Chalkboard Paint Fun

Transform your bottles into fun, interactive decor using chalkboard paint! This innovative approach allows you to write seasonal messages or reminders, making your decor both functional and playful. Imagine a bottle that changes with your mood, showcasing quotes or designs that brighten your day.
Simply coat your bottle with chalkboard paint and let it dry. Once ready, use chalk or markers to customize your designs. This project is perfect for crafting unique gifts or playful kitchen organizers.
Follow these steps for chalkboard painted bottles:
– Clean the bottles thoroughly before painting
– Apply chalkboard paint evenly for best results
– Use a damp cloth to easily wipe off and change messages
These versatile bottles can serve as decorative accents and practical organizers, adding a whimsical touch to your home.
Fun fact: Chalkboard-painted bottles dry in about 15 minutes, and you can swap messages with chalk markers in seconds. This is one of the easy bottle painting ideas that makes gifts personal and practical—perfect for seasonal notes or playful kitchen reminders.


Last update on 2026-02-27 / Affiliate links / Images from Amazon Product Advertising API
9. Drip-Style Painting

Unleash your creativity with the exciting drip-style painting technique! This fun method allows paint to flow freely, creating dynamic designs on your bottles. Imagine vibrant colors cascading down, each bottle becoming a unique work of art.
Pour different colors of paint onto the top of your bottle, letting gravity do the work. You can control the flow by tilting the bottle, resulting in stunning patterns without needing precise brush strokes.
Consider these tips for successful drip-style bottles:
– Work quickly to prevent paint from drying too soon
– Use a tray to catch excess drips for easy cleanup
– Experiment with color combinations for vibrant results
These eye-catching drip-painted bottles will certainly capture attention, adding an artistic flair to your decor.


Last update on 2026-02-27 / Affiliate links / Images from Amazon Product Advertising API
10. Upcycled Bottle Candle Holders

Convert your empty bottles into enchanting candle holders, creating a warm and inviting atmosphere in your home. This simple project yields beautiful results, adding charm to your decor while repurposing old materials. Picture flickering candles illuminating your bottles, casting a soft glow during cozy evenings.
Start by painting your bottles in colors that complement your decor. You can keep the top open for an organic look or cut a hole for a votive candle. For safety, consider using LED candles, which eliminate fire risks.
Here’s how to create your candle holders:
– Clean and dry your bottles thoroughly
– Paint and let them dry completely
– Cut an opening for candles if desired
These charming candle holders will enhance any occasion, from romantic dinners to festive gatherings.
11. Seasonal Decor Bottles

Celebrate the changing seasons by creating themed bottles that reflect the beauty of each time of year. Whether it’s autumn leaves, winter snowflakes, or spring flowers, these bottles add a festive touch to your decor. Envision bottles filled with seasonal treasures, bringing a fresh look to your home throughout the year.
Select a color palette that resonates with the season and incorporate decor elements that represent each theme. You could paint the bottles corresponding colors or fill them with seasonal items like pinecones or seashells.
Follow these steps for crafting seasonal decor bottles:
– Clean and dry your bottles before painting
– Fill with seasonal decorations for added flair
– Use removable adhesive for easy theme changes
Seasonal decor bottles can beautifully enhance your space, ensuring your home feels vibrant and inviting as the seasons change.
12. Layered Paint Techniques

For a truly artistic endeavor, explore layered paint techniques on your bottles. This method allows you to create depth and texture, turning simple bottles into stunning art pieces. Imagine your bottles showcasing intricate designs and colors that reflect your personal style.
Start with a solid base coat in your favorite color, and once dry, layer on additional techniques like sponging or stippling. This approach adds unique elements to each bottle, ensuring no two are alike.
Consider these tips for layering paint:
– Experiment with different application tools for varied effects
– Allow each layer to dry completely before adding more
– Mix colors to achieve a custom look
Layered paint techniques create breathtaking decor pieces that are distinctly yours, perfect for personal enjoyment or gifting.
Conclusion

These 12 easy bottle painting ideas are not only budget-friendly but also allow for endless creativity and personalization! Whether you’re a seasoned DIY enthusiast or just starting out, upcycling bottles into beautiful decor can be both fun and fulfilling.
So gather your materials and let your imagination run wild! With just a few supplies and a sprinkle of creativity, you can transform your home with unique pieces that reflect your style and personality. Don’t hesitate to share your creations with friends and family, or even on social media to inspire others on their DIY journey!
Frequently Asked Questions
Question: What are the simplest steps to get started with easy bottle painting ideas using items I already have?
Getting started with easy bottle painting ideas is simpler than you think. First, gather bottles you already have, give them a good clean and dry them completely.
Next, pick a simple color palette and a couple of bottle painting techniques you’d like to try. For beginners, a basic bottle painting technique like color blocking or a light dry-brush works great.
Use acrylic craft paints or glass paints designed for bottles, and finish with a clear sealant to protect your design. Add a little upcycled charm with twine, washi tape, or decorative paper for texture, and you’ve got a budget-friendly decor piece in no time.
Question: Which bottle painting techniques work best for beginners and why?
Great question. For beginners, start with a few bottle painting techniques that are forgiving and quick: color blocking, simple stripes, and a soft dry-brush to add texture.
Masking tape helps you get clean lines, while light stencils or decoupage add pattern without freehand drawing.
Use acrylic craft paints on glass and seal with a clear sealant after the paint dries. These techniques keep projects fast, cheap, and highly satisfying, perfect for building confidence with upcycled bottle crafts and DIY home decor projects.
Question: What common household items work great for upcycled bottle crafts?
Almost anything you have around the house can become a feature for upcycled bottle crafts. Think twine, rope, jute, washi tape, decorative napkins, fabric scraps, corks, buttons, or even old jewelry.
Clean and dry, then glue or decoupage these items onto the bottle, or use them to create lids, hangers, or pattern accents. For finishing touches, add gloss paints, marker accents, or a spray sealant. This approach keeps things budget-friendly crafts while letting your creativity shine.
Question: How can I use easy bottle painting ideas to create budget-friendly DIY home decor?
Turn a few bottles into a cohesive display by planning a color story that matches your space. Group bottles as centerpieces, arrange them on a tray, or use them as simple vases and candle holders with LED lights. Choose 2–3 techniques and repaint mismatched pieces to feel intentional rather than random. By repurposing and painting, you refresh a room without breaking the bank—perfect for budget-friendly crafts and DIY home decor projects.
Question: What finishes or sealants should I use to protect bottle art and make it last?
For longevity, seal your bottle art with a clear sealant designed for glass or acrylic surfaces. Spray sealants (water-based, UV-resistant) give a smooth, even finish and are easy to apply in thin coats. Brush-on options like polycrylic or Mod Podge work well for decoupage and textured surfaces. Apply 2–3 light coats, letting each dry fully, and finish with a final coat that matches your desired look (matte or gloss). Proper sealing helps your easy bottle painting ideas shine as DIY home decor pieces or gifts.
Related Topics
easy bottle painting
upcycled decor
budget-friendly crafts
beginner friendly
creative painting projects
DIY home decor
bottle painting techniques
vintage style
quick crafts
recycled materials
handmade gifts
seasonal decorations