
You can turn ordinary soda and beer can tabs into stylish jewelry, useful accessories, and eye-catching home decor with just a few simple tools and some basic supplies. Bold chains become bracelets, purses, lampshades, and even costume armor when you link tabs with rings, ribbon, or cord.
You really can make something practical or showy from what you already have.
Start small with a bracelet or keychain to get a feel for how tabs link and hold together. Once you’re confident, try scaling up to bags, chandeliers, or even wearable art.
Using pop tabs saves materials, costs little, and opens up dozens of creative project ideas you can finish in an afternoon or over a few evenings.
Key Takeaways
- You can make jewelry and accessories from can tabs with a few basic tools.
- Start with simple projects and build skills before attempting larger decor pieces.
- Can tab crafts are low-cost, eco-friendly, and highly customizable.
Getting Started with Can Tab Crafts

You’ll want to know which tab types work best, what tools and supplies to grab, and how to keep your workspace safe. With a few steps, you’ll be ready to make bracelets, lampshades, bags, and other projects from soda can tabs and pop tabs.
Types of Soda Can Tabs and Pop Tabs
Not all tabs are the same. Standard pull-tabs from soda and beer cans are thin, oval pieces with a central hole.
These work best for jewelry, chains, and small linked projects since they’re lightweight and easy to bend. Older-style pop tabs—full rings or larger shapes—are thicker and can add structure to bags, clutches, or decorative panels.
Check the edges for burrs and dents before using any tab. Toss any with sharp edges or rust.
If you’re planning to add color, aluminum tabs take paint and patina better than coated metal. Save similar-sized tabs together so your finished pieces look even.
For chainmail or armor-like projects, pick tabs with consistent hole size so jump rings and cord fit reliably.
Essential Tools and Materials
Gather a few simple tools and start a small kit before you dive in. You’ll need needle-nose pliers, flat pliers, metal snips or heavy-duty scissors, and a set of small jump rings.
A hole punch for leather or fabric helps when attaching tabs to cloth. Keep a ruler and marker handy for measuring layouts.
Materials to collect: cleaned soda can tabs, jump rings (4–8 mm), thin craft wire, strong thread or cord, and some thin fabric or backing if you’re making bags or lamp shades. Beads, acrylic paint, and clear sealant are great for decoration.
Use a small tray or magnetic dish to hold tiny pieces. Label containers so you can find matching tabs quickly.
Safety Tips for Can Tab Crafting
Protect your hands and eyes when working with metal tabs. Wear gloves to avoid cuts and safety glasses if you’re cutting or hammering tabs.
Use pliers instead of fingers to bend tabs or open jump rings. Work on a flat, well-lit surface and keep small parts away from kids and pets.
If you sand or file tabs, wear a dust mask so you don’t breathe in metal particles. Toss damaged or rusty tabs safely.
When using adhesives or paints, follow the manufacturer’s venting and drying instructions to avoid fumes.
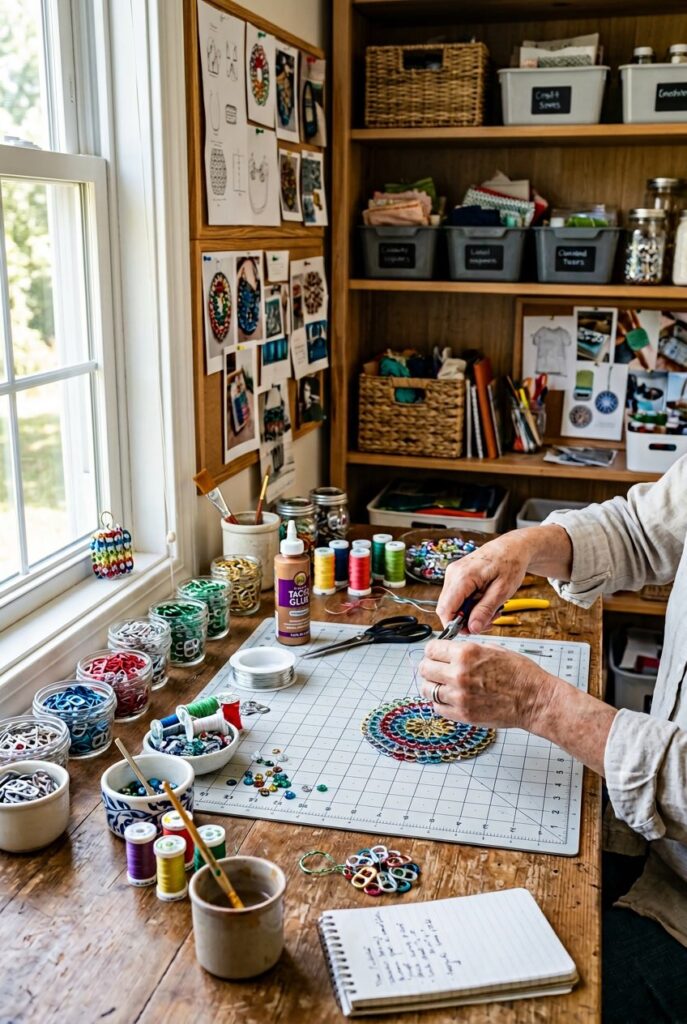
Jewelry and Wearable Can Tab Crafts

A pile of pop tabs can become practical, stylish pieces if you know a few tricks. Here are some ideas, step-by-step basics, and tips to help your creations last.
Pop Tab Bracelets
Link tabs side-by-side or stack them vertically to make a bracelet. For a simple woven bracelet, thread ribbon, embroidery floss, or thin leather cord through the two holes of each tab and tie knots or a clasp at the ends.
If you like a metal look, use jewelry wire or clear beading cord to bind tabs together. Twist small jump rings through tab holes to create flexible links.
You’ll need pop tabs, ribbon or cord, jump rings, pliers, scissors, and maybe beads or charms. Measure your wrist before joining tabs, leaving about half an inch for closure.
For a snug fit, overlap tabs just a bit so they lay flat and don’t pinch. Add a lobster clasp or tie a sliding knot for an adjustable finish.
Soda Tab Belt Making
A soda tab belt is basically a long strip of tabs joined like chainmail. Pick uniform tabs for a clean look or mix colors for a pattern.
Connect tabs by threading small rings, cord, or weaving ribbon through alternating holes so each tab overlaps the next. Measure your waist and plan how many tabs you’ll need.
Make a sample row of 5–10 tabs to check flexibility. For strength, use split rings or heavy-duty cord.
Tie reinforced knots and seal cord ends with glue. Finish with a sturdy buckle or sew the tab strip onto a fabric backing for comfort.
Trim rough edges and check the movement before wearing.
Pop Tab Necklaces
Turn a few tabs into a bold pendant or link dozens into a chain-style necklace. For a pendant, glue or wire-wrap a decorative tab to a bottle cap or charm and hang it on a chain or cord.
For a chain necklace, use jump rings or thin wire to interlock tab holes, alternating directions so the necklace drapes nicely. Remove any sharp burrs with a metal file.
Add beads or spacers to break up the metal and reduce rubbing on your skin. Use a jewelry clasp and measure for your preferred length.
If you want color, paint tabs with enamel or spray paint and seal with clear varnish.
Earrings and Rings from Soda Tabs
Make simple earrings by pairing two matching tabs, smoothing edges, and attaching ear wires with jump rings. Add beads or tiny charms between tabs for drop earrings.
Keep them light so they don’t pull on your earlobe—aluminum tabs are best. For rings, bend small tabs into bands and overlap the ends, or wrap wire around a tab to make a comfortable base.
File any rough spots and polish with a cloth. Cover wire joins with a tiny bead or dab of jewelry glue and let dry for a more finished look.
Bags, Accessories, and Chains

You can turn collected can tabs into sturdy purses, wallets, chains, and decorative straps. Simple joining methods, a strong base or lining, and the right thread or jump rings make your pieces last.
Pop Tab Purse and Wallet Ideas
Make a pop tab purse by linking tabs in rows and sewing them to a fabric lining. Use strong nylon thread or thin crochet yarn and stitch through the tab holes so the tabs lie flat.
For a small wallet, join two rectangles of tabs and add a fabric or vinyl lining, then sew a snap or zipper to keep coins secure. Choose tab spacing to control flexibility.
Tight rows make a rigid panel; staggered rows give a softer, chainmail-like drape. Add straps from woven tabs or attach leather or fabric handles for comfort.
Reinforce stress points with extra stitching or a small patch of fabric inside.
Soda Tab Chain and Keychains
Make a soda tab chain by connecting tabs end-to-end with small jump rings or by weaving them with thread. Open jump rings with pliers, thread through tab holes, and close rings firmly.
For a keychain, attach a short tab chain to a split ring and add a bead or charm for fun. You can make patterns by rotating tabs or mixing colored anodized tabs.
Keep chains short for keychains and longer for straps or belt accents. Test the ring closures and thread knots so the chain doesn’t pull apart under weight.
Chainmail Techniques for Accessories
Try chainmail techniques to make flexible panels from soda tabs for bracelets, belts, or lamp shades. Overlap edges and link through holes to form European or Japanese-style patterns.
A 2-in-2 pattern—two tabs linked to two others—creates strong, even fabric. Use pliers for precise ring closure.
A crochet hook or needle helps weave thread through tab holes for a softer edge. Line larger items with fabric to protect skin and hold shape.
For durability, choose stainless jump rings or reinforce with nylon thread at stress points.
Home Decor with Can Tabs

Cans tabs can become useful, attractive decor that fits a bunch of styles. These projects need basic tools and common materials, so you can start with just a small stash of tabs.
Soda Tab Lampshade and Pendant Lights
Make a lampshade by linking tabs with wire, yarn, or crochet stitches to form a shell around a lampshade frame. Measure the frame first and make a small sample strip to see how many tabs fit per row.
Use pliers to bend tabs flat where needed and join them with jump rings or fishing line for a cleaner look. For pendant lights, attach the tab shell to a metal or wooden ring and hang it from a cord kit.
Keep tabs at least 2–3 inches from the bulb if you use incandescent bulbs. LED bulbs run cooler and are safer, so they’re the best choice (and save energy).
Paint tabs before assembly if you want color; use spray paint designed for metal.
Tools and supplies:
- Needle-nose pliers, jump rings, wire, or crochet hook
- Shade frame or ring, light cord kit, LED bulb
- Optional: spray paint, clear sealant
Wall Art and Picture Frames
Add texture and shine to frames by gluing tabs around the edge. Lay the tabs face-up or alternate them to create a repeating pattern.
Apply strong adhesive like epoxy or hot glue and press each tab firmly for about 30 seconds. For larger wall art, arrange tabs on a painted canvas to form shapes or mosaics.
Start with a cheap canvas and sketch your design. Use a grid or template to keep spacing even.
Secure tabs with heavy-duty glue and spray a clear coat to keep the finish uniform. Silver tabs on a matte black background look pretty dramatic.
Smooth any sharp tab edges with a metal file before attaching them near high-traffic areas.
Soda Tab Chandeliers
Build a soda tab chandelier by creating multiple tiers of tab chains and hanging them from a central frame. Use a metal hoop for each tier and hang tab strands evenly around the hoop with jump rings.
Work from the top tier down to balance weight and shape. Pick a ceiling canopy and a rated light fixture base that can handle the finished weight.
Use LED bulbs or hidden socket strips to keep things cool and safe. Overlap strands or double them for each hook point if you want a fuller look.
Mix tab colors or add beads for variety.
Installation checklist:
- Sturdy frame or hoop, multiple jump rings, centered support
- Ceiling canopy rated for fixture weight, electrical kit, LED bulbs
- Even strand spacing, secure ceiling mount, optional paint or embellishments
Creative and Themed Can Tab Crafts

You can turn soda can tabs into wearable pieces, small sculptures, and seasonal decor. These ideas use simple links, basic tools, and a few extras like beads, ribbon, or wire.
Pop Tab Flowers and Ornaments
Pop tab flowers are fun for jewelry, fridge magnets, and hanging ornaments. Start by flattening tabs a bit with pliers, then overlap five or six tabs in a circle to make petals.
Secure the center with a rivet, jump ring, or a dab of strong glue. Add a button, bead, or small mirror to cover the join and finish the look.
For ornaments, thread a loop of ribbon or thin wire through a top tab. Paint a few tabs with acrylic paint or use metallic markers for contrast.
Glue felt or fabric to the back to protect surfaces. Use clear sealant if the ornament will hang outside or somewhere humid.
Materials list (basic):
- Pop tabs (5–8 per flower)
- Pliers, jump rings, rivets or glue
- Beads/buttons and ribbon
- Paint and sealant (optional)
Butterflies and Sculptures
You can build small butterfly shapes or bigger sculptures by linking tabs and adding wire frames. For a butterfly, arrange tabs as two wing pairs and join them at the center with a narrow wire body.
Bend and twist the wire to form antennae and attach the wings securely. It’s a bit fiddly, but you’ll get the hang of it after a few tries.
Larger sculptures need a lightweight armature—think wire, mesh, or even cardboard. Attach tabs with jump rings, or try sewing through the tab hole into fabric stretched over the frame.
Work in rows, overlapping tabs like scales for a textured look. At stress points, reinforce with extra wire or a dab of epoxy.
If you’re planning to display your piece for a while, a quick coat of clear lacquer helps cut down on tarnish. It’s worth the extra minute.
Tools and tips:
- Wear gloves if you’re bending heavy wire.
- Always test connections for movement before calling it done.
Holiday and Seasonal Crafts
Seasonal themes let you adapt pop tab crafts for holidays in no time. Make wreaths by linking tabs into rings and attaching them to a foam or wire base.
For Christmas, toss on tiny ornaments, bells, or a bit of red ribbon. For Halloween, paint tabs black and arrange them into a bat silhouette or string them into a spooky garland.
Create Easter eggs by covering a small foam egg with tabs layered like fish scales. In autumn, form leaf shapes and use gold or copper paint for that fall vibe.
For gift tags, glue two tabs together, punch a hole, and thread twine through. Write names on a small cardstock insert and glue it between the tabs.
Quick holiday idea checklist:
- Wreath: linked tabs + base + decorations
- Garland: string tabs with jump rings
- Gift tag: two tabs + twine + cardstock label
Upcycled and Functional Projects

These projects show how small metal pieces can turn into useful things for your home. You’ll see how to build a wind chime, make pen holders, and use tabs for quick fixes or organizing.
Bottle Cap Wind Chimes
Use can tabs and bottle caps to make a light, musical wind chime that shrugs off rust. Drill a small hole in each bottle cap and thread nylon cord or thin chain through a stack of caps, separating them with 1–2 tabs for space.
Tie a loop at the top so you can hang it from a hook or branch. Add beads, small bells, or painted tabs if you want to change up the sound or look.
Hang the chime where it’ll catch a gentle breeze—like a porch corner or near a window. If you’re after a cleaner sound, space the strands farther apart and use heavier caps at the bottom.
Seal painted metal with clear spray to keep colors bright.
Pen Holders and Organizers
Turn rows of linked tabs into a shell for a pen holder or desk organizer. Arrange tabs in a square or cylinder, then crochet or weave yarn through the holes to hold them firm.
Glue a round wooden base or a plastic lid inside the bottom so it doesn’t tip over. If you want a quicker version, tape two layers of tabs together and wrap sturdy fabric or felt around them to make compartments.
Use extra tabs as dividers for pens, scissors, or rulers. Label each section with a tag or a painted strip so you can grab what you need fast.
Practical Everyday Uses for Soda Can Tabs
Soda can tabs can fix small household headaches in a pinch. Slide a tab over a broken zipper pull and you’ve got a working zipper again.
Screw a tab onto the back of a picture frame to make a hanging hook—the two holes make it easy to mount with just one screw. Use tabs as closet helpers: slip one loop over a hanger hook and hang a second hanger from the other loop.
For cords, thread a charger cable through a tab and clip the tab to your desk edge with a binder clip. No more cables slipping off.
Advanced Techniques and Project Inspiration

You’ll pick up sturdy joining methods, design layouts, and ways to mix can tabs with other materials for bigger projects. There are steps for making wearable chainmail, ideas for large art pieces, and tips for combining tabs with fabric, beads, or lights.
Soda Can Tab Chainmail
Start by sorting tabs by shape and size. Standard pull-tabs from soda cans work best—flush tabs link cleanly.
Flatten sharp edges with a file or sandpaper so nothing snags. Use jump rings or small wire loops to connect tabs.
Link each tab so it overlaps like classic chainmail: two tabs through one, or try a 4-in-1 pattern for a tighter weave. For bracelets, weave ribbon or cord through the outer holes to keep it comfy.
Work in small panels first, maybe 4–6 inches square. Join panels with heavy thread, rivets, or larger rings at the seams.
Seal with a clear coat if you want it to resist water and tarnish. You’ll need pliers, a flat file, awl, and some heavy thread or thin wire.
Materials: soda can tabs, jump rings, ribbon, or a fabric backing. Try small pieces first before you go for armor or big garments.
Pop Tab Art Installations
If you want to go big, prep hundreds or thousands of pop tabs for a sculpture or wall piece. Plan your layout on paper or a computer.
Grid the design into panels so you don’t have to handle everything at once. Secure tabs to a backing—plywood, wire mesh, or clear acrylic all work.
Use small screws, rivets, or stitched anchors, depending on what you’re working with. For hanging panels, add a frame or reinforced edge so the weight spreads out.
Mix up tab orientations, paint some tabs, or add lights for visual effects. LED strings behind translucent panels can make the whole thing glow.
Label each panel as you go to keep the pattern lined up. Mounting hardware and total weight matter—use wall anchors that can handle it, and protect your walls with felt pads.
Take photos along the way to track alignment and lighting choices. It helps, trust me.
Combining Can Tabs with Other Materials
Pair can tabs with fabric, beads, leather, or even recycled bottle caps to change up the look and function. Sew tabs onto heavy fabric or canvas for purses, belts, or wall hangings.
Use a backing strip to keep stitches from tearing. Mix tabs with beads or chain for jewelry, or thread elastic cord through tab holes for stretch bracelets.
Leather straps attached with rivets make belts or bag handles last longer. Thread micro-LEDs through tab holes or mount tabs on clear panels with LEDs behind for lighting.
For mixed-media art, glue or rivet tabs to wood frames, then add paint, yarn, or metal leaf for contrast. Always test attachments on a scrap first to make sure they hold up.
Match your hardware—use corrosion-resistant jump rings and rivets if your piece might get wet.
Frequently Asked Questions

You can turn pop tabs into jewelry, home decor, and wearable items with just pliers, jump rings, ribbon, and thread. Most projects need only tabs and basic fasteners, though a few call for sewing or small hardware for structure.
What are some creative ways to reuse soda can tabs in DIY projects?
Make bracelets, necklaces, and earrings by linking tabs into chains.
Craft curtains, chandeliers, and lampshades by sewing or wiring tabs onto fabric or rings.
Use tabs as decorative scales for bags, clutches, or costume armor by overlapping and connecting them.
How can I make jewelry out of aluminum can tabs?
Clean and flatten tabs if needed, then link them with jump rings or ribbon.
Add beads, charms, or chain for variety, and finish with clasps for necklaces or bracelets.
For earrings, attach a single tab to an ear hook or use small chains to dangle multiple tabs.
What materials are needed to start crafting with pop can tabs?
Gather pop tabs, jump rings, small pliers, needle-nose pliers, and wire cutters.
Keep ribbon, leather cord, sewing thread, and strong glue on hand for non-metal joins.
Optional items: beads, clasps, fabric base, and small screws or rivets for sturdy builds.
Are there any simple can tab craft projects for beginners?
Yes. Try a pop tab bracelet by weaving ribbon through linked tabs.
Make a keychain by threading a tab onto a split ring and adding beads.
Create a simple pendant by gluing a tab to a small piece of fabric or a bead backing.
What safety precautions should I take when working with metal can tabs?
Wear gloves to avoid sharp edges and protect your fingers when bending tabs.
Use eye protection when cutting or hammering metal pieces.
File sharp burrs smooth and keep children supervised during projects.
How can I connect can tabs together for creating larger craft pieces?
Grab some jump rings or tiny split rings, and link the tabs through their holes. That gives you flexible chains—super handy for jewelry or drapey projects.
If you want something sturdier, sew the tabs onto a fabric base. Use strong thread or even small rivets for extra hold.
Another way? Twist short bits of wire through the holes. Or, if you’re feeling precise, go for small bolts and nuts to lock everything down tight.