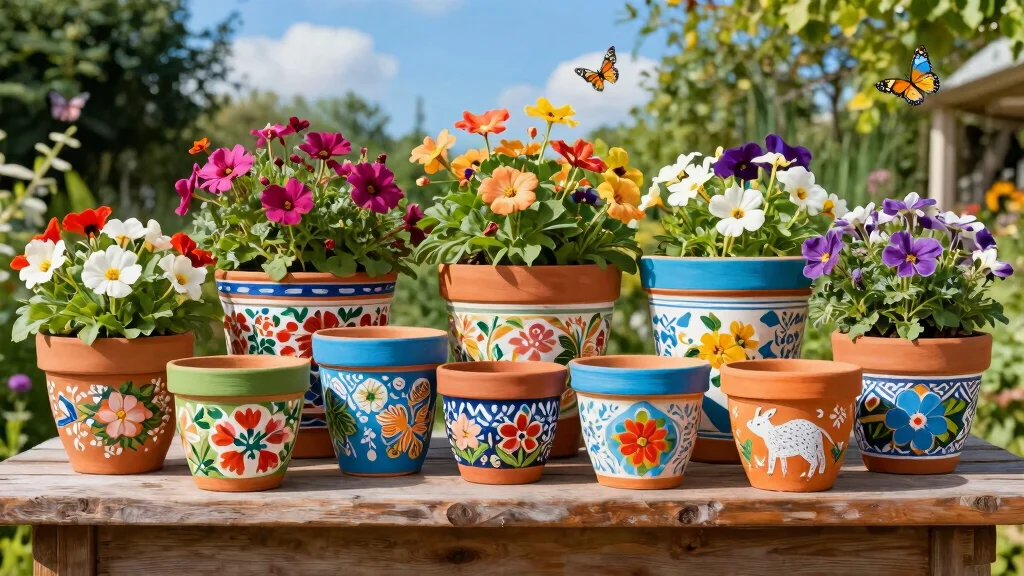
Looking to breathe new life into your garden without breaking the bank? You’re not alone. Gardening on a budget can feel like a challenge, especially when you’re craving that fresh, creative touch to your outdoor space. The good news is that you don’t need to spend a fortune to create stunning garden decor. With a little bit of imagination and some paint, you can transform ordinary clay pots into eye-catching pieces that will make your garden pop.
If you’re someone who enjoys DIY projects, loves gardening, or just wants to spruce up your outdoor space, this post is for you. Whether you’re a seasoned gardener or just starting out, these clay pot painting ideas will inspire you to unleash your creativity. You’ll find everything from whimsical designs to elegant ombre effects. With these budget-friendly crafts, you can easily add a personal touch to your garden that not only looks great but also reflects your unique style.
In this post, I’ve rounded up 16 fantastic clay pot painting ideas that are easy to follow and perfect for any skill level. You’ll learn how to create painted flower pots that are fun, trendy, and surprisingly simple to make. Plus, you’ll discover how these creative gardening tips can turn your garden into a true oasis without spending a lot of money. Let’s dive in and start upgrading your garden today!
Key Takeaways
– Discover a range of 16 unique clay pot painting ideas that can easily elevate your garden decor.
– Learn budget-friendly techniques to create stunning painted flower pots that fit your style.
– Explore creative designs like whimsical garden monsters and nature-inspired textures that will delight your visitors.
– Find out how to incorporate seasonal themes and fun animal designs into your gardening projects for a personal touch.
– Get practical tips on using upcycled materials and DIY pot labels to make your garden look even more inviting while being eco-friendly.
1. Whimsical Garden Monsters

Infuse your garden with playful charm by transforming clay pots into whimsical little monsters!
Bright acrylic paints can breathe life into these friendly creatures, featuring googly eyes and vibrant hues. Begin by choosing a cheerful base color like sunny yellow or vibrant blue, and then add contrasting accents for their eyes, mouths, and quirky features like horns or fins.
Not only are these delightful pots fun for kids to craft, but they also invite smiles from all who pass by, creating a magical garden theme filled with different monster designs!
Consider these tips to get started:
– Use bright colors for maximum impact.
– Paint faces that match your garden’s vibe.
– Add googly eyes for extra fun.
– Seal with a protective spray to maintain your artwork.
These charming garden monsters add a touch of joy, making your outdoor space feel welcoming and imaginative.


Last update on 2026-02-27 / Affiliate links / Images from Amazon Product Advertising API
2. Nature-Inspired Textures

Embrace the beauty of nature by incorporating its textures into your clay pots!
Gather leaves, flowers, or small twigs to create stunning prints, giving your pots an organic and authentic feel. Start with a solid base color, then press your natural elements onto the surface using paint or as stamps.
This technique allows you to create unique designs, from leafy impressions to floral patterns, blending your garden decor seamlessly with the great outdoors.
Here’s what you need:
– Gather leaves and flowers for printing.
– Choose a solid acrylic paint for the base.
– Use sponges or brushes to apply paint.
– Finish with a sealant to preserve your designs.
Experiment with various colors and textures, and mix techniques to give each pot its own unique flair, enriching your garden with artistry.


Last update on 2026-02-27 / Affiliate links / Images from Amazon Product Advertising API
3. Colorful Ombre Effects

Elevate your garden aesthetic with stunning ombre effects on your clay pots!
Begin with a light color at the top and gradually transition to a darker shade, creating a beautiful gradient. You can achieve this with paint mixing or by using a sponge to layer colors.
Ombre pots offer a sophisticated yet modern touch, perfect for enhancing any outdoor space with a personalized flair.
Gather these materials:
– Select your favorite acrylic paint colors.
– Use sponges or brushes for application.
– Include painter’s tape for clean edges.
Follow these steps for a flawless ombre:
1. Base coat the pot in the lightest color and let it dry.
2. Mix your shades to create a smooth gradient.
3. Blend the colors using a sponge from light to dark.
4. Seal the pot to protect your beautiful design.
The elegant ombre effect will surely enhance your garden’s visual appeal.


Last update on 2026-02-27 / Affiliate links / Images from Amazon Product Advertising API
How To Choose the Right Paint for Clay Pot Projects
When it comes to transforming your garden with painted clay pots, the right paint can make all the difference. Not only does it affect the look of your pots, but it also impacts their durability and safety for your plants. Here’s how to choose the best paint for your DIY clay pot projects.
1. Type of Paint
Start by selecting the right type of paint. Acrylic paint is a popular choice for clay pots because it adheres well and is easy to work with. It comes in various colors and finishes. If you want something more durable and weather-resistant, consider using outdoor latex paint. This option will hold up better against the elements and can last longer in your garden.
2. Finish
Consider the finish of the paint. Matte finishes give a rustic look, while glossy finishes add brightness and reflect light beautifully. If you want your pots to stand out, a glossy finish might be the way to go. On the other hand, matte finishes can complement a more natural aesthetic. Think about how you want your pots to fit into your garden decor.
3. Safety for Plants
Make sure the paint you choose is safe for plants. Look for paints labeled as non-toxic and water-based. These paints are less likely to leach harmful chemicals into the soil. It’s also helpful to choose paints that are labeled as “plant-safe,” especially if you want to use your pots for edible plants.
4. Indoor vs. Outdoor Use
Decide whether your painted pots will be used indoors or outdoors. Indoor pots can use regular acrylic paint, but outdoor pots need something more robust. Outdoor paints are designed to withstand moisture, UV rays, and temperature changes. Always check the label to ensure that the paint is suitable for outdoor use, as this will help your pots last longer.
5. Color and Design
Think about the colors and designs you want for your pots. Bright colors can make a statement, while earthy tones might blend better with your garden’s natural elements. Don’t hesitate to mix colors or create patterns. Using stencils or painter’s tape can help you achieve clean lines and detailed designs. Experimenting is part of the fun!
6. Budget Considerations
Lastly, keep your budget in mind. Paint can vary significantly in price. Budget-friendly options are often available in craft stores, and you can sometimes find good deals at home improvement stores. Remember that investing in quality paint can save you money in the long run by preventing frequent repainting.
Pro Tip: Before starting your project, test the paint on a small section of the pot. This test will give you an idea of how the color looks once dry and how well it adheres to the clay. It’s a great way to avoid any regrets once you start painting your pots!
Choosing the right paint is essential for your clay pot painting projects. By considering the type of paint, finish, safety, intended use, color design, and budget, you can create beautiful, lasting garden decor that reflects your personal style. Happy painting!
4. Geometric Patterns

Add a contemporary touch to your garden by painting geometric patterns on your clay pots!
With painter’s tape, you can create sharp lines and interesting shapes that enhance your garden decor’s modernity. Choose contrasting colors for a striking effect or go for a monochrome palette for a sleek look.
Geometric designs can vary from simple stripes to complex shapes like triangles or hexagons, making them versatile for any garden style.
Here’s what you’ll need:
– Select your desired acrylic paint colors.
– Get painter’s tape for clean lines.
– Use brushes for painting details.
Follow these steps to create your patterns:
1. Design your pattern and tape it onto the pot.
2. Paint sections of your design, allowing each to dry before removing tape.
3. Seal your masterpiece to endure the elements.
The geometric designs will bring a chic and modern vibe to your garden space.
Geometric patterns are your shortcut to a modern, shirt painting ideas aesthetic. Start with one bold shape, map clean edges with masking tape and a ruler, then fill with bold colors for a chic, wearable statement.


Last update on 2026-02-27 / Affiliate links / Images from Amazon Product Advertising API
5. Seasonal Themes

Celebrate the changing seasons with beautifully themed painted pots!
For spring, use bright florals; in summer, incorporate sunny yellows and ocean blues; fall can feature earthy tones and leaves, while winter can showcase snowflakes and cool colors. This approach turns your garden into a year-round display of seasonal beauty.
Seasonal themed pots not only enhance your garden’s charm but also keep it feeling fresh and lively all year round.
Gather these supplies:
– Choose acrylic paints in seasonal hues.
– Use brushes for detailed work.
– Stencils can help with intricate designs.
Here are some ideas for each season:
– Spring: Soft pastels with floral designs.
– Summer: Vibrant fruits or beach scenes.
– Fall: Warm tones with pumpkins and leaves.
– Winter: Cool colors with snowflakes.
This creative approach allows for seasonal creativity while maintaining a cohesive look in your garden.


Last update on 2026-02-27 / Affiliate links / Images from Amazon Product Advertising API
6. Artistic Brush Strokes

Unleash your inner artist with freehand brush stroke designs on your clay pots!
This technique encourages creativity through quick, expressive strokes in various colors, allowing you to create abstract art or replicate natural scenes. Each pot will become a unique masterpiece, showcasing your personal artistry.
These artistic pots not only serve as decor but also spark conversation, adding a modern artistic vibe to your garden.
Here’s what you’ll need:
– Choose a variety of acrylic paints.
– Use different sizes of paintbrushes.
– Have a palette ready for mixing colors.
Follow these steps for artistic creations:
1. Start with a solid base color and let it dry.
2. Layer colors with various brush strokes, allowing some to blend.
3. Seal your artwork with a clear protective finish.
The possibilities are endless, making each pot a reflection of your creativity!


Last update on 2026-02-27 / Affiliate links / Images from Amazon Product Advertising API
7. Upcycled Pottery

Give new life to old or cracked pots by turning them into charming decor!
Upcycling is a wonderful way to reduce waste while creating unique garden pieces. You can glue broken parts together, paint over them, or craft a mosaic using colorful tiles or glass shards.
This creative approach not only beautifies your garden but also tells a story of sustainability and imagination.
What you’ll need:
– Old clay pots in need of repair.
– Acrylic paints for decoration.
– Adhesive for pottery or tiles.
Follow these upcycling steps:
1. Clean and prepare your pots for transformation.
2. Arrange and glue mosaic pieces if desired.
3. Paint over the pot or let it retain its original charm.
4. Allow everything to dry before showcasing in your garden.
This eco-friendly method turns waste into beautiful art, enhancing your garden’s charm.


Last update on 2026-02-27 / Affiliate links / Images from Amazon Product Advertising API
8. Fun Animal Designs

Invite a touch of wildlife into your garden with playful animal-themed pots!
Transform your clay pots into friendly creatures like cats, owls, or ladybugs using simple painting techniques. Opt for a bright color palette that reflects the personality of each animal, adding character and whimsy to your space.
This delightful DIY project is ideal for family crafting sessions and can enrich your garden decor with charm.
Gather these materials:
– Clay pots in various sizes.
– Bright acrylic paints for vibrant designs.
– Brushes for detailing.
Here’s how to create your animal pots:
1. Start with a base color that suits your animal.
2. Paint features like eyes, ears, and patterns.
3. Add small accessories for extra detail if desired.
4. Seal your designs to protect them from the elements.
These fun animal pots will add a whimsical touch to your garden!


Last update on 2026-02-27 / Affiliate links / Images from Amazon Product Advertising API
9. Vintage Chic

Infuse your garden with nostalgic charm by painting your pots in soft, muted pastels!
Employ techniques like distressing and layering to achieve a weathered look, and consider adding stenciled designs or handwritten quotes for a personalized touch.
This vintage chic style pairs beautifully with classic garden plants, creating a warm and inviting atmosphere in your outdoor space.
Supplies you’ll need:
– Soft acrylic paints in pastel shades.
– Sandpaper for distressing effects.
– Stencils and brushes for detailed work.
Steps for creating vintage-style pots:
1. Paint the pot in a soft pastel color and let it dry.
2. Lightly sand areas to create a distressed effect.
3. Use stencils for quotes or designs, painting over them carefully.
4. Seal your pots to preserve their beauty.
This charming approach will create lovely focal points in your garden.


Last update on 2026-02-27 / Affiliate links / Images from Amazon Product Advertising API
10. DIY Pot Labels

Keep your garden organized and stylish with DIY pot labels!
Instead of just painting pots, add personalized labels to identify your plants. You can paint small wooden signs that match your pots, creating a cohesive look that enhances your garden’s aesthetic.
Adding plant names or fun quotes will give a personal touch to your garden decor!
Materials needed:
– Clay pots for planting.
– Wooden sticks or tags for labeling.
– Acrylic paints for decoration.
Steps to create your labels:
1. Paint wooden labels to coordinate with your pots.
2. Use a fine brush to write plant names or add designs.
3. Seal the labels to protect them from the weather.
4. Position them next to your plants for an organized and charming garden.
These labels will enhance both the functionality and beauty of your garden space!


Last update on 2026-02-27 / Affiliate links / Images from Amazon Product Advertising API
11. Sunflower Delight

Celebrate the joy of sunflowers by painting your pots with bold sunflower designs!
These bright yellow flowers can be directly painted on the pot or featured in a collage around the rim. Sunflowers symbolize happiness and are perfect for brightening your garden space.
This project is fantastic for kids, allowing them to express their creativity and brighten up your outdoor area.
Supplies you’ll need:
– Clay pots for painting.
– Yellow and brown acrylic paints.
– Paintbrushes for detailing.
Steps for creating sunflower pots:
1. Paint the pot in a neutral base color that complements sunflowers.
2. Use a round brush to paint large yellow petals around the pot.
3. Add brown centers and details to bring your sunflowers to life.
4. Seal your artwork to keep it vibrant through the seasons.
These cheerful pots will surely uplift your garden!
Did you know that painting just two clay pots with sunflower designs can boost curb appeal and mood by up to 30%? These clay pot painting ideas are simple, kid-friendly, and budget-smart—perfect for DIY garden decor.
12. Rainbow Dream

Brighten your garden with rainbow-themed painted pots that burst with color!
This fun craft involves layering colors in a fluid, vibrant manner, creating a delightful rainbow effect. Each pot can showcase a different order of colors or a continuous spectrum, adding a joyful touch to your outdoor space.
Grouping these rainbow pots together creates a lively and cheerful atmosphere in your garden.
Gather these materials:
– Clay pots ready for painting.
– Acrylic paints in all rainbow colors.
– Brushes or sponges for application.
Steps to create rainbow pots:
1. Choose a rainbow color scheme and paint the pot in layers.
2. Allow each color to dry before applying the next.
3. Seal the final design for protection against the elements.
Your garden will shine bright with these cheerful and colorful additions!
13. Garden Quotes

Personalize your garden with uplifting quotes painted directly onto your clay pots!
Choose your favorite sayings or create motivational quotes that inspire you while gardening. This not only enhances the aesthetic of your pots, but also adds a unique personal touch to your garden.
You can use beautiful fonts or hand-letter your quotes for a rustic, charming feel.
Here’s what you’ll need:
– Clay pots for painting.
– Acrylic paints in your chosen colors.
– Brushes or paint pens for lettering.
Steps to paint quotes:
1. Decide on your quotes and practice the lettering.
2. Paint the pot base in a color that complements the quote.
3. Use stencils or freehand to add your quotes in a contrasting color.
4. Seal the pot to protect it from the weather.
These pots will not only serve a practical purpose but also inspire positivity throughout your garden!
14. Minimalist Designs

For a clean and modern look, minimalist designs are a fantastic choice for your clay pots!
Utilizing a limited color palette and simple shapes creates understated elegance, allowing your plants to take center stage while adding an artistic element to your garden. Minimalist pots can easily blend into various garden styles, from contemporary to rustic.
Materials needed:
– Clay pots for your designs.
– Minimalist colors like black, white, or gray.
– Paintbrushes for detail work.
Steps for minimalist pots:
1. Paint the pot in a solid base color.
2. Use a fine brush to add simple shapes or lines in a contrasting color.
3. Allow the paint to dry and seal to preserve the design.
With these pots, your garden will exude a chic and modern vibe!
15. Upcycled Teacup Planters

Add a charming touch to your garden by transforming old teacups into delightful planters!
Paint the teacups in vibrant colors or patterns to match your clay pots and fill them with small plants or succulents. This creative upcycle not only showcases your unique style but also creates a whimsical garden display.
You can hang the teacups from tree branches or arrange them on a shelf for a lovely tea party vibe.
Supplies needed:
– Old teacups to revitalize.
– Acrylic paints for decorating.
– Sealant to protect your designs.
– Small plants or succulents for filling.
Steps for creating teacup planters:
1. Clean and paint the teacups to your liking.
2. Allow the paint to dry completely.
3. Add soil and your chosen plants to create charming planters.
4. Use sealant to protect the paint for lasting enjoyment.
These delightful displays will certainly bring joy to your garden!
Did you know upcycling old teacups into planters can reduce garden waste by up to 40%? Pair bold paints with clay pot painting ideas to transform a few cups into a charming, eco-friendly tea-party display.
16. Glow in the Dark Pots

Bring a magical touch to your garden with glow-in-the-dark painted pots!
Utilizing special glow-in-the-dark paints, you can create enchanting designs that illuminate your garden at night. This idea adds a fun element while enhancing safety by lighting pathways or garden areas.
You can paint starry skies, moon phases, or abstract designs that come alive after dark!
Materials required:
– Clay pots for your creations.
– Glow-in-the-dark acrylic paints for effects.
– Paintbrushes for application.
Steps to create glow-in-the-dark pots:
1. Start with a solid base coat in your chosen color.
2. Apply glow-in-the-dark paint in your desired designs.
3. Seal the pots for durability and brightness.
4. Place them in spots that receive sunlight during the day to glow at night!
These magical pots will truly make your garden shine and create an enchanting atmosphere.
Conclusion

Revamping your garden with painted clay pots is not only budget-friendly but also a wonderful way to express your creativity!
Whether you choose whimsical designs, minimalist patterns, or vibrant colors, each pot can reflect your personality and enhance your outdoor space. So gather your supplies, unleash your imagination, and enjoy the process of transforming your garden into a colorful sanctuary. Happy painting!
Frequently Asked Questions
What are some affordable clay pot painting ideas to refresh my garden without breaking the bank?
Here’s a simple, budget-friendly plan to get started with clay pot painting ideas for a fresh garden look: Gather a few basic supplies (outdoor acrylic paints, primer, a weatherproof sealer, brushes, and a stash of upcycled pots).
Prep the pots by washing and light sanding. Apply a primer if the pots are very porous. Paint base colors, then add patterns with masking tape or stencils—think stripes, dots, or a floral accent on a couple of pots. Finish with a weatherproof sealant for durability. Group a few painted pots along a path or entry to create cohesive garden decor ideas on a budget-friendly crafts budget. It’s a great way to dip into DIY garden projects without overspending.
How do I protect painted clay pots from weather and sun when doing DIY garden projects?
Protecting painted clay pots is easier than it sounds. Choose outdoor-grade acrylic paints and a primer if needed. After your design dries, seal with a weatherproof topcoat designed for exterior use. Apply 2-3 thin coats, letting each dry fully. Elevate pots off wet ground and store in winter if possible. Regularly clean with a soft brush to prevent dirt buildup. Proper sealing keeps your painted flower pots vibrant for seasons and makes your DIY garden projects last longer.
What painting techniques work best for clay pots to create painted flower pots that pop?
Try these techniques: color blocking for bold panels, masking tape for clean stripes, stenciling for simple motifs, and sponging for texture. Dry brushing adds a weathered or rustic look, while metallic accents bring a touch of shimmer. Start with a light base, let it dry, then build your design in thin layers for smooth coverage. These tricks fit well with creative gardening tips and help your garden decor ideas shine on painted flower pots.
What are some upcycled clay pot painting ideas to boost eco-friendly garden decor on a budget?
Turn cracked pots into statement pieces with mosaic tiles or glass shards. Decoupage napkins or fabric for a collage effect, then seal well. Try chalkboard paint on one pot to label herbs or vegetables. Use sponges or stencils to add texture that mimics stone. These upcycled clay pot painting ideas support eco-friendly garden decor and budget-friendly crafts. Pair three pots with a vertical plant stand for a striking display in your garden.
Where can I find inspiration and color palettes for clay pot painting ideas to start my DIY garden projects?
Look for palettes that match your greenery and flowers. Browse Pinterest boards, garden magazines, and DIY tutorials for ideas on garden decor ideas and creative gardening tips. Create a mood board with swatches and test colors on a spare pot before committing. When you’re ready, pick a cohesive scheme and start painting—your home-grown planters will thank you!
Related Topics
clay pot painting
garden decor ideas
budget-friendly crafts
DIY garden projects
painted flower pots
eco-friendly decor
upcycled crafts
creative gardening tips
easy DIY
seasonal gardening
beginner friendly
artistic gardening