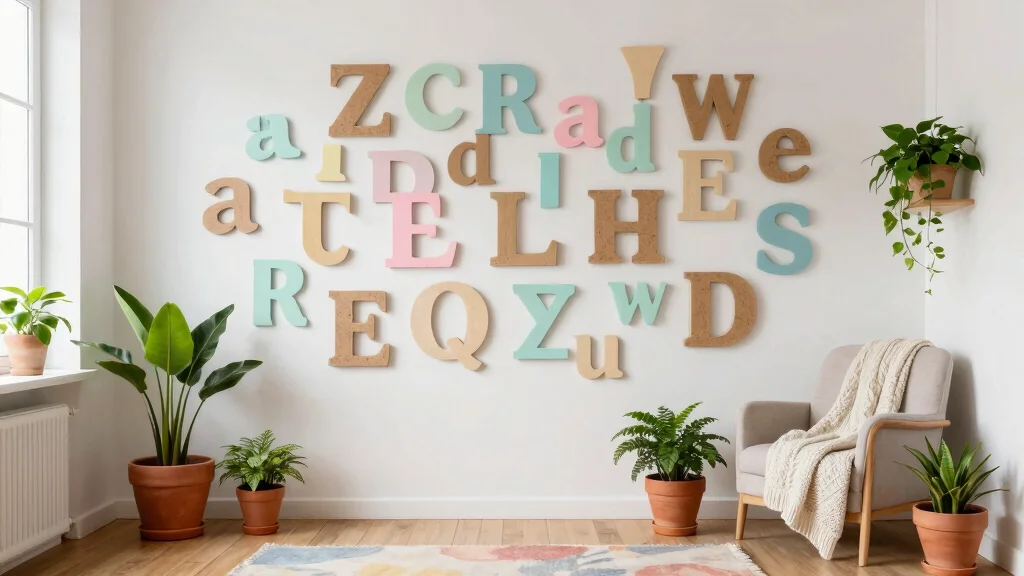
Are you looking to add a personal touch to your home decor? If so, you’re in for a treat! This post is all about 3D letter decoration ideas that are not only easy but also eco-friendly. With the growing trend of sustainable crafting, many people are searching for ways to repurpose materials and create beautiful items for their living spaces. We’ve compiled a list of ten creative DIY projects that will inspire you to craft unique wall accents using letters.
If you love hands-on projects that add character to your home, this guide is perfect for you. Whether you’re an experienced DIYer or just starting out, these ideas will spark your creativity and help you design one-of-a-kind pieces. You’ll find everything from upcycled wooden letters to seasonal decorations that will make your space feel warm and inviting.
Get ready to discover ten fun and innovative 3D letter decoration ideas. Each project is designed to be easy and enjoyable, allowing you to create pieces that reflect your personality and style. By the time you finish reading, you’ll have the inspiration you need to bring your walls to life!
Key Takeaways
– Diverse Projects: This post includes ten unique 3D letter decoration ideas, each offering different materials and techniques for your DIY home decor.
– Eco-Friendly Focus: Many projects utilize upcycled or natural materials, making them perfect for environmentally conscious crafters.
– Easy to Follow: Each idea is designed to be easy and accessible, ensuring that even beginners can create stunning wall art.
– Creative Expression: These projects allow you to express your personality and style, making your home feel more inviting and personalized.
– Seasonal Options: Some ideas, like seasonal letters, allow you to refresh your decor throughout the year, keeping your space dynamic and interesting.
1. Upcycled Wooden Letter Art

Transform your space with upcycled wooden letter art that breathes new life into old materials! Combining rustic wood with personalized letters creates a warm, inviting atmosphere that adds character to any room. You can craft these letters from leftover wood scraps or pallets, ensuring that each piece reflects your unique style and personality. Consider using eco-friendly paints or natural wood stains to enhance the wood’s beauty while preserving its organic feel.
To implement this idea, begin by cutting the wood into your preferred letter shapes and sanding them for a smooth finish. Secure the letters to the wall with nails or strong adhesive, mixing different sizes and colors to create an eye-catching display. This project not only showcases your creativity but also connects you to sustainable practices.
– Pair painted letters with natural wood accents for contrast.
– Install letters at varying heights for a dynamic look.
– Use stencils to create intricate designs on the letters.
This charming decor idea enhances your space with a touch of nature while celebrating your individual taste. The warmth of wood adds a cozy touch that resonates throughout your home.
Fun fact: upcycling wooden scraps into 3d letter art fits eco-friendly 3d letter decoration ideas, cutting waste by up to 60% on DIY wall accents. With a touch of eco-friendly paint, each piece becomes a personalized statement that’s stylish and sustainable.


Last update on 2026-02-28 / Affiliate links / Images from Amazon Product Advertising API
2. Fabric-Covered Letter Decor

For a cozy and plush wall accent, fabric-covered letters are a delightful choice! This approach adds texture and warmth, making your decor feel more inviting. By using fabric scraps or old clothes, you can create stylish letters that resonate with your room’s color palette. Select patterns that harmonize with your existing decor for a cohesive and polished look.
To get started, cut your fabric into manageable pieces and wrap them around cardboard or wooden letters, securing them with glue. Consider embellishing with buttons, lace, or embroidery to infuse your personality into the design. Hang these letters using adhesive strips or nails for an easy installation that brings your walls to life.
– Use a mix of fabrics to create visual interest.
– Incorporate personal touches like initials or favorite quotes.
– Opt for fabric that complements your existing decor colors.
These fabric letters not only serve as decorative pieces but also highlight your creativity, adding a unique charm to any space.


Last update on 2026-02-28 / Affiliate links / Images from Amazon Product Advertising API
3. Paper Mache Letters

Dive into creativity with paper mache letters that are both fun to make and visually striking! This classic craft allows you to repurpose scrap paper and old newspapers, giving them a new life as decorative art. By inflating a balloon or using a cardboard mold, you can shape your letters in any style you desire, making them truly unique.
Begin by tearing paper into strips and mixing water with glue to create a paste. Apply the strips to your mold, and once dry, paint your letters in vibrant colors or intriguing designs. These lightweight creations can be easily hung on walls or displayed on shelves, adding a playful touch to your decor.
– Create bold colors using acrylic paint for a striking finish.
– Use multiple layers for added strength and durability.
– Experiment with various shapes and sizes for diversity.
The texture of paper mache offers a one-of-a-kind look that enhances your space with artistic flair and whimsy.


Last update on 2026-02-28 / Affiliate links / Images from Amazon Product Advertising API
How To Choose the Right 3D Letter Decoration Ideas
When it comes to choosing 3D letter decoration ideas for your DIY home decor, it’s essential to consider a few key factors. Your selection can greatly impact the overall look and feel of your space. Here are some important criteria to keep in mind:
1. Size Matters
Think about where you want to place your letters. Measure the space on your wall to determine how big your letters should be. For small spaces, opt for smaller letters that won’t overwhelm the area. Large letters can make a bold statement in bigger rooms. A general guideline is to keep your letters at least 1/3 the height of the wall where they will hang for a balanced look.
2. Material Choice
The material you choose will affect both the appearance and durability of your letters. Options include wood, cardboard, fabric, or even metal. Wooden letters offer a rustic feel, while cardboard is lightweight and easy to paint. Fabric-covered letters can add texture and warmth to your decor. Think about your theme and how each material fits into your overall design.
3. Color Coordination
Consider the color palette of your room. Choose colors that complement or contrast nicely with your existing decor. Neutral colors like white, gray, or beige can blend well with many themes. Bright colors can add a pop of fun! You might also think about using wall paint or spray paint to customize your letters to match your furnishings.
4. Style and Theme
What is the style of your space? Modern, vintage, or rustic? Your 3D letters should reflect the overall theme of your home decor. For instance, if your style is farmhouse, wooden letters painted in soft pastels can work wonderfully. If you lean towards a more contemporary style, sleek metal letters might be the best choice.
5. Purpose and Message
Decide what message or words you want to display. Are they initials, inspirational words, or fun phrases? Understanding the purpose of your letters will guide your design choices. If you want to spell out a motivational quote, consider using a font that’s clear and legible from a distance.
6. Budget Considerations
Your budget will play a significant role in your selection. Some materials and styles can be more expensive than others. For example, wooden letters can be pricier than cardboard options. Set a budget before you start shopping to help narrow your choices. You can also save money by upcycling materials you already have.
Pro Tip: Always start with a vision board! Collect images of styles, colors, and materials you like. This will help you see how your ideas mesh together, making it easier to select the perfect 3D letter decor for your space. Creating mock-ups in your chosen color palette can guide your decisions too!
Selecting the right 3D letter decoration ideas takes careful thought about size, material, color, style, purpose, and budget. By thoughtfully considering these factors, you can create stunning DIY wall accents that truly reflect your personality and enhance your home. Happy crafting!
4. Natural Element Letters

Infuse your decor with the beauty of nature by crafting letters from natural elements! This approach draws inspiration from the outdoors, creating a rustic charm that complements various design styles, especially farmhouse and bohemian aesthetics. Gather materials like twigs, pinecones, and moss to build letters that resonate with your love for nature.
Start by constructing a wire frame or using sturdy cardboard as a base, then glue your natural materials onto the letters. Once complete, hang them on your wall or display on a shelf for a stunning centerpiece. The earthy textures and colors of these letters will elevate your space and create a warm, inviting atmosphere.
– Choose lightweight materials to avoid wall damage.
– Incorporate seasonal elements like flowers or leaves for variety.
– Arrange items to create depth and visual interest.
This delightful project showcases your creativity while celebrating the beauty found in the natural world.


Last update on 2026-02-28 / Affiliate links / Images from Amazon Product Advertising API
5. Cardboard Letters with a Twist

Discover the potential of cardboard letters to create stunning, personalized decor! This versatile material allows for creativity and experimentation, transforming simple shapes into eye-catching accents. By cutting out letters from cardboard and layering them, you can achieve a three-dimensional effect that adds depth to your walls.
Paint your letters or wrap them in colorful paper or fabric, giving them a fresh, vibrant look. For an extra twist, use a hot glue gun to attach fun embellishments like beads or small toys that represent your hobbies and interests. These custom letters are perfect for hanging or displaying on shelves, making them a fun project for all ages.
– Layer letters for added dimension and visual impact.
– Incorporate personal items to reflect your personality.
– Experiment with different finishes for a unique look.
This craft not only allows for self-expression but also creates a playful atmosphere, bringing joy and creativity to your home.


Last update on 2026-02-28 / Affiliate links / Images from Amazon Product Advertising API
6. Magnetic Letters for a Fun Twist

Bring an interactive element to your decor with magnetic letters that spark creativity! By using lightweight materials like foam or cardboard, you can easily cut out letters and attach magnetic strips to the back. This allows you to place them on any magnetic surface, such as your refrigerator or a magnetic board, adding a playful touch to your space.
Customize your letters by painting or decorating them to match your style. This craft is perfect for families, as kids can enjoy rearranging the letters to form words or names, making it a fun and educational experience. Enhance your kitchen or playroom with these engaging accents!
– Use bright colors for a cheerful appearance.
– Consider chalkboard paint for added versatility.
– Create letters that spell out family names or fun phrases.
Magnetic letters offer a whimsical way to incorporate art and interaction into your home, making decor a playful adventure.
Kids love rearranging the letters, turning meals into a tiny design studio. These magnetic 3d letter decoration ideas make learning colors and spelling fun on any magnetic surface. Pro tip: reuse lightweight foam to keep it eco-friendly and mess-free.


Last update on 2026-02-28 / Affiliate links / Images from Amazon Product Advertising API
7. Shadow Box Letters

Add depth and intrigue to your decor with shadow box letters that combine art and functionality! Creating a shadow box involves using a deep frame filled with decorative items like small plants, photographs, or lights. Insert your letters into the box, surrounded by these captivating elements to create a unique focal point.
Whether you spell out a name, a favorite quote, or an inspiring word, this project allows you to tell a story with your decor. Position your shadow box on a shelf or hang it on the wall to instantly elevate your space and create visual interest.
– Choose a variety of decorative items for a rich display.
– Experiment with different letter sizes to enhance visual appeal.
– Incorporate lights for a magical touch.
This creative approach not only beautifies your home but also serves as a personal expression of your memories and inspirations.


Last update on 2026-03-01 / Affiliate links / Images from Amazon Product Advertising API
8. String Art Letters

Let your artistic side shine with string art letters that merge creativity with decor! Start by selecting a wooden or cardboard base shaped like your desired letter, then hammer small nails along its outline. Using colorful string or yarn, weave it around the nails to fill in the letter, creating a visually stunning piece.
This hands-on project encourages fine motor skills and dexterity while resulting in a playful art piece that enhances your wall decor. Hang your string art letters or prop them on a shelf for a vibrant touch.
– Choose contrasting colors for string and base for a striking look.
– Experiment with different thread techniques for diverse designs.
– Personalize with initials or meaningful words.
String art letters provide a tactile element to your decor, making them not just beautiful but also fun to create and display.
Did you know that string art can boost fine motor skills in just 15 minutes? For easy 3d letter decoration ideas, outline a letter on wood, hammer nails along the edge, then weave colorful string to finish a stunning wall piece.


Last update on 2026-02-28 / Affiliate links / Images from Amazon Product Advertising API
9. Burlap and Twine Letters

Infuse rustic charm into your home with burlap and twine letters that evoke a cozy, country feel! Start with cardboard letters as your base and wrap them in burlap to create a textured look. Secure the burlap with glue, then add twine around the edges or create crisscross patterns for added style.
This combination is perfect for achieving a warm and inviting atmosphere, ideal for farmhouse or country-style homes. Display your burlap letters on a wall or mantelpiece to showcase your charming decor.
– Add faux flowers or greenery for a fresh touch.
– Experiment with different wrapping techniques for variety.
– Combine letters to spell meaningful words or phrases.
These letters bring a unique, handcrafted quality to your decor, enhancing your space with natural textures and warmth.


Last update on 2026-02-28 / Affiliate links / Images from Amazon Product Advertising API
10. Seasonal 3D Letters

Keep your decor fresh and exciting with seasonal 3D letters that celebrate the changing times! Using lightweight materials like foam or cardboard, you can create letters that reflect the spirit of each season. Decorate them with seasonal items, such as colorful leaves for autumn or pastel hues for spring, allowing you to embrace the beauty of each time of year.
This approach lets you switch your decor easily, celebrating holidays and seasonal changes without investing in permanent fixtures. When the mood strikes, simply swap out your letters for something new and festive!
– Store seasonal letters safely for reuse each year.
– Personalize your letters with family names or seasonal greetings.
– Incorporate decorations that reflect your favorite holidays.
Seasonal 3D letters provide a fun and interactive way to keep your space feeling fresh and aligned with nature’s rhythms, enhancing your home with each season’s charm.


Last update on 2026-02-28 / Affiliate links / Images from Amazon Product Advertising API
Conclusion

With these 10 creative 3D letter decoration ideas, transforming your home into a personalized sanctuary has never been easier!
Each project celebrates eco-friendliness and creativity, allowing you to express yourself without compromising your values. From upcycled materials to natural elements, the possibilities are endless. So gather your supplies, unleash your creativity, and start crafting your unique wall accents today!
Frequently Asked Questions
What are some easy eco-friendly 3D letter decoration ideas for wall art?
Here are a few easy, eco-friendly ideas you can try today: cardboard letters stacked for depth and painted in bold colors; papier-mache letters using recycled newspaper for a light, textured look; fabric-wrapped letters using scrap fabric and a cardboard core for a cozy finish; and twine-wrapped letters with a natural cork or wood backing for a rustic touch. These approaches fit well with eco-friendly 3d letter decoration ideas and align with DIY home decor and wall art ideas collections.
Experiment with color, texture, and scale to create a personalized phrase or initials that brighten any room.
Which budget-friendly, eco-friendly materials work best for 3D letter crafts?
Start with what you already have: cardboard or corrugated cardboard for a sturdy core, foam sheets, or repurposed paper for lightweight pieces. Combine with reclaimed fabric, scrappy plastics, or wood scraps for texture. Use non-toxic acrylic paints, natural sealants, and a hot glue gun for quick assembly. For a more organic look, wrap letters in jute or baker’s twine and finish with a matte sealant. These tips make 3d letter decoration ideas affordable and environmentally friendly, perfect for craft projects and easy DIY decorations.
How can I customize 3D letter decoration ideas to match my DIY home decor style?
Pick a font that fits the vibe (block for modern, script for whimsical), decide on sizes to balance your wall, and choose a color palette that resonates with your room. You can paint letters, add metallic leaf, or incorporate textures (fabric, twine, cork). Use sustainable paints and sealants, and align with wall art ideas and creative letter crafts to keep things cohesive.
Pro tip: assemble a small mock layout on the floor before mounting to ensure spacing works with your wall.
What’s the simple step-by-step process to make 3D letter wall art from start to finish?
Plan your word or initials and pick a material; cut or shape letters; create thickness by stacking or layering; decorate with paint, fabric, or texture; seal for durability; hang. Step-by-step: 1) trace letters on material, 2) cut, 3) glue extra layers for thickness, 4) apply base coat, 5) add color and details, 6) seal, 7) mount with safe hardware. This approach covers 3d letter decoration ideas and translates easily to DIY home decor projects.
Bonus: add LED strip behind for a subtle glow or mount in a shadow box for depth.
How should I mount and arrange 3D letter decorations on a wall for a clean, secure display?
Start with a dry layout using painter’s tape on the wall to plan spacing and alignment. For light letters, use removable command strips or hooks; for heavier pieces, use small screws with anchors or a picture-hanging wire. Keep uniform gaps (about 1–2 inches) and stagger heights for visual interest. Group letters into a single word, a name, or a short phrase that fits your space and wall art ideas. Always consider safety and weight for families with kids.
This setup gives you a professional, cohesive look with easy DIY decorations that still feel polished.
Related Topics
3D letter decoration
DIY home decor
eco-friendly crafts
wall art ideas
creative letter crafts
easy DIY decorations
beginner friendly
budget friendly
upcycled materials
personalized decor
quick DIY projects
home accents