Halloween is just around the corner, and if you’re anything like me, you might find yourself scrambling for last-minute decorations. The spooky season always ignites that creative spark within us, but sometimes, time simply slips away. That’s why I put together this list of easy Halloween window painting ideas for those of you looking to add a bit of festive flair to your home without the stress.
If you’re a parent, grandparent, or simply someone who loves to celebrate Halloween with kids, this post is perfect for you. These window painting ideas are not only fun but also friendly and easy to execute. They allow you to spend quality time with the little ones while awakening your inner artist. You’ll find that these Halloween crafts are engaging, colorful, and a great way to bond over creativity.
In this guide, you’ll discover 12 quick and easy window painting ideas that are perfect for a last-minute Halloween celebration. From friendly ghosts to whimsical witch hats, each idea is simple and can be completed with minimal supplies. So grab your paints, open those windows, and let’s make your space scream Halloween in the most delightful way!
Key Takeaways
– The post offers 12 easy Halloween window painting ideas that are kid-friendly and perfect for last-minute decorating.
– Each painting idea includes basic instructions and can be completed with simple supplies.
– Activities focus on creativity and fun, making them a great bonding experience for families.
– Ideas range from cute characters like ghosts and pumpkins to spooky elements like spiders and tombstones.
– These crafts provide a festive touch to your home while keeping the Halloween spirit alive without overwhelming preparation.
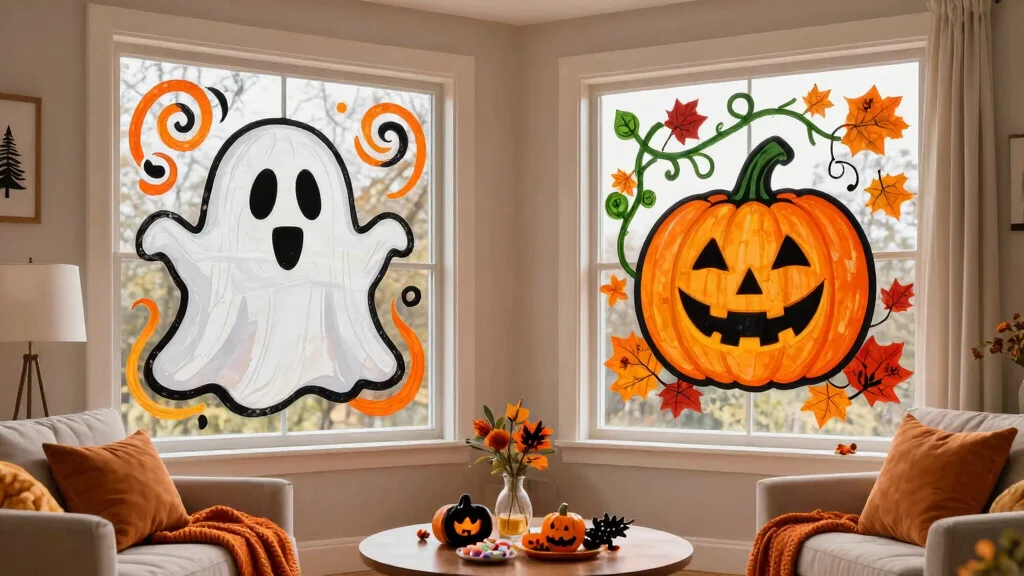
1. Friendly Ghosts

Looking for a fun way to add some Halloween spirit to your windows? Friendly ghosts are the perfect choice! These playful apparitions are simple to create, making them great for kids and adults alike. With some white paint, you can form cheerful ghost shapes that come alive with oversized eyes and big smiles. For an extra touch, sprinkle on some glitter paint for a magical shimmer.
Start by letting the kids dip their sponges or hands in the paint to create ghostly figures. You can even add a bright yellow moon behind them for an added Halloween vibe. It’s a quick and enjoyable project everyone can participate in!
Materials Needed:
– White washable window paint
– Black paint for eyes and mouth
– Sponge or paintbrush
– Glitter paint (optional)
– Stick to simple shapes for maximum fun!
– Incorporate various sizes for depth.
– Use a mix of glitter and plain paint for a playful effect.
2. Cute Pumpkins

Pumpkins are a Halloween classic, making them a delightful subject for your window art! With bright orange paint, you can easily craft adorable, smiling pumpkins that bring joy to your home. Start by painting large pumpkin shapes and add cute facial expressions to each one. Don’t forget to include green vines and leaves for that extra flair!
This project is not only entertaining but also educational, as kids can learn about colors and shapes while painting. You could even hold a fun pumpkin contest to see who can create the silliest faces!
Materials Needed:
– Orange and green window paint
– Brushes in various sizes
– Paper plates as palettes
– Water for cleaning brushes
– Use a sponge to blend orange and yellow for a more realistic pumpkin effect.
– Mix in some tiny pumpkins for variety in size.
– Encourage kids to sign their masterpiece at the bottom!
Cute pumpkins brighten any window and spark playful Halloween vibes. With easy halloween window painting ideas, kids learn colors and shapes while adding smiling faces and leafy vines for extra charm.
3. Spooky Spiders

Want to add some creepiness to your Halloween décor? Spooky spiders are an excellent choice! Using black and purple window paints, you can create a fun yet eerie look that kids will love. Start by painting large spider bodies and long, creepy legs, then add webs with white paint stretching across the corners of the window.
Get creative by varying the sizes of the spiders, from tiny ones to big creepy crawlers. This project allows kids to unleash their artistic side while learning about shapes and symmetry!
Materials Needed:
– Black and purple window paints
– White paint for webs
– Brushes or a paint pen for details
– Paper towels for cleaning up
– Make it a group activity! Kids can work together to cover the whole window in spider art.
– Encourage them to create a “spider family” with various colors and sizes.
– Use a fine-tip brush for detailed web designs.
4. Whimsical Witch Hats

Witch hats are iconic symbols of Halloween, and painting them on windows is a blast! Bring your décor to life with colorful witch hats that add a touch of magic. Use black paint for the base of the hats, and then let your creativity shine with vibrant bands in purple, green, and orange. Kids can even add whimsical patterns like stars and moons to personalize each hat!
This project is perfect for teamwork, allowing everyone to create their unique design for a collective display.
Materials Needed:
– Black and multi-colored window paint
– Brushes of different sizes
– Paper for testing designs
– Mix in some glitter to make the hats sparkle!
– Encourage kids to come up with names for their hats.
– Use stencils for neatly shaped hats if needed.
5. Colorful Candy Corn

Candy corn is a sweet symbol of Halloween, making it a fun choice for window painting! Use bright yellow, orange, and white paints to create colorful candy corn pieces that brighten your home. This craft is easy for little hands, allowing them to paint varying sizes and arrangements across the window. Add smiles or playful faces to each piece for an extra twist!
This activity is a great way to celebrate the season while teaching kids about festive treats.
Materials Needed:
– Yellow, orange, and white window paints
– Paintbrushes
– Paper for practice designs
– Use a fine brush for more detail and larger brushes for filling in colors.
– Display the candy corn in layers to create a 3D effect.
– Mix in some actual candy corn on the sill for an extra festive touch.
6. Terrifying Tombstones

Add a spooky touch to your Halloween setup with hand-painted tombstones! Kids can unleash their creativity by designing unique tombstone shapes and writing funny epitaphs. Use gray or black paint for the tombstone bases, and white paint for lettering to make them stand out. This project is a wonderful way for children to express their humor while practicing their writing skills.
Don’t forget to include decorative elements like vines or mini ghosts creeping around the tombstones for added detail!
Materials Needed:
– Gray and black window paint
– White paint for lettering
– Brushes in different sizes
– Optional: stencils for tombstone shapes
– Encourage kids to come up with clever sayings for their tombstones.
– Make it a storytelling session where they share the backstory of their tombstones.
– Create a family graveyard scene by painting multiple tombstones together!
7. Spooky Silhouettes

For a quick yet impactful decoration, consider spooky silhouettes! These are easy to craft using black window paint to form figures like bats, witches, and creepy cats. Arrange them in different poses across the window for a dramatic effect, especially when the light shines through.
This craft promotes creativity as kids can design their own silhouettes or use templates for classic Halloween characters. It’s a fantastic project for teamwork, allowing everyone to contribute to a spooky scene!
Materials Needed:
– Black window paint
– Brushes or sponges
– Template designs for various silhouettes
– Use contrasting colors in the background for added visual appeal.
– Create different scenes, like a flying bat or a witch on a broomstick.
– Hang small lights behind the window for a glowing effect at night.
8. Haunted House

Transform your window into a haunted house with this exciting painting idea! Kids can create a spooky structure using black and gray paint for the house, windows, and doors. Add fun details like bats or ghosts peeking out from the windows to ramp up the fright factor!
This craft encourages creativity, allowing children to personalize their haunted houses with unique designs. You can even create a whole haunted neighborhood across multiple windows for a larger impact!
Materials Needed:
– Black and gray window paint
– Brushes, sponges, and detail tools
– Optional: stencils for windows and doors
– Make sure to use a mix of colors for dimension.
– Use bright colors for ghosts to create a contrast with the dark house.
– Have kids name their haunted houses to make it even more engaging.
9. Mysterious Moon

A mysterious moon can add a magical touch to your window decorations. Use soft yellow and white paint to create a glowing full moon that shines brightly against a starry background. Kids can dab on soft colors with sponges for the moon and paint tiny stars around it.
This idea encourages creative expression and serves as a calming centerpiece in your Halloween décor. Use it as a backdrop for other fun designs like bats, witches, or friendly ghosts!
Materials Needed:
– Yellow and white window paints
– Sponges and brushes for dabbing
– Optional: glitter paint for stars
– Experiment with blending colors for a more realistic moon effect.
– Include different sized stars for diversity in the design.
– Use a light color for the window frame to enhance the moon’s glow.
How To Choose The Right Halloween Window Painting Supplies
When you’re ready to create some spooky art for your windows, picking the right supplies can make the process fun and easy. Here’s a guide to help you select everything you need to start your Halloween window painting adventure.
1. Choose the Right Paints
You’ll want to use window-safe paints that won’t damage your glass. Look for washable, non-toxic acrylic paints or specially made window markers. These options are easy to clean off after Halloween and are safe for kids. If you’re unsure, a quick test on a small area will help you check how easily it wipes away.
2. Select Brushes and Tools
Using the right brushes can make a big difference in your painting process. Get a variety of sizes: small brushes for details and larger brushes for filling in areas. You might also want sponge brushes or even stencils for more intricate designs. If you’re painting with kids, consider using finger paints or sponges, which can be more manageable and fun!
3. Gather Your Accessories
Think about what else you might need. Paper towels or old rags are great for cleaning up spills. A palette or plate will help you mix colors. If you want to create different textures, consider using sponges or cotton balls. Don’t forget a water cup to rinse your brushes in between colors!
4. Pick a Theme or Design
Before you begin, decide on your design. Do you want friendly ghosts or spooky spiders? Sketch out a few ideas on paper. This will give you a roadmap for your painting and help keep your kids engaged. You can also find plenty of inspiration online or in craft books.
5. Budget for Supplies
If you’re on a budget, look for supplies that won’t break the bank. Many dollar stores carry basic paints and brushes. Check your local craft store for coupons or sales. You can even ask your friends or family if they have any leftover supplies from previous projects. This way, you can save money while still being creative!
6. Consider Safety and Clean-Up
Make sure to choose non-toxic materials, especially if kids are involved. Lay down old newspapers or a drop cloth to protect your floor. When you’re done, clean the windows with warm soapy water. If you used paint, a window cleaner will do the trick. Always supervise children closely during the painting process to ensure a safe and enjoyable experience.
Pro Tip: Set a timer for painting sessions with kids to keep things fun and focused. This way, they have a clear start and end time, which can make cleanup easier too!
With this guidance, you’re all set to create eye-catching Halloween window art. The right supplies will turn your windows into a festive canvas in no time. Happy painting!
10. Creepy Crawlers

Creepy crawlers can make for exciting window art! Think about colorful spiders, centipedes, and ants that create a lively display. Kids can use a variety of paint colors to bring their bugs to life, making them as silly or scary as they wish. This project sparks creativity and invites storytelling about each creature!
You can even use actual bug templates as a guide for added fun.
Materials Needed:
– Various colors of window paint
– Brushes and sponges
– Bug templates for reference
– Capture the kids’ creativity with different patterns on each bug.
– Make it a game by having kids come up with names for their creepy crawlers.
– Set a time limit for extra fun!
Did you know 4 out of 5 kids love DIY window art? With easy halloween window painting ideas, you can turn creepy crawlers into a colorful, storytelling display—spiders, centipedes, and ants that are as silly or spooky as you want.
11. Autumn Leaves

Celebrate the beauty of the season with vibrant autumn leaves painted on your windows! Using warm colors like red, orange, yellow, and brown, kids can create a stunning fall landscape that feels festive and inviting. This activity is perfect for little hands and encourages artistic growth.
Use leaves as stencils for added texture or let kids draw their own unique shapes. This design can seamlessly transition your home from Halloween to Thanksgiving!
Materials Needed:
– Red, orange, yellow, and brown window paints
– Leaf templates or real leaves as stencils
– Brushes and sponges
– Layer colors for added depth.
– Create a blend of colors to mimic changing leaves.
– Use clear window paint for a glossy finish!
Fun fact: Using autumn leaves as stencils can speed up painting sessions, with kids finishing a window in about 15 minutes. Keep the palette warm—red, orange, yellow, and brown—to craft a cozy transition from Halloween to Thanksgiving.
12. Halloween Characters

Bring your window to life with beloved Halloween characters! From witches to zombies, kids can paint their favorites using vibrant colors. This fun activity encourages storytelling as they share who their favorite character is and what they do on Halloween night.
Encourage creativity by allowing them to add their unique twists to each character. You could even create a Halloween character parade across the window for added excitement!
Materials Needed:
– Various colors of window paint
– Brushes and sponges
– Reference images for inspiration
– Create a character legend to go along with their artwork.
– Encourage kids to incorporate their favorite Halloween stories into their designs.
– Work together to create a cohesive theme across multiple windows!
Conclusion

With these easy Halloween window painting ideas, your home is sure to become a festive haven just in time for the spooky season. Each project encourages creativity and teamwork, making them not just decorations, but fun bonding activities for the family.
So grab your paints and make your windows shine with Halloween cheer! What will you create this year? Don’t forget to share your beautiful displays with friends and neighbors!
Frequently Asked Questions
What are some easy halloween window painting ideas that are perfect for kids and great for last-minute Halloween ideas?
Here are easy halloween window painting ideas that kids can whip up in under an hour and still look great. Try ghosts using simple white shapes, smiling pumpkins, quick bats in flight, candy corn stripes, or a spooky moon with stars. Use washable window markers or glass-friendly acrylic paints and keep colors to 2–3 for speed. Prep the window with a quick clean, sketch lightly with chalk, fill in with color, and let dry. This approach suits last minute Halloween ideas and easy crafts for kids alike.
Which window painting techniques work best on glass for beginners?
For glass surfaces, start with a clean, dry window. Use window markers or glass paints that are water-based for easy cleanup. Outline shapes with a fine brush or marker for definition, then fill in with color. Use simple stencils or shapes to speed things up, and consider a light, glass-safe sealant if you want longer wear. Let each layer dry before adding details to keep things neat and Halloween crafts friendly.
What quick motifs can kids paint that still look festive on windows?
Think simple, bold shapes: ghosts, pumpkins, bats, witches’ hats, candy corn, moons, and stars. Encourage a two-color design with a bold outline for visibility. A quick method is to sketch with chalk, fill in with a marker or paint pen, then add a dark outline for crisp edges. This keeps the project moving fast and makes a striking display for DIY Halloween decorations and easy crafts for kids.
What safety tips should I follow for a kid-friendly window painting project?
Choose non-toxic, washable supplies and always supervise kids during the project. Test a small area first to check for any reactions, wear old clothes or aprons, and work in a well-ventilated area. Use washable markers and water-based paints when possible, and avoid spray paints or solvents near children. For cleanup, wipe with warm soapy water or a damp cloth, followed by a quick glass wipe with a safe cleaner. Your Halloween crafts will stay fun and safe.
How can I turn window art into other last-minute Halloween decorations?
Create a cohesive look by extending the window scene to nearby walls or doors with coordinating cutouts or banners. Pair the window art with paper bat garlands, glow-in-the-dark accents, or a simple printable sign to reinforce the theme. Reuse leftover markers or paints for a few quick touch-ups, and add string lights behind the window for a magical glow. It’s a great way to enhance DIY Halloween decorations and keep last minute Halloween ideas flowing across your home.
Related Topics
easy halloween crafts
children’s activities
last minute decorations
window painting techniques
DIY Halloween decor
quick crafts for kids
seasonal art projects
festive window designs
beginner friendly
family fun
halloween painting ideas