
You don’t need fancy training or pricey supplies to make wall art that turns heads. Just pick a simple technique—geometric tape designs, splatter effects, or wallpaper-covered canvases—and you’ll get fast, satisfying results that look intentional and modern.
Here’s how you can take blank canvases and turn them into unique decor, step by step, using stuff you probably already have.
Start small. Learn the basics: color mixing, clean tape lines, and adding texture with a stamp or even some embroidery.
Try themed pieces for different rooms if you’re feeling it. When you’re ready for more, push into bold stuff like resin pours or layered stencils.
Key Takeaways
- Begin with simple projects to build skills and confidence.
- Everyday materials can create stylish, personal canvas art.
- Move at your own pace from easy to advanced techniques.
Fundamentals of DIY Painting

First things first, pick up the right tools. Choose a good canvas and paint, and don’t skip the little tips that help your first projects look clean.
You really just need a few quality supplies, the right kind of paint, and some habits that make learning faster.
Essential Supplies for DIY Painting
Start with the basics: a set of synthetic brushes (grab a flat and a round), a palette (wood or metal, your call), a palette knife, and a jar for water.
Toss in a roll of paper towels and a spray bottle to keep acrylics from drying out too fast.
Acrylic paints in primary colors, white, and black let you mix almost anything. Student-grade tubes work for practice, and you can upgrade if you want richer color.
Stick with a plain stretched canvas (8×10 or 11×14) for your first tries.
Protect your table with a drop cloth. Work at a comfy angle with an easel or just prop the canvas on a sturdy board.
Keep a container for dirty brushes and another for clean water. That’s pretty much all you need for beginner painting and most easy canvas ideas.
Choosing the Right Canvas and Paint
If you’re just starting out, cotton or cotton-poly canvases are cheap and reliable. Go for a small pre-stretched canvas (8×10 or 12×12) for easy projects and practice.
Medium tooth (texture) helps paint stick without getting gloopy.
Acrylics dry quickly and clean up with water, which is perfect for beginners. They work well for geometric, abstract, and floral projects.
If your canvas isn’t primed, brush on a thin coat of acrylic gesso to smooth things out.
If you want more time to blend, try student oil paints—but make sure you’ve got good airflow and don’t mind the smell.
For mixed media or quick wall art, experiment with cheap canvases and acrylics before splurging on the fancy stuff.
Beginner Tips for Successful Projects
Sketch a simple idea in pencil or thin paint before you start. Stick to three or four colors at first so you can focus on shapes and values, not mixing a million shades.
Work in layers: block in big shapes, then add midtones and highlights. Let each acrylic layer dry so colors stay crisp.
For texture, try a palette knife or a sponge stamp instead of just piling on with a brush.
Practice steady brush strokes by painting lines and circles on scrap canvas. Painter’s tape keeps geometric edges sharp.
Snap photos of your progress in daylight to check color and contrast. Sign your piece when it’s totally dry (don’t rush it).
Getting Started: Easy Painting Ideas for Beginners

Grab a small canvas (8×10 or 11×14), some cheap brushes, basic acrylics, a palette, and a cup of water.
Pick one clear idea, set a timer for short sessions, and layer as you go—mistakes are easy to fix this way.
Abstract Color Blocks
Pick three to five colors that vibe together—maybe teal, mustard, and gray. Tape off big rectangles or just freehand blocks across the canvas.
Give each block one coat, let it dry, then go over it again for solid color.
Mix up the texture: use a dry brush, sponge, or palette knife for some blocks. Crisp edges look modern, but you can soften them with a damp brush if that’s your thing.
Put the darkest color off-center to keep things interesting.
Leave some canvas blank to make the colors pop. If you like, add a thin black or white line between blocks for contrast.
Simple Geometric Painting
Sketch a basic grid or triangles in pencil or a light wash. Choose a couple of shapes—squares, triangles, circles—and repeat them in a loose pattern.
Paint shapes with a flat brush. Painter’s tape gives you sharp edges, or go freehand for a softer look.
Try mixing matte and glossy paints, or throw in a metallic accent for a little sparkle.
Paint the background first, then the shapes. If a shape looks weird, just paint over it and try again.
Monochrome Silhouette
Pick one color family—blues, browns, whatever you like. Paint a background gradient: darker at the top, lighter at the bottom.
Let that dry, then sketch a simple silhouette—a tree, skyline, or figure.
Fill it in with a darker shade from your palette. Keep the edges sharp for contrast.
Add tiny highlights or thin lines in a lighter tone to hint at texture, but don’t overdo it.
Minimalist Line Art
Start with a plain white or off-white background. Use a fine liner or small round brush with thinned black or colored acrylic.
Plan out a single line or a few connected lines.
Draw faces, leaves, or abstract shapes—keep it simple and steady.
If you mess up, let it dry and turn it into a shadow or a little texture. Combine thin and thicker lines for interest.
Leave wide margins to keep it feeling minimalist.
Creative DIY Canvas Art

These projects are all about adding shape, shine, and texture to a blank canvas. You’ll use stencils, glue, poured paint, and palette knives.
Stenciled Art
Stencils give you sharp shapes without needing a super steady hand. Pick a pattern that fits your space—florals for a bedroom, geometric for the living room.
Tape the stencil down so it stays put. Use a foam brush or sponge, and dab paint on in light layers for crisp edges.
Try layering two stencils: paint a base color, let it dry, then offset a second stencil on top for depth. Seal with clear acrylic spray.
Tools:
- Stencils (plastic or vinyl)
- Foam brushes or sponges
- Painter’s tape
- Acrylic paints
- Clear acrylic sealer
Glue Art on Canvas
Glue art mixes glue, found bits, and paint for a raised, tactile look. Draw a simple outline, then squeeze clear-drying glue along the lines.
Press in scraps—paper, fabric, shells, whatever you’ve got.
After it dries, paint over or around the glued parts with acrylics. Use thin layers so you don’t bury the texture.
Gloss it up with resin or clear gloss medium if you want shine.
Tips:
- Work in sections so glue doesn’t dry out too fast.
- Use matte medium for heavier pieces.
- If any edges are sharp, sand them down after drying.
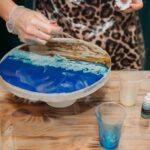
Acrylic Pouring Techniques
Acrylic pouring looks wild but is surprisingly easy. Mix acrylic paint with pouring medium (about 1:1), then thin with a bit of water.
Layer colors in a cup, then pour onto a tilted canvas.
Try a dirty pour (all colors in one cup), a swipe (bands of color, then swipe with a spatula), or a flip cup (put it face down, then lift).
Work over a tray to catch drips. Let it sit flat for a day or two to cure. Finish with resin or varnish for a glossy, deep look.
Supplies:
- Pouring medium
- Silicone drops (for cells)
- Disposable cups, stir sticks
- Heat gun or torch (for popping bubbles)
Texture Art with Palette Knife
Palette knife art means thick, sculptural paint. Load up a knife with heavy acrylic or modeling paste mixed with color.
Press and drag, or sweep for ridges and peaks.
Start with a thin background, then layer thicker strokes on top for highlights. Change up your knife angles for different marks.
Add sand or pumice to the paste for extra texture.
Keep in mind:
- Work quickly, as paste dries fast.
- Wipe the knife between colors.
- Seal with flexible varnish to prevent cracking.
Themed Painting Projects for Every Home

Pick a theme that fits your room’s mood. Choose colors, tools, and a clear focal point.
Try lettering and stencils for words, layered washes for landscapes, or simple floral shapes for small canvases.
DIY Wall Art with Song Lyrics and Quotes
Pick a lyric or quote that actually means something to you. Test out some fonts on scrap paper.
Lightly sketch the words on your canvas or a primed wood panel. Painter’s tape helps keep lines straight, or use letter stencils for even size.
If you like a handmade vibe, write freehand with acrylic marker pens or a small brush.
Go for contrast—dark text on a light background is easy to read, or use metallic paint on matte for a pop.
Add little accents—doodles, stars, or a color wash behind the words. Seal with matte or satin varnish to keep dust off.
Landscape and Beach Scene Painting
Find a photo reference you love and crop it to fit your canvas. Block in big color zones first: sky, water, land.
Use wide brushes for skies and water, then smaller brushes for details like rocks and grasses.
For beaches, layer thin glazes to show distance—pale blues and grays for far-off water, warmer tones near the shore.
Use a palette knife for sand or waves. Add highlights with white or pale yellow on wave crests and sun spots.
Varnish at the end for extra color and protection.
Floral and Botanical Canvas Ideas
Focus on one flower—peony, sunflower, wildflowers, whatever catches your eye. Block in base colors, then add darker shades for depth.
For leaves, use a fan or angled brush to get veins and movement.
Try grouped stems on a 12×16 canvas for a bold look, or do a little set of small canvases for a gallery wall.
Acrylic or gouache dries fast and works well. Use a liner brush for sharp outlines, and dab with a sponge for texture if you want.
Seal with satin varnish to keep colors bright.
Small and Large Canvas Wall Art
Match canvas size to your wall. Small canvases work in groups or above shelves; big ones become the room’s anchor.
Keep small canvases simple—a single flower, a lyric, or an abstract block stands out from a distance.
For big canvases, sketch out your design with a grid. Scale up your shapes and use broad strokes for unity.
Try color drenching—stick to one main hue to tie the piece to your decor.
When hanging multiples, keep spacing even—2–3 inches for a tight group, 4–6 for a looser gallery.
Unique Styles and Techniques

You don’t need fancy tools for these projects—just a few basics and a willingness to go bold. Each idea lists must-have supplies, a straightforward method, and some tips to dodge common pitfalls.
Gold Leaf Splatter and Metallic Accents
Try loose gold leaf or metallic paint to add striking details on wood, canvas, or even old furniture. Start with a matte or eggshell base coat.
For splatter, thin out metallic paint, dip a stiff brush, and flick it toward your surface. Cover what you don’t want splattered with tape or paper.
If you’re using gold leaf, brush on a tacky adhesive, wait until it’s sticky, then gently lay down the leaf and press with a soft brush. Knock off the extra leaf with a dry brush.
Tips:
- Work in small sections so the adhesive doesn’t dry out too soon.
- Always seal metallics with a clear, non-yellowing varnish.
- Test your splatter technique on scrap first to control the droplet size.
Abstract Heart Painting
A modern heart can really pop as a focal point, especially with some texture. Start with a light background wash by diluting acrylic paint and brushing it on.
Sketch a loose heart with pencil or masking fluid. Fill it with two or three bold colors, using broad strokes.
While the paint’s still wet, drag a palette knife or comb through the layers for texture and blended edges. Peel off masking fluid if you used it, then splash on highlights or thin drips for movement.
Materials and steps:
- Use acrylics, a wide brush, palette knife, and masking fluid.
- Work from light to dark, letting some background peek through.
- Keep your strokes bold and loose for that abstract energy.
Dandelion and Daisy Painting
Paint delicate flowers with just a few tools and strong shapes. For dandelions, start with a dark center dot, then flick out thin lines for seeds using a liner brush or even a dry toothbrush.
Flick a few seeds away from the flower to show motion. For daisies, paint a round center, then layer on short, tapered petals with an angled brush.
Add soft shadows under petals with a thin wash of gray or a complementary color.
Practical tips:
- Use a round liner and angled brush for crisp petals and fine seeds.
- Go wet-on-wet for softer dandelion heads, wet-on-dry for sharper daisy petals.
- Keep the background muted so the white petals really stand out.
Birch Tree Canvas Techniques
It’s easier than you think to get that birch bark look. Paint a pale base—off-white or very light gray works well.
Mix a darker gray or brown for the bark marks. Use a flat brush to paint horizontal strokes for the trunk.
Drag a palette knife or even the edge of an old credit card to scrape thin vertical lines and reveal the lighter underlayer. Add knots and oval scars with a small round brush.
Highlight trunk edges with a thin, light stroke.
Key steps:
- Start with a base coat, then add mid-tone strokes, scrape for texture, and finish with knots and highlights.
- Vary the trunk widths and spacing so it doesn’t look too uniform.
- A thin glaze of warm or cool color over the whole thing can pull the scene together.
Advanced DIY Canvas Painting Ideas

Want to push your art further? Build up texture, add metallics, or mix in other materials for a bold, modern vibe.
These techniques help you layer, use copper safely, and blend collage, paint, and found objects for truly unique abstract canvas art.
Acrylic Painting Tutorial for Texture and Depth
Pick heavy-body acrylics and a primed canvas. Use a palette knife to slap on thick strokes and create real ridges—light loves to dance on them.
Work in layers. Lay down a textured base with modeling paste, let it dry, then paint over with your mid tones. Add highlights and shadows to make things pop.
Try glazing to deepen the effect without hiding your texture. Thin acrylics with glazing medium or water, then brush on see-through layers.
Let each glaze dry before you go again. For sharp lines, mask areas with tape and peel it off when the paint’s just tacky.
Finish with a satin or matte varnish to even out the sheen and protect raised spots.
Copper Accents and Modern Abstracts
A little copper leaf or metallic paint brings warmth and a slick focal point. Mark out small areas on your canvas before you start—less is more here.
Brush on adhesive size just where you want copper, wait until it’s tacky, then gently press the leaf and sweep off the extra with a soft brush.
Prefer paint? Go for high-pigment copper or metallic paste and skim it over textured areas so it catches the light.
Seal copper with a clear varnish to keep it from tarnishing or flaking. Pair copper with bold shapes or loose brushwork for a fresh, modern look that balances shine and matte.
Combining Mixed Media Elements
Pick a theme and stick to three main materials: paint, fabric or paper, and a found object. Seal any porous stuff with gesso before you start.
For collage, use archival PVA or heavy gel medium to glue down fabric, paper, or thin wood. Press out bubbles before it dries.
Paint over and around your materials to tie everything together. Try stencils, stamps, or a dry brush for subtle marks.
Anchor heavier objects with epoxy or even screws, but only on stretched or cradle-mounted canvases. Always test adhesives and finishes on scraps so you don’t wreck your main piece.
Frequently Asked Questions

Here’s where you’ll find straightforward steps and tool lists for prepping surfaces, adding texture, picking the right paint, and getting crisp edges. No fluff—just what you need to get started today.
How can I prepare walls for painting to ensure the best results?
Wash the wall with mild detergent and water to clear off grease and dust. Rinse and let it dry completely.
Fill holes and cracks with spackle or lightweight filler. Sand smooth after it dries, then wipe away dust with a damp cloth.
Prime patched spots or the whole wall if you’re going from dark to light, painting new drywall, or using a glossy finish. Use a stain-blocking primer for any smoke or water marks.
What are some creative techniques for texturing paint on walls?
Use a thick-nap roller or a specialty texture roller for a subtle stipple or orange-peel effect. Roll paint in a crosshatch motion if you want more texture.
Try a faux finish by thinning joint compound to a paintable consistency and troweling or sponging it on. Once dry, sand lightly to soften any rough bits.
For a combed look, drag a notched trowel or wallpaper brush through wet compound. Tackle small sections at a time and feather the edges for a smooth blend.
Which type of paint is best suited for a beginner’s DIY project?
Go for water-based acrylic or latex paint for most indoor walls. They dry fast, clean up with soap and water, and don’t stink up the house.
Eggshell or satin finishes work well in living spaces—they hide flaws and wipe clean easily. Use semi-gloss on trim and doors if you want something tougher.
Pick paint with high coverage so you use fewer coats. Check the label for coverage per coat and drying times.
Can you suggest a list of essential tools for a DIY painting project?
Grab these basics: a 2–2.5 inch angled sash brush, a 9-inch roller frame, two roller covers (one smooth, one textured), drop cloths, painter’s tape, and a paint tray.
Add a small putty knife and sandpaper (120–220 grit) for patching. A step ladder, extension pole, microfiber cloth, and sponge will help with cleaning and reaching tricky spots.
For trim, use a trim guard or painter’s tape and a 1–1.5 inch angled brush. If you’re using strong primers or working in stuffy areas, wear a mask and gloves.
Keep spare brushes and a water or solvent container nearby.
How do I choose a color scheme for a room that I want to paint myself?
Start by sampling three colors: one for the walls, one for trim or ceiling, and one accent. Paint 12×12 inch swatches on different walls and check them at different times of day.
Use the color wheel—complementary colors for contrast, analogous for a chill vibe. Match undertones (warm with warm, cool with cool) so nothing clashes.
Think about room lighting and your furniture’s finish. If you need a match, bring a fabric or wood sample to the paint store.
What are the most effective methods for painting clean edges and corners?
Stick painter’s tape along trim and corners. Press the tape edges down hard—otherwise, paint will sneak underneath.
Peel the tape off when the paint’s still a bit tacky. That’s when you’ll get the cleanest line.
Try the “cut-in” method with an angled brush. Hold the brush like you’d hold a pencil, then paint a 2–3 inch stripe along the edge before you start rolling.
Tackle small sections at a time so the paint stays wet. It’s way easier to blend that way.
If you want even more control, grab a foam trim pad or a paint shield. These work well around windows or switch plates.
Made a mistake? It happens. Wipe it up with a damp cloth, or use a tiny artist brush dipped in your base color to fix it.