Are you ready to add a splash of creativity to your next kids’ party? Badge decoration ideas have been on my mind lately, and I couldn’t wait to share them with you! Whether it’s a birthday bash, a school event, or just a fun gathering, personalized badges can elevate the atmosphere and make the day even more special. Kids love to express themselves, and what better way to do that than by wearing adorable, custom designs?
If you’re a parent, teacher, or party planner looking for fun ways to engage children in crafts, this post is for you. It’s all about cute and easy DIY badge displays that will bring smiles and spark creativity. I’ve pulled together nine delightful ideas that are not only charming but also simple enough for kids to help with. From whimsical rainbow ribbons to sparkling glitter and glow badges, you’ll find projects that cater to every interest and skill level.
Get ready to dive into a world of imagination and hands-on fun! You’ll leave with a treasure trove of badge decoration ideas that can transform any event into a memorable occasion. With these creative badge decorations, you’ll create an engaging experience that kids will cherish—plus, who doesn’t love a little glitter and glam?
Key Takeaways
– You’ll discover nine creative badge decoration ideas that are perfect for kids’ parties, making them fun and personalized.
– Each project is designed to be simple enough for kids to get involved, encouraging hands-on crafting and teamwork.
– Ideas include themes like rainbow ribbons and nature-inspired badges that appeal to a wide range of interests.
– You’ll find practical materials and techniques for each badge project, ensuring easy implementation.
– The guide helps you create memorable experiences that kids will love, enhancing the party atmosphere with fun and creativity.
1. Rainbow Ribbon Badges
Brighten up your next celebration with vibrant rainbow ribbon badges! These fun decorations are simple to create and can be made with ribbons in all your favorite colors, easily sourced from any craft store. Layering these ribbons around a sturdy badge base adds flair and excitement that kids will love to wear at the party!
To make your badges, cut ribbons into equal lengths and arrange them in a circular design. Use a glue gun to secure the ribbons and finish off with a charming button or small charm in the center. This personal touch makes each badge unique and special!
Key Steps to create your badges:
– Gather 5-6 colorful ribbons of your choice.
– Cut each ribbon into 6-8 inch segments.
– Layer and glue the ribbons around your badge base.
– Attach a charm in the middle for added flair.
Tips for success:
– Choose colors that match your party theme or reflect the birthday child’s favorites.
– Let the kids join in on the fun by creating their own unique designs!
2. Glitter and Glow Badges
Sparkle and shine with glitter and glow badges that every kid will adore! These eye-catching creations start with a basic badge base covered in a layer of glue, followed by a generous sprinkle of colorful glitter. Once the glitter dries, add a coat of glow-in-the-dark paint for a magical nighttime effect!
These badges not only look fantastic during the day, but they will also light up the night, making them perfect for evening events. Finish them off with a pin back, allowing kids to proudly wear their dazzling creations all night long!
Key Steps to get started:
– Select glitter colors that complement your party theme.
– Apply glue evenly to the badge base.
– Generously sprinkle glitter and allow it to dry completely.
– Add glow-in-the-dark paint for a stunning effect.
Tips for crafting:
– Work in a well-ventilated area to avoid paint fumes.
– Experiment with different badge shapes for added variety.
Badge decoration ideas that sparkle make party prep feel playful, not stressful. Glitter and glow badges are easy to DIY—stick, sprinkle, glow. Kids wear them proudly, and the night lights up with smiles.
3. Nature-Inspired Badge Decor
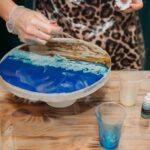
Celebrate the beauty of the outdoors with nature-inspired badges that are both charming and creative! Using dried flowers, leaves, and even tiny twigs, you can craft beautiful designs that kids will love. Start by selecting a badge base and gluing your nature elements onto its surface for a unique look.
For a polished finish, consider encasing your natural materials in clear resin. This project not only helps kids connect with nature but also lets them express their artistic side. These badges can be worn proudly or displayed as special keepsakes!
Key Steps to create these badges:
– Collect dried flowers and leaves for your designs.
– Choose your badge base and glue the natural elements on top.
– Optionally, pour clear resin over the design for durability.
Tips for crafting:
– Gather materials from your garden or local park for a personal touch.
– Ensure all natural items are fully dried to prevent damage.
Nature-inspired badge decoration ideas are a game changer for party crafts. Start with a plain badge, glue on dried flowers, leaves, and tiny twigs, then seal with clear resin for a durable, kid-friendly keepsake—perfect for DIY brag-worthy moments.
4. Character-Themed Badges
Bring favorite characters to life with fun character-themed badges! Perfect for kids who love superheroes, princesses, or cartoon characters, these badges can be personalized to showcase their beloved figures. Start with a simple badge shape and paint it in the character’s iconic colors.
Once the base is dry, add printed images or stickers that you can easily find online. Extra embellishments like sequins or mini figurines can enhance the design, making these badges great for party favors too!
Key Steps to follow:
– Choose popular characters that resonate with the birthday child.
– Paint the badge base to match the character’s colors.
– Glue on images or stickers, adding embellishments for extra pizzazz.
Tips for a successful craft:
– Allow the paint to dry completely before adding any stickers.
– Offer a variety of character options for kids to choose from.
5. Simple Fabric Badges
Create soft and delightful fabric badges that add a charming touch to any celebration! These badges are especially perfect for younger kids who appreciate a tactile experience. Start by cutting colorful fabric into fun shapes like animals or stars.
Using fabric glue or iron-on patches, attach the shapes together, and consider stitching the edges for a polished finish. Lightweight and comfy, these badges are sure to be a hit with the kids!
Key Steps to craft your badges:
– Select vibrant fabrics and cut into playful shapes.
– Use fabric glue or iron-on patches to attach the pieces.
– Optionally stitch the edges for a charming touch.
Tips for crafting:
– Experiment with different fabric textures for added interest.
– Encourage kids to design their own unique fabric combinations.
6. DIY Photo Badges
Capture precious memories with DIY photo badges that add a personal touch! These badges can feature favorite pictures of the birthday child, family, or friends, making them special keepsakes. Print small photos on sturdy paper or use photo stickers and attach them to the badge base.
To protect the photos, add a thin layer of clear tape over them and consider enhancing the look with decorative borders or stickers. Kids will love wearing badges that showcase their loved ones throughout the party!
Key Steps to create your badges:
– Print small photos and cut them to fit the badge size.
– Attach the photos to the badge base, using clear tape for protection.
– Decorate edges with stickers or washi tape.
Tips for success:
– Choose fun and silly pictures to keep the mood light and joyful.
– Set up a photo booth at the party for more fun pictures to use!
How To Choose the Right Badge Decoration Ideas
Choosing the perfect badge decoration ideas can turn an ordinary kids’ party into a memorable event. With so many options available, it’s essential to consider a few key factors before diving into your DIY projects. Here are some tips to help you select the best badge decoration ideas for your needs:
1. Theme Compatibility
Always start with the party theme. Whether it’s a birthday, holiday, or school event, your badges should align with the overall vibe. For instance, if the theme is a rainbow, colorful badges with ribbons or glitter will fit perfectly. If you’re hosting a nature-themed party, consider badges with floral designs or animal motifs. Match your decorations to the party’s color scheme for a cohesive look.
2. Material Selection
The materials you choose play a significant role in the final look and feel of your badges. From fabric and paper to plastic and metal, each material offers a different aesthetic. Fabric badges are soft and can be sewn or glued, while paper badges are lightweight and easy to customize. Consider what materials you have on hand or can easily procure. Don’t forget to think about durability—especially if kids will be wearing them during active play!
3. Age Appropriateness
Consider the age of the children who will be wearing the badges. Younger kids might prefer bright colors and fun designs like cartoon characters, while older kids may appreciate more sophisticated styles, like DIY photo badges or nature-inspired themes. Keep in mind that the complexity of the crafts should match the skill level of the kids involved. For younger ones, opt for simpler projects that can be completed quickly.
4. DIY Skill Level
Your crafting skills matter! If you are a seasoned DIYer, you might want to tackle more intricate designs like 3D badges or interactive badges with movable parts. If you are a beginner, stick to simpler ideas, like fabric or glitter badges. Also, consider the kids’ abilities if they will be involved in the crafting process. Choose ideas that everyone can successfully create and enjoy.
5. Budget Considerations
Budgeting is key when planning any party. Calculate how much you’re willing to spend on materials for your badges. Some ideas, like photo badges, might require printing services, which could add to your costs. On the other hand, ideas that use items you already own or can find cheaply, like old fabric or paper scraps, can save you money. Always look for ways to be creative with what you have!
6. Fun Factor
Finally, think about how much fun each badge idea will bring to the party. The more interactive and engaging the badges are, the more excitement they will generate. For example, interactive badges that allow kids to swap designs or badges that serve as game tokens can add an exciting twist to the event. Aim for ideas that will not only look good but also bring joy and excitement to the kids.
Pro Tip: Don’t hesitate to mix and match ideas! You can combine elements from different projects to create unique badges that fit your theme perfectly. For example, use nature-inspired designs as a backdrop for character-themed badges. This adds personalization and can wow your guests!
With these tips, you’re well on your way to creating cute and memorable badge decorations that will delight kids at any party. Embrace your creativity and enjoy the crafting process!
7. Seasonal Theme Badges
Honor the changing seasons with themed badges that reflect nature’s beauty! From spring flowers to winter snowflakes, these badges can capture the spirit of each season. Crafting these badges is easy—simply cut shapes from colorful paper, felt, or use stickers to represent seasonal elements.
Arrange and glue these elements onto a badge base, allowing kids to appreciate the beauty of nature all year round. These badges can also serve as delightful party favors!
Key Steps to get started:
– Choose a season and gather colored materials.
– Cut out shapes like flowers, suns, leaves, or snowflakes.
– Assemble and glue on a badge base, adding glitter for extra flair.
Tips for crafting:
– Incorporate natural materials like leaves or flowers for authenticity.
– Use the badges as party favors to remind kids of the seasons.
8. Interactive Badges
Add a fun twist with interactive badges that kids can personalize! Start with a basic badge base and attach a small chalkboard or felt piece to let children write their names or draw designs. Providing chalk markers makes it easy to create and switch designs throughout the party!
These badges serve as both identification and a creative outlet, encouraging kids to express themselves during the celebration.
Key Steps to create your interactive badges:
– Attach a small chalkboard or felt piece to the badge base.
– Provide chalk markers for personal customization.
– Encourage kids to change their designs during the event.
Tips for crafting:
– Ensure the chalkboard surface is smooth for easy writing.
– Consider organizing a mini contest for the best badge design!
9. 3D Badge Designs
Bring your badges to life with exciting 3D designs! These badges can be crafted using foam sheets or cardboard to create depth and texture that kids will love. Cut out various elements and layer them on the badge using double-sided tape or glue for stability.
This tactile element makes the badges engaging and fun to wear—think about creating animals, vehicles, or anything your imagination allows!
Key Steps to get started:
– Gather foam sheets or thick cardboard for crafting.
– Cut out different shapes to layer for a 3D effect.
– Assemble and glue all elements securely together.
Tips for crafting:
– Use bright colors to make badges pop!
– Allow kids to mix and match elements for a design that’s uniquely theirs.
Fun fact: 3D badge designs grab kids’ attention up to 40% longer than flat badges. Layer foam sheets or cardboard for depth, and watch pretend-play explode—animals, cars, and big imaginations. Your badge decoration ideas just got unforgettable!
Conclusion
Badge decorations can transform any kids’ party into a colorful and personalized celebration filled with creativity.
These nine ideas not only provide unique ways to display badges but also engage kids in the crafting process, allowing them to express themselves. By adding a personal touch to each badge, you create lasting memories for the children and their friends. So why not gather some materials and start creating? The fun is just a craft away!
Frequently Asked Questions
What are easy badge decoration ideas for a kids’ party?
Here are some quick, cute badge decoration ideas you can try at a kids’ party. Start with simple blank badge discs or printable templates and decorate with stickers, markers, and washi tape to create cute badge designs. Turn them into wearable pins or magnetic badges so guests can display them, tapping into badge display ideas for the party. You can also make a mini badge garland by linking finished badges with string for a playful creative badge decorations display. Color-code by guest or theme to keep things organized and visually appealing. All of these are easy craft ideas that kids can help with. Set up a dedicated decorating station with pre-cut shapes, glue sticks, kid-safe scissors, markers, and a quick laminating step if you have a laminator.
What materials do I need for DIY badge projects that kids can do?
Needed materials for DIY badge projects your kids can handle include: blank badge discs or pin-back buttons, printable badge templates, sturdy paper or lightweight cardboard, decorative paper, markers, gel pens, stickers, washi tape, glue sticks, kid-safe scissors, a hole punch, ribbon or string for lanyards, and optional laminating supplies (laminator or self-sealing pouches). If you want multiple looks fast, print a few theme icons in advance. Pro tip: pick one theme and prepare a small batch of ready-to-decorate badges to speed things up.
How can I display badges at the party to maximize cute badge designs?
Display ideas to make all the finished badges pop: pin them on a color-coded corkboard or foam board; hang a clothesline or string with mini clothespins for a portable badge wall; use a magnetic board or pegboard so guests can browse and pick their favorites. Group badges by color or theme and add a simple label like ‘Princess’ or ‘Superhero’ for quick browsing. A backdrop with a banner and a tray of finished badges gives a simple, photo-friendly setup. These approaches are classic badge display ideas that keep things cute and organized.
How can I personalize badges to fit different party themes or guests?
Personalizing badges is where the magic happens. Use printable templates to add guest names, initials, or numbers; choose color palettes that match your party theme; add theme-specific icons (princess crowns, space rockets, animals) for instant personality. Offer a few badge shapes (circle, star, heart) so kids can pick their favorite. Let guests pick a symbol and color to express themselves, then assemble the badge with a simple background layer for depth. This falls under DIY badge projects and cute badge designs that feel special but stay manageable.
How can I keep badge crafts affordable and safe for kids?
To keep costs low and safety high, buy badge blanks in bulk and reuse scraps from other crafts. Use printable designs and inexpensive decorative supplies like markers, stickers, and washi tape. If you don’t have a laminator, seal badges in clear contact paper or use self-adhesive laminating pouches for a budget-friendly seal. Set a clear decorating window to keep things moving and reduce waste. For safety, supervise with child-safe scissors and non-toxic markers. These tips make easy craft ideas that align with badge decoration ideas without breaking the budget.
Related Topics
badge decoration ideas
DIY badge projects
kids party crafts
cute badge designs
easy craft ideas
creative badge decorations
personalized crafts
party display ideas
family-friendly DIY
beginner friendly
quick crafts
seasonal party themes